Introduction
Welcome to the Instruction Manual for "Work With Script".
This software is a specialized environment designed specifically for the production, post-production, and delivery stages of your project.
Rather than a typewriter for a first draft, "Work With Script" is a workspace built to help production teams, script supervisors, accountants, and coordinators refine, protect, and track a screenplay as it transitions from the page to actual production — and, with Write Mode, to keep drafting it in the same file without ever leaving that production context.
What You Can Do in "Work With Script"?
This manual will guide you through the core modules designed to bridge the gap between the script and the crew:
- Drafting in Write Mode: Type a scene straight through on a continuous screenplay surface. Block formatting, row splitting and page breaks are handled as you write, so a new scene lands in the same numbered, exportable document as everything else.
- Script Refinement: Easily edit scene action, dialogue, character names and update other script elements while the software automatically manages industry standard formatting, line numbers, and margins.
- Story-Level Notes: Mark a passage with an Event Note and arrange those notes as cards in the Event Graph, connected to each other and viewed by scene or along a timeline.
- Production Injections: Embed non-textual instruments called "injection boxes" directly into the chronological flow of your script. This includes among others Board Injections for storyboards and visual continuity, Music Injections for live MIDI tracking and notation playback, and Sheet Injections for managing complex logistics like budgets, call sheets, and costume logs.
- Comprehensive Export Options: Deliver your work exactly how your crew needs it. Generate industry-standard clean screenplays, interactive digital files for collaboration, or specialized analytical documents isolated by department.
2. Project Manager
2.1 Project Browser Overview
When you launch the software, you will be greeted by a splash screen while your assets load. Once ready, a Project Browser will appear.
The Project Browser is the central hub for managing your work. From this window, you can create new projects, access recent work, and manage your user profile.
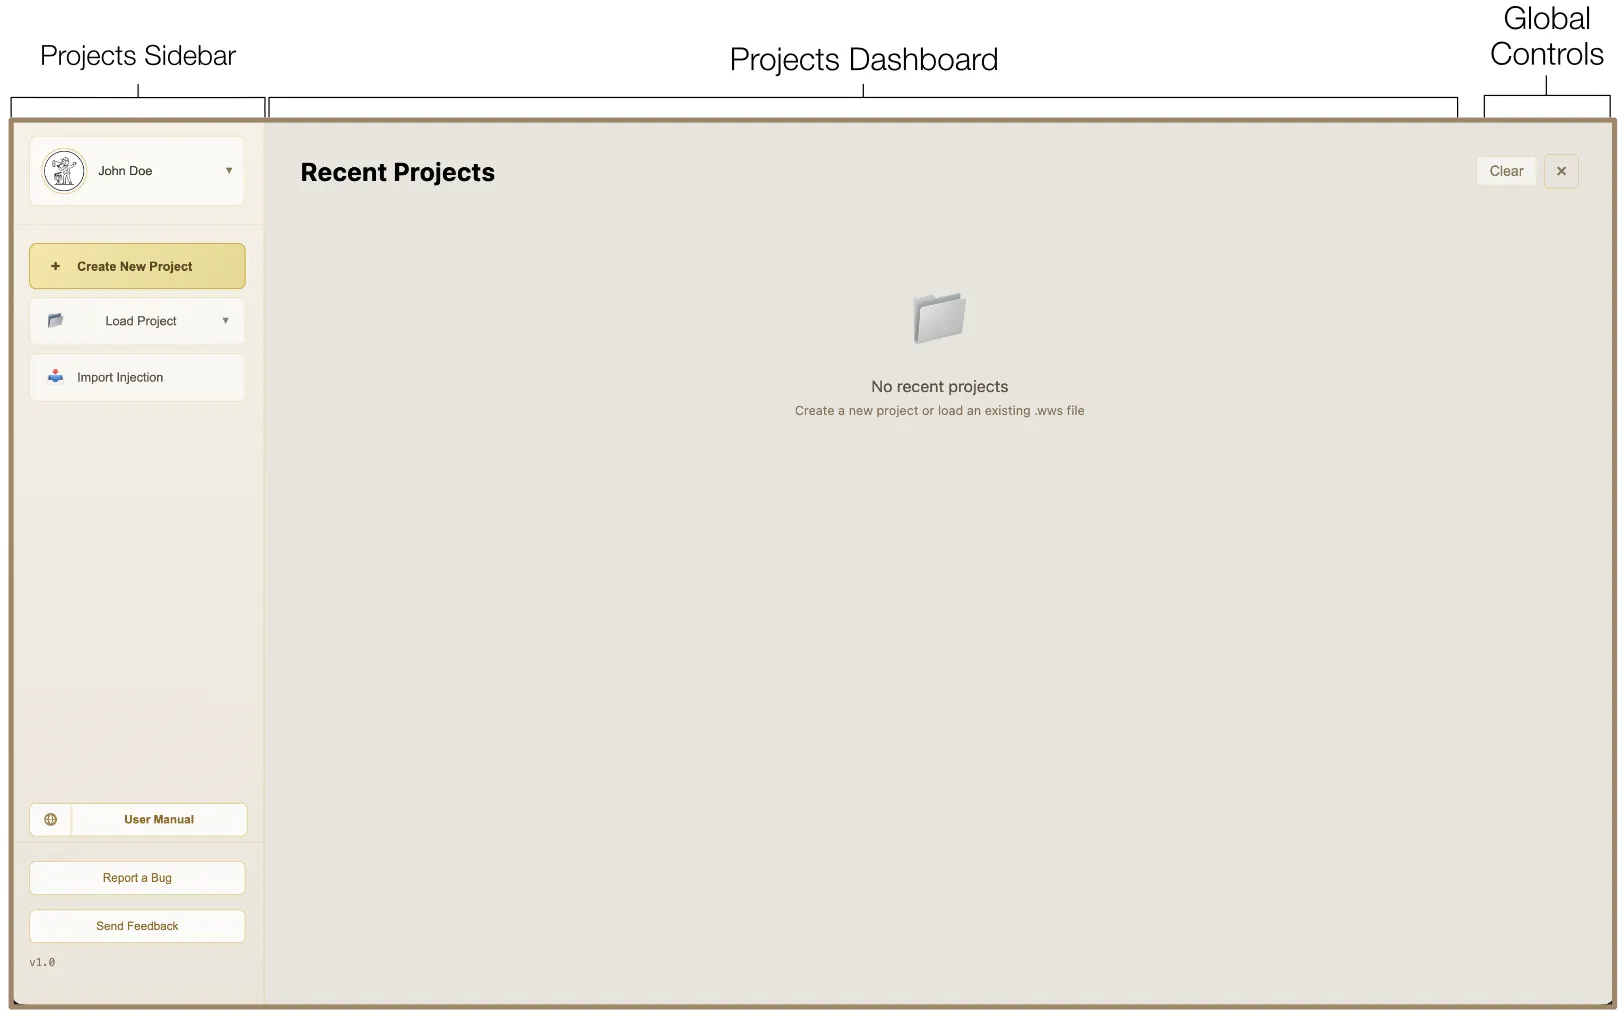
Projects Sidebar
- User Profile: Located in the top-left corner, this section displays your current profile information.
- Create New Project: Use this button to create a new project folder with hierarchy.
- Load Project & Import Injection: Below the creation button, you will find the options for accessing existing data.
- Instruction Manual: You can open the instruction manual online and locally as a PDF shipped with the software.
- Support & Feedback: At the bottom of the sidebar, you can access the buttons to contact the development team.
Projects Dashboard
The central area of the screen displays your Recent Projects. Each project you open is added to this list for quick access as a Project Card. Each Project Card provides a summary, including the project title, file path, and the "Last opened" timestamp.
Global Controls
- Clear: Click this button to remove the list of recent projects from your dashboard.
- Close icon (×): Use this to exit the Project Browser.
2.2 Profile Management
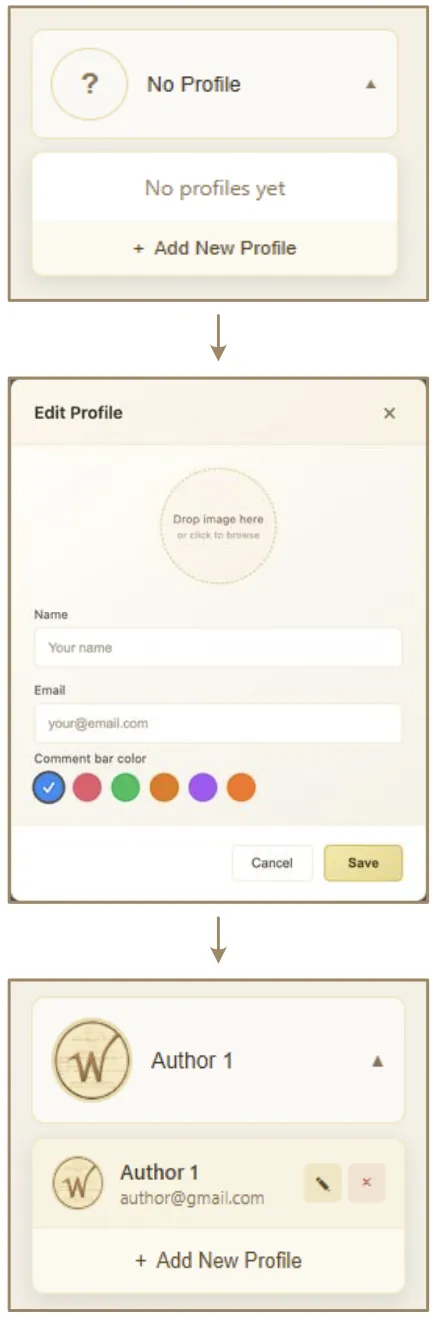
The software allows you to create and manage multiple user profiles to personalize your experience, track authorship, and maintain individual settings.
Why use Profiles?
- Authorship: Comments and notes added to the script are tagged with your profile name and color, making it easy to track who made which suggestion in a collaborative environment.
- Personalized Settings: Key preferences, such as the zoom level or color theme, are saved independently for each Profile. This allows different users on the same device to have their own optimized view.
Creating a Profile
To add a new profile, click the "Profile" button (displaying your current avatar and name) to open the profile dropdown. Click the "Add New Profile" button at the bottom of the dropdown list. Fill in the Profile Details:
- Profile Image: Click the avatar area to browse files or drag and drop an image onto the dropzone.
- Name: Enter your display name as you want it to appear on comments and project metadata.
- Email: Providing an email address helps with identification and is used as a default for support and feedback reports.
- Comment Bar Color: Choose the color for your comment bar to enable easy, color-coded navigation.
To apply changes, click the "Save" button. New profiles are automatically set as active.
Managing Profiles
- Access: Click the "Profile" button to open the profile dropdown, which displays a list of all available profiles.
- Switch: Click any profile name in the dropdown list to immediately switch to that Profile.
- Edit: Click the Edit icon (✎) next to any profile in the list. To apply changes, click the "Save" button.
- Delete: Click the Delete icon (×) to remove a profile. You cannot delete the profile that is currently active; you must switch to another profile first.
2.3 Creating a New Project
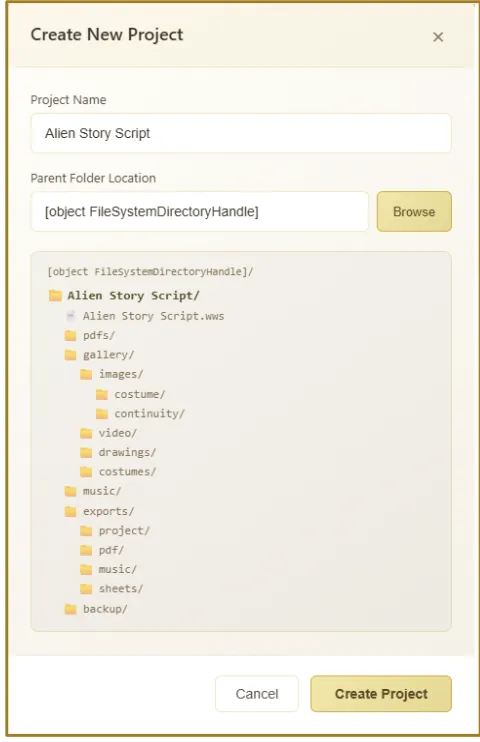
To create a new hierarchy for your project, click the "Create New Project" button in the left sidebar of the Project Browser.
When you create a project, the software automatically generates a folder hierarchy:
- gallery/: For images, videos, and drawings.
- music/: For audio tracks and notation.
- exports/: Destination for the exported files.
- backup/: Automatic safety copies.
You can edit the hierarchy according to your needs later, e.g., adding subfolders for costumes or continuity images.
Enter a unique title for your project in the name field and select a destination folder on your device where all project-related data will be stored. Click the "Create Project" button. Once the project is initialized, a Workspace will open automatically.
Note: Your project data is stored in a .wws file (e.g., MyProject.wws). Never manually edit this file. Every project is assigned a unique ID (e.g., proj_a7f3b9c2e1d4).
2.4 Load Project
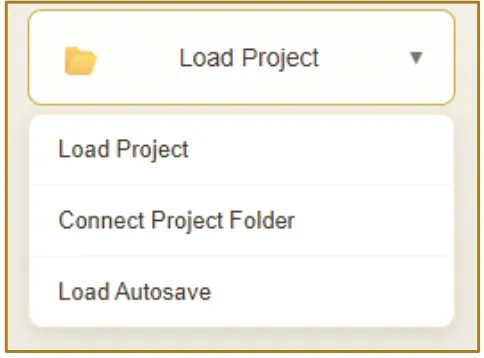
Click the "Load Project" button in the sidebar to reveal a dropdown menu with several loading methods:
- Load Project: The standard way to open a
.wwsproject file from your computer. - Connect Project Folder: Use this function if your project is stored as a folder hierarchy rather than a single file. It will scan the folder for
.wwsfiles and link all associated assets (Gallery, Music, etc.) automatically. - Load Autosave: A recovery tool that allows you to browse and restore from automatic backups of your projects. You will first be asked to select the original project file to find matching backups.
2.5 Importing Injections (.wwsel)
If you have exported specific injection elements (like board files or music notation) from another project, you can bring them into your current workspace:
- Ensure you have a project already open.
- Click the "Import Injection" button in the Project Browser sidebar.
- Select the
.wwselfile you wish to import. - The software will automatically register any new gallery items, board files, music notation and all injection related items included in the package.
2.6 Recent Projects
The main area of the Project Browser displays a dashboard of your Recent Projects. Each project you open is added to this list as a Project Card for quick access.
- Projects are automatically sorted by the date they were last opened.
- By default, cards show the project name and its root folder. Alt-Click (or Option-Click on Mac) any card to display the full file path.
- Double-click any project card to open it immediately.
- Right-click any project card to open a Context Menu. This is useful if a project folder contains multiple
.wwsfiles — the menu allows you to choose exactly which project file to launch. - To remove a card from the recent list, click the Delete icon (×) in the top right corner of a card. Use the "Clear" button to empty the recent projects dashboard. This does not delete the project file from your computer.
2.7 Instruction Manual
A detailed instruction manual is available as a PDF via the "User Manual" button, shipped with the software. To open the online version of the manual, click the Web icon.
2.8 Support & Feedback
Located at the bottom of the sidebar, these tools allow you to communicate with the development team.
- Report a Bug: If you encounter an error or unexpected behavior, click "Report a Bug". A form will appear. The email associated with your profile will be filled in automatically as the contact address. Please provide a clear topic and a detailed description of what happened.
- Send Feedback: Use this button to tell us what you think of the software, suggest new features or improvements.
3. Script Editor Basics
3.1 Script Editor Overview
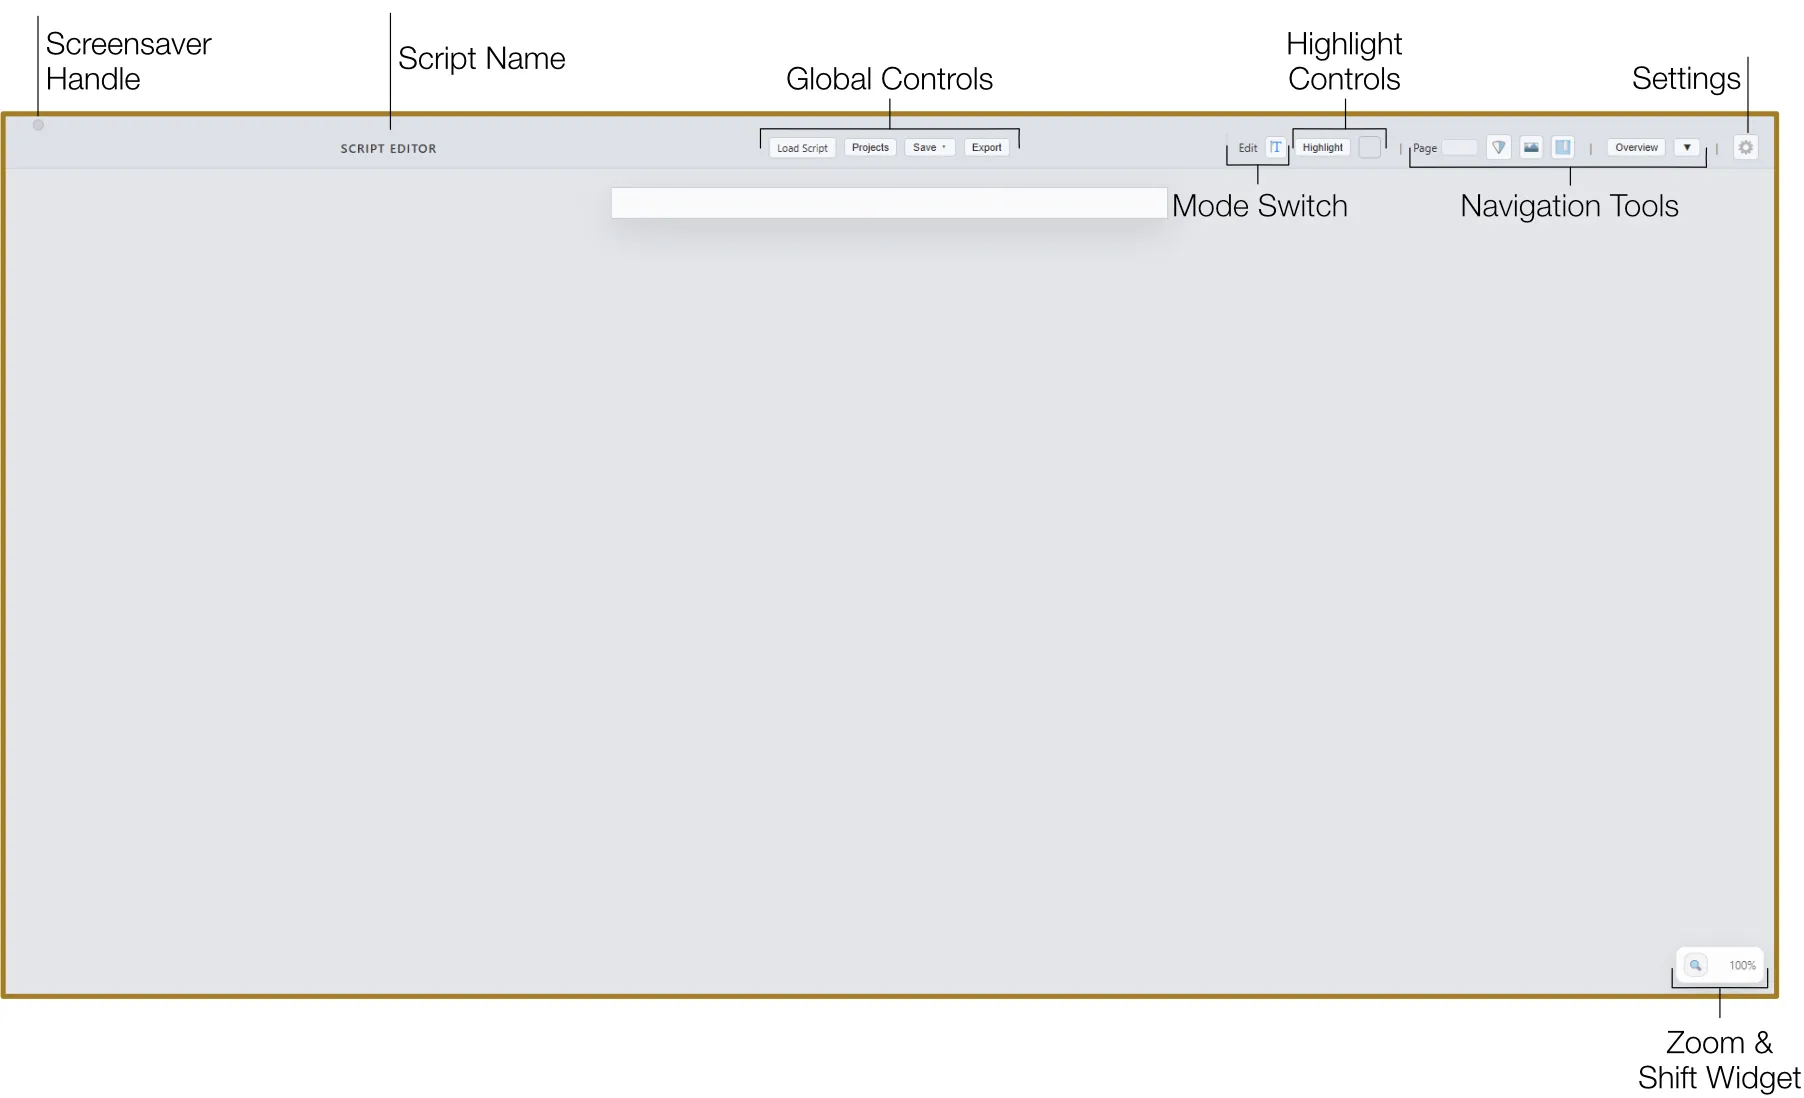
Once you have selected or created a project in the Project Manager, the Script Editor opens. This is the core environment where you will spend most of your time managing project elements. The workspace is organized around a central script canvas, with tools arranged in the top toolbar and navigation widgets positioned around the edges.
3.2 Global Controls (Top Toolbar)
The central top toolbar provides quick access to essential global actions.

Load Script
The "Load Script" button opens a dropdown with two ways in:
- Load document: Select your script file. The software supports PDF (.pdf), Word Documents (.docx), Plain Text (.txt), and Rich Text Format (.rtf). The text is parsed into numbered editable lines that appear in the central script area.
- Create blank page: Start an empty, correctly formatted screenplay page and switch straight into Write Mode with the caret in row 001. See 4.1 Starting a Script.
Projects
The "Projects" button brings you back to the Project Browser screen to view all your projects. To return to the Script Editor, simply close the Project Browser by clicking the Close icon.
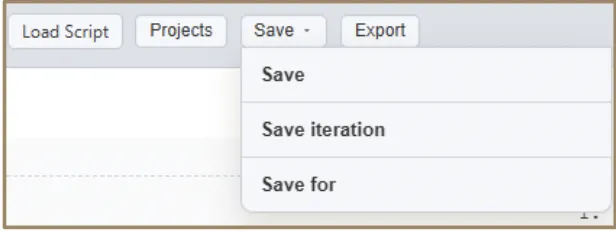
Save
The "Save" button has a dropdown menu with several options:
- Save: Standard overwrite of your project file.
- Save Iteration: Saves a numbered version (e.g., "Project_v2.wws") to keep a history of your progress.
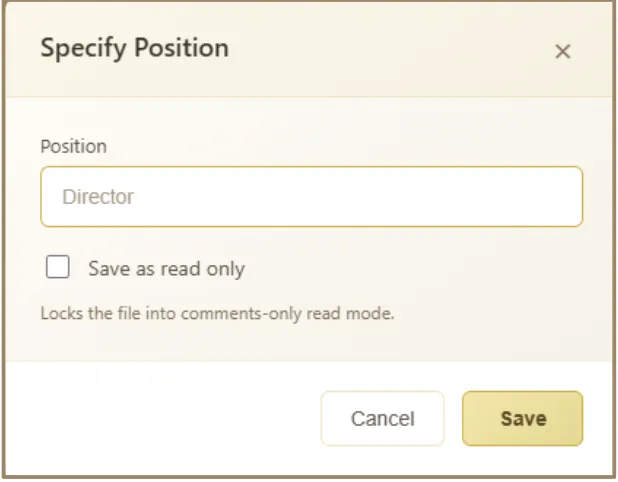
- Save For: Creates a specialized version for a specific crew member (e.g., Director) with optional read-only locks.
Export
The "Export" button opens the Export Window — a comprehensive tool for sharing your work, creating production documents, and archiving different versions of your project. The left sidebar displays four specialized export modes: Project, PDF, Music, and Sheets.
3.3 Mode Switch
The Script Editor operates in three modes. Click the Mode icon in the top toolbar and choose one from the dropdown, or press the "Tab" key to step to the next mode (Write → Read → Edit → Write).
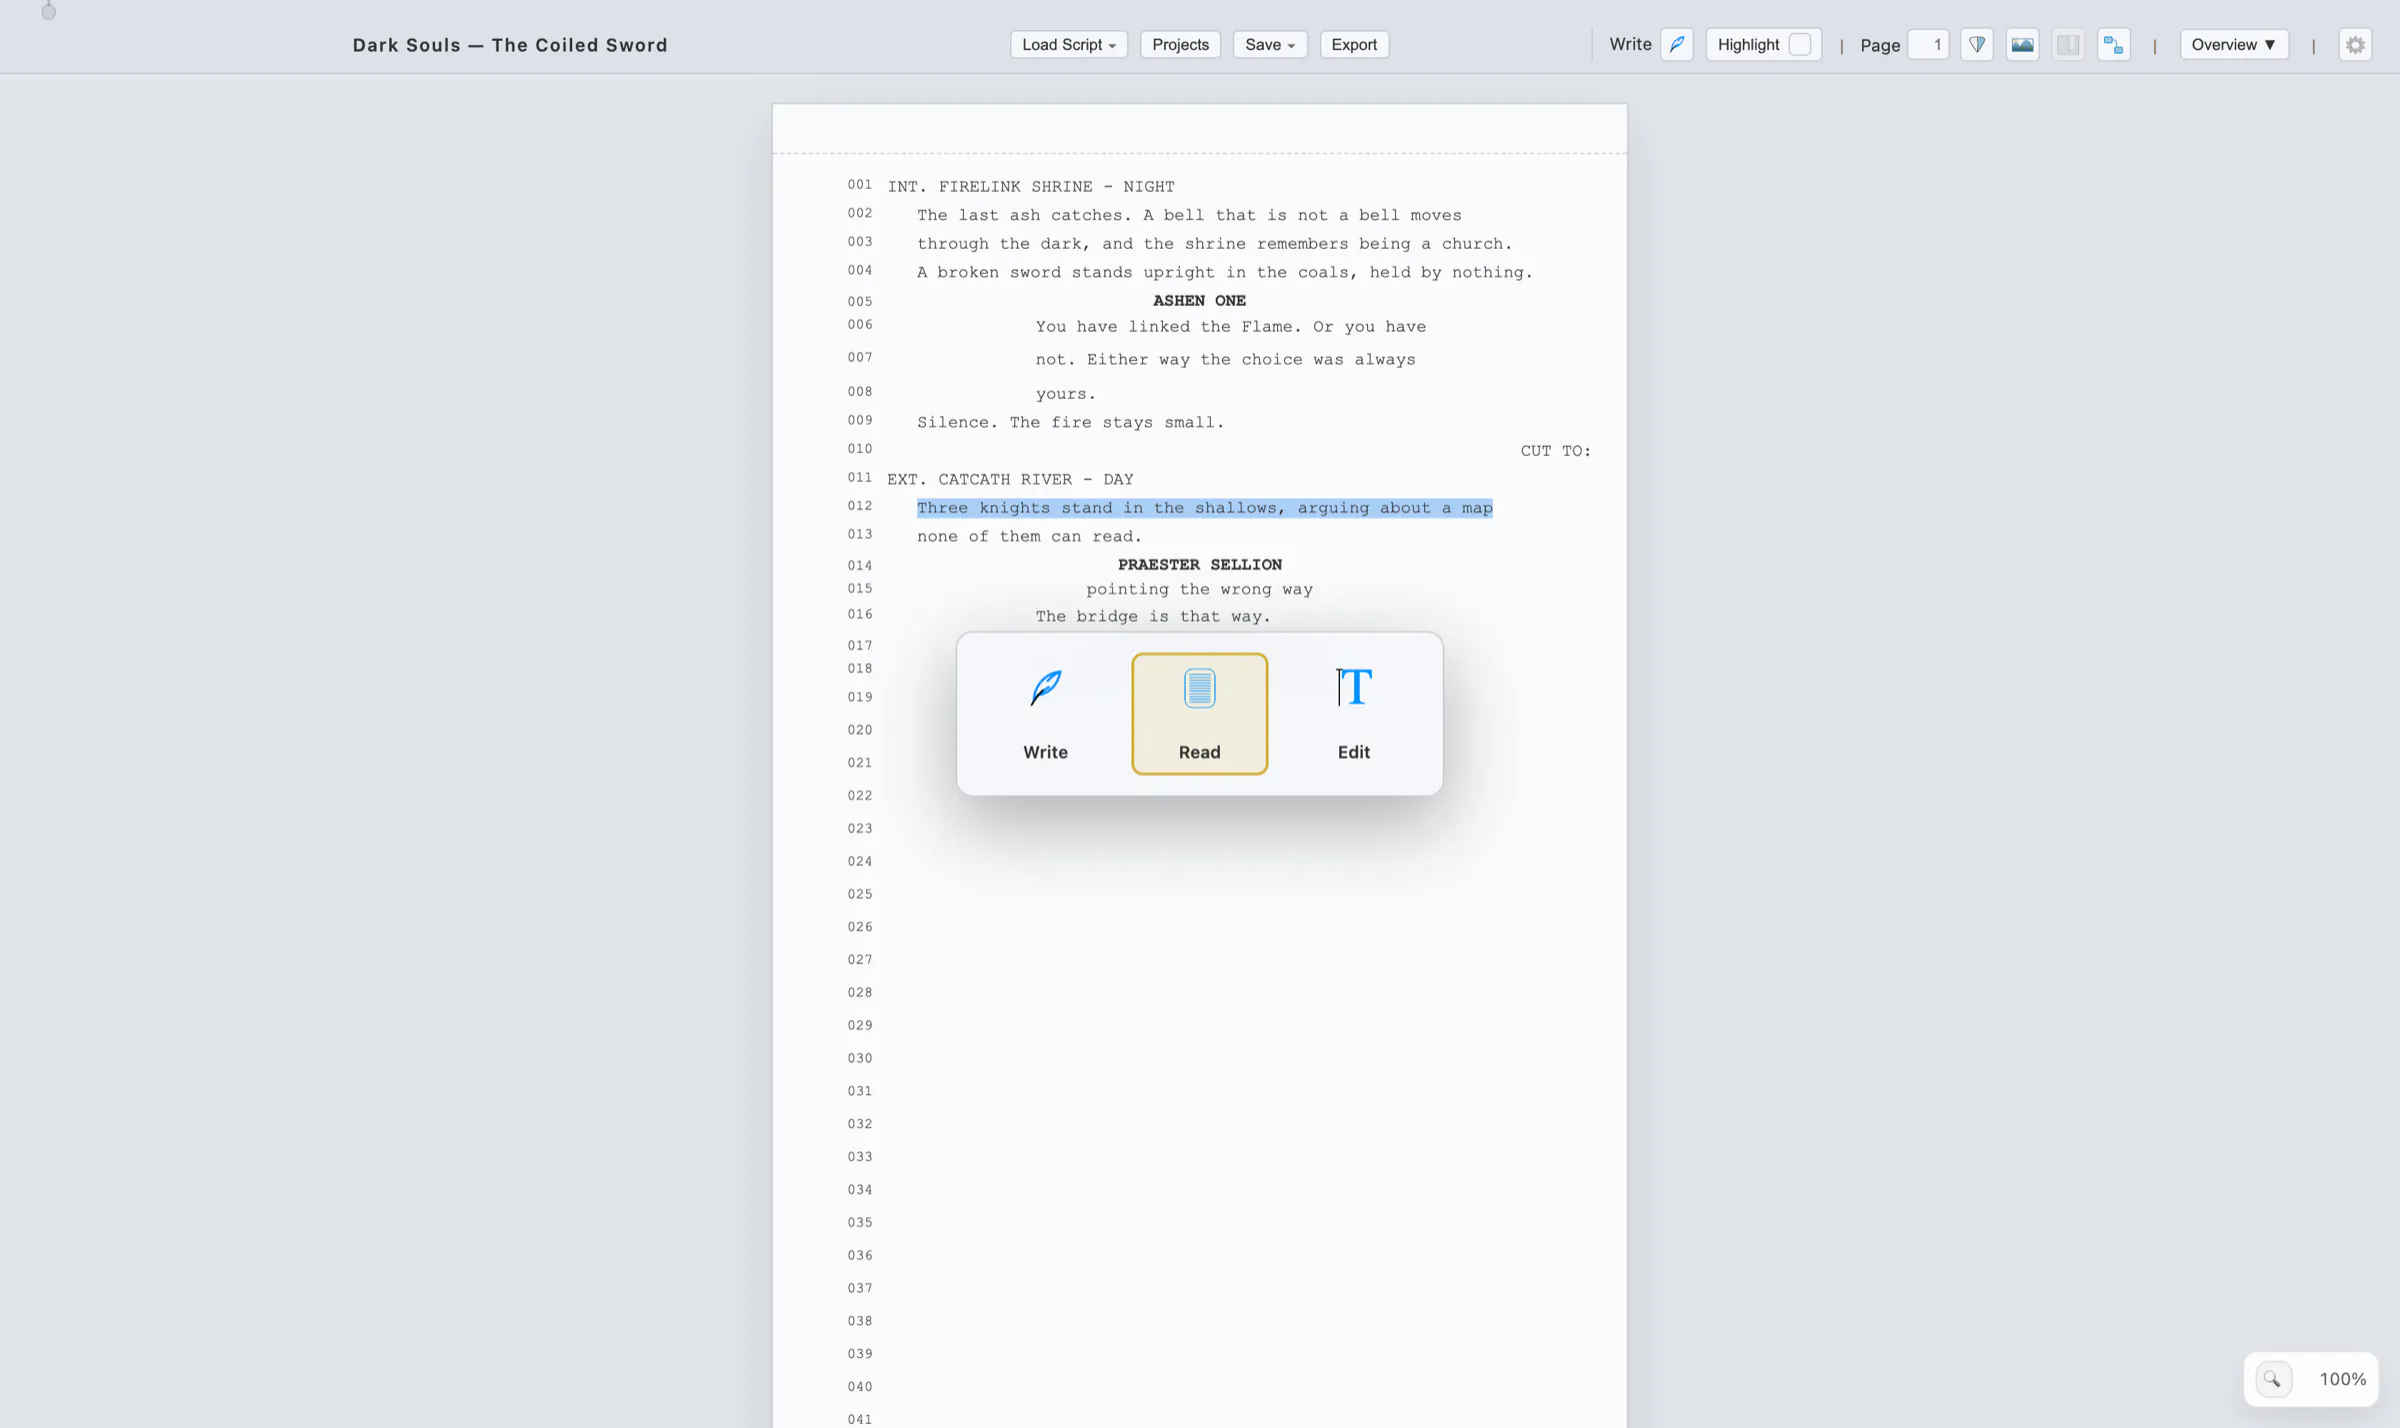
- Write Mode: The continuous drafting surface. You type one screenplay block after another and the software assigns the formatting as you go, splitting rows and paginating automatically. Injections are locked here and the Archive is unavailable, because nothing in Write Mode is ever deleted by hand. See 4. Write Mode.
- Read Mode: A specialized locked state designed for review, table reads, and distraction-free navigation. Editing UI elements are hidden and script text is set to read-only. You can still highlight, change line types, and comment.
- Edit Mode (Default): Your primary creative environment with full interactivity. All "plus" buttons for adding injections and margin controls are visible and active. As you type, the script will automatically repaginate and adjust to accommodate your changes.
Hold "Shift" and tap "Tab" to open the mode switcher without leaving the keyboard: keep tapping "Tab" to move the highlight through Write, Read and Edit, then release "Shift" to commit. "Esc" cancels. A project that was saved as read-only is locked into Read Mode and cannot be switched.
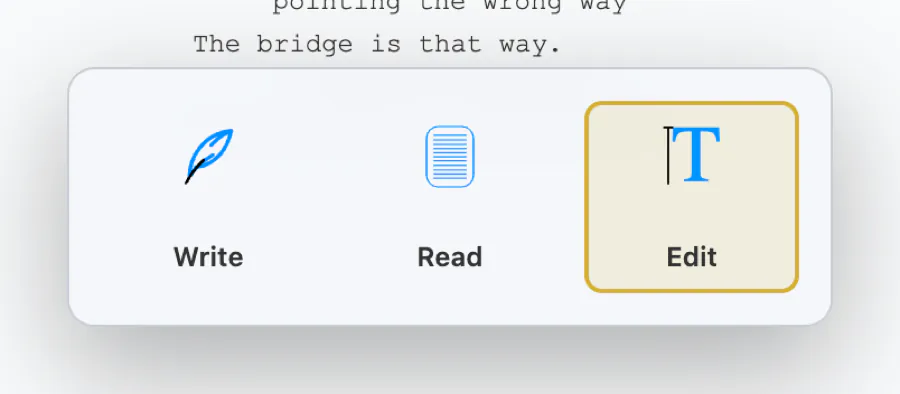
What each mode lets you touch: Write Mode edits screenplay rows only; Edit Mode edits one row at a time plus every injection; Read Mode edits no text at all. Injection boxes (Notes, Script, Board, Music, Sheet) are authored in Edit Mode only — in Write and Read modes the box greys out, and clicking it tells you which mode to switch to.
3.4 Toolbar Actions
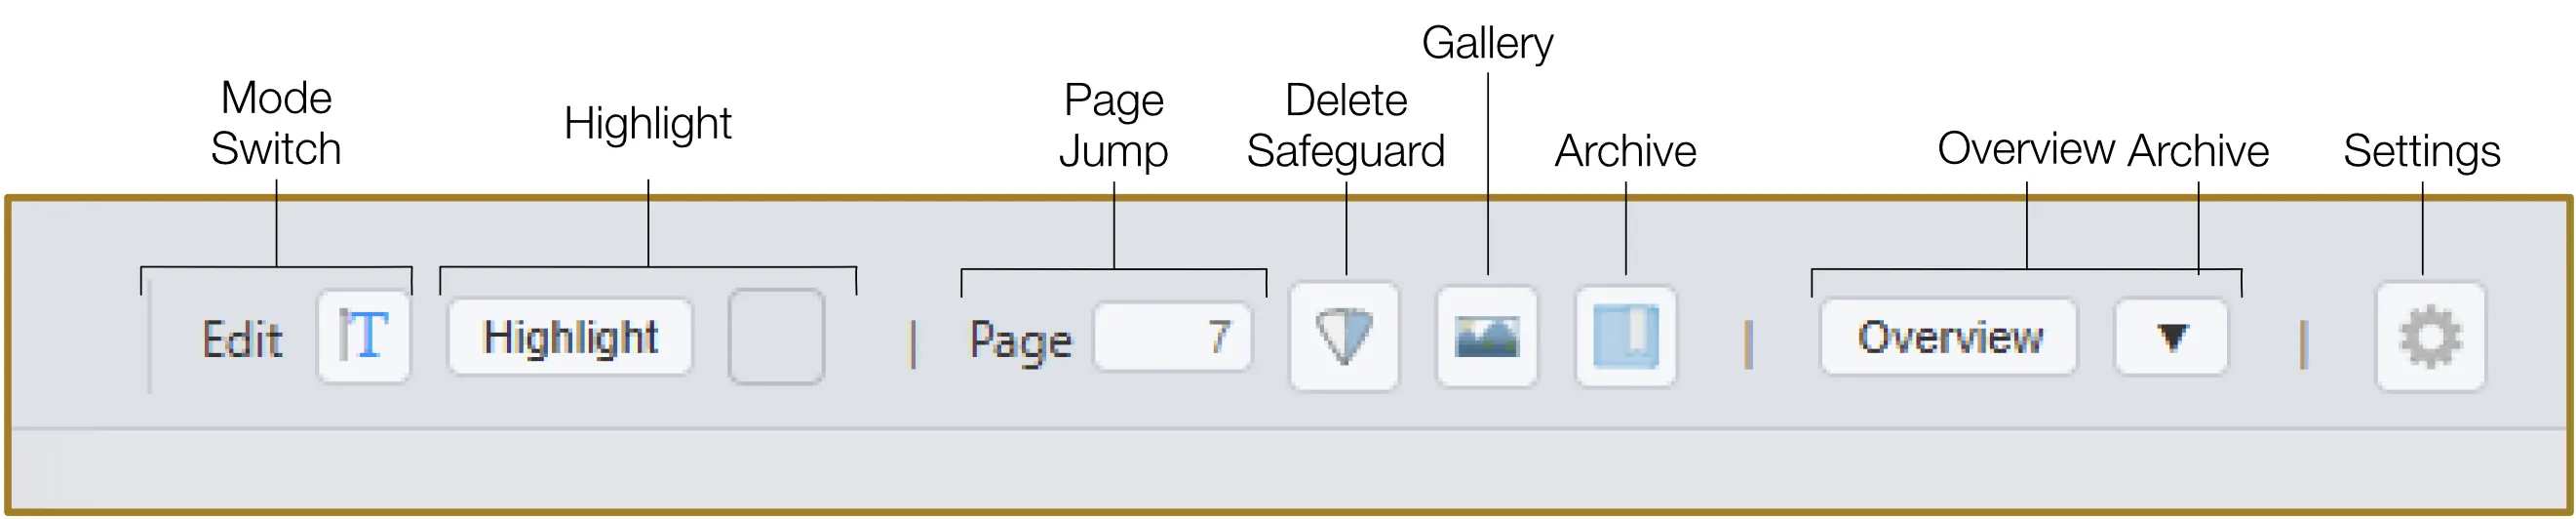
Highlight
Select any text and click the Color Swatch button in the top toolbar to apply a highlight color. You can also press the "H" key to toggle highlight on or off instantly.
Settings
Click the Settings icon in the top toolbar to open the Settings Panel. It is divided into three groups: General Settings (language, region, autosave intervals, undo depth), Appearance Settings (themes, custom themes, UI scaling), and Screensaver Settings (custom video, reset to default).
Safeguard (Shield)
By default, the Safeguard function requires you to hold the "Delete" button for 2.5 seconds (until it is "full") to prevent accidental deletion of lines and injections. To delete elements in one click, toggle the Safeguard icon.
Event Graph
The Event Graph icon opens the board where your Event Notes become cards you can arrange, connect and view by scene or along a timeline. The icon is a door into that workspace, not a counter — it never badges a number of notes. See 13. Event Notes & Event Graph.
3.5 Navigation Tools
Page Jump
Enter a page number and press the "Enter" key to navigate the script page instantly.
Gallery
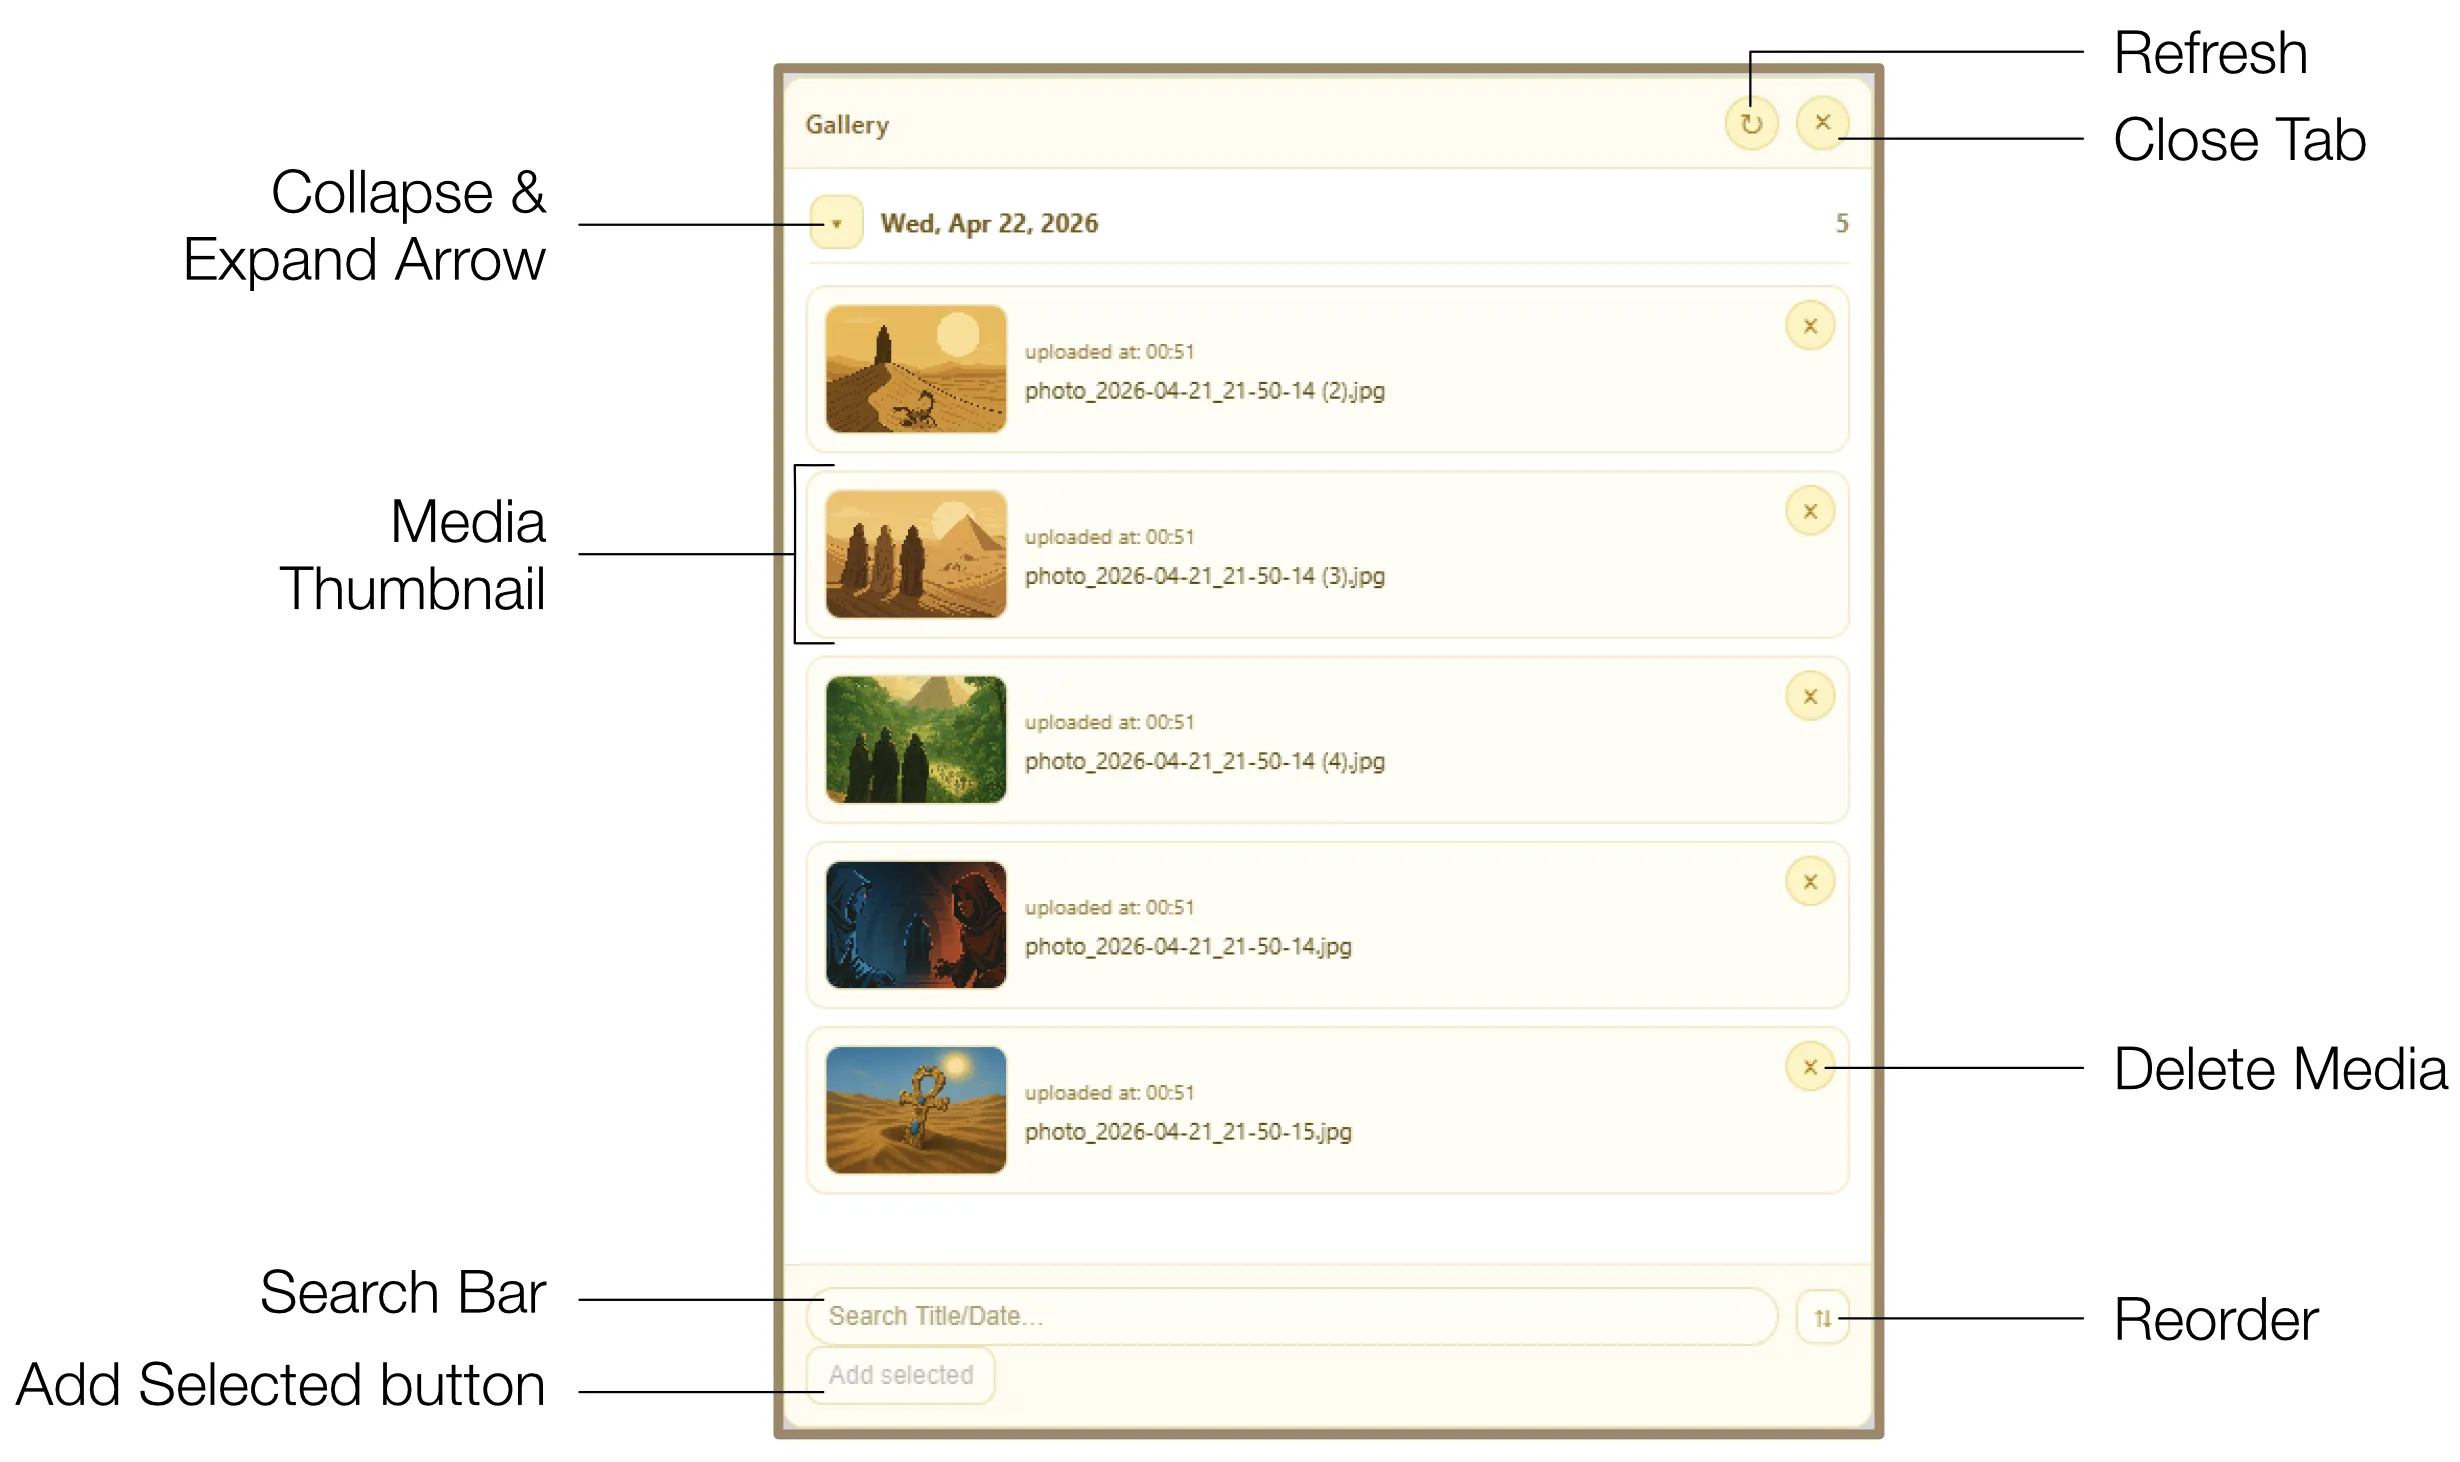
The Gallery is your project-wide library for all visual assets. Click the Gallery icon for quick access to images, videos, and drawings. Media items are automatically organized by upload date. You can search, select, and add them directly to the script.
Archive
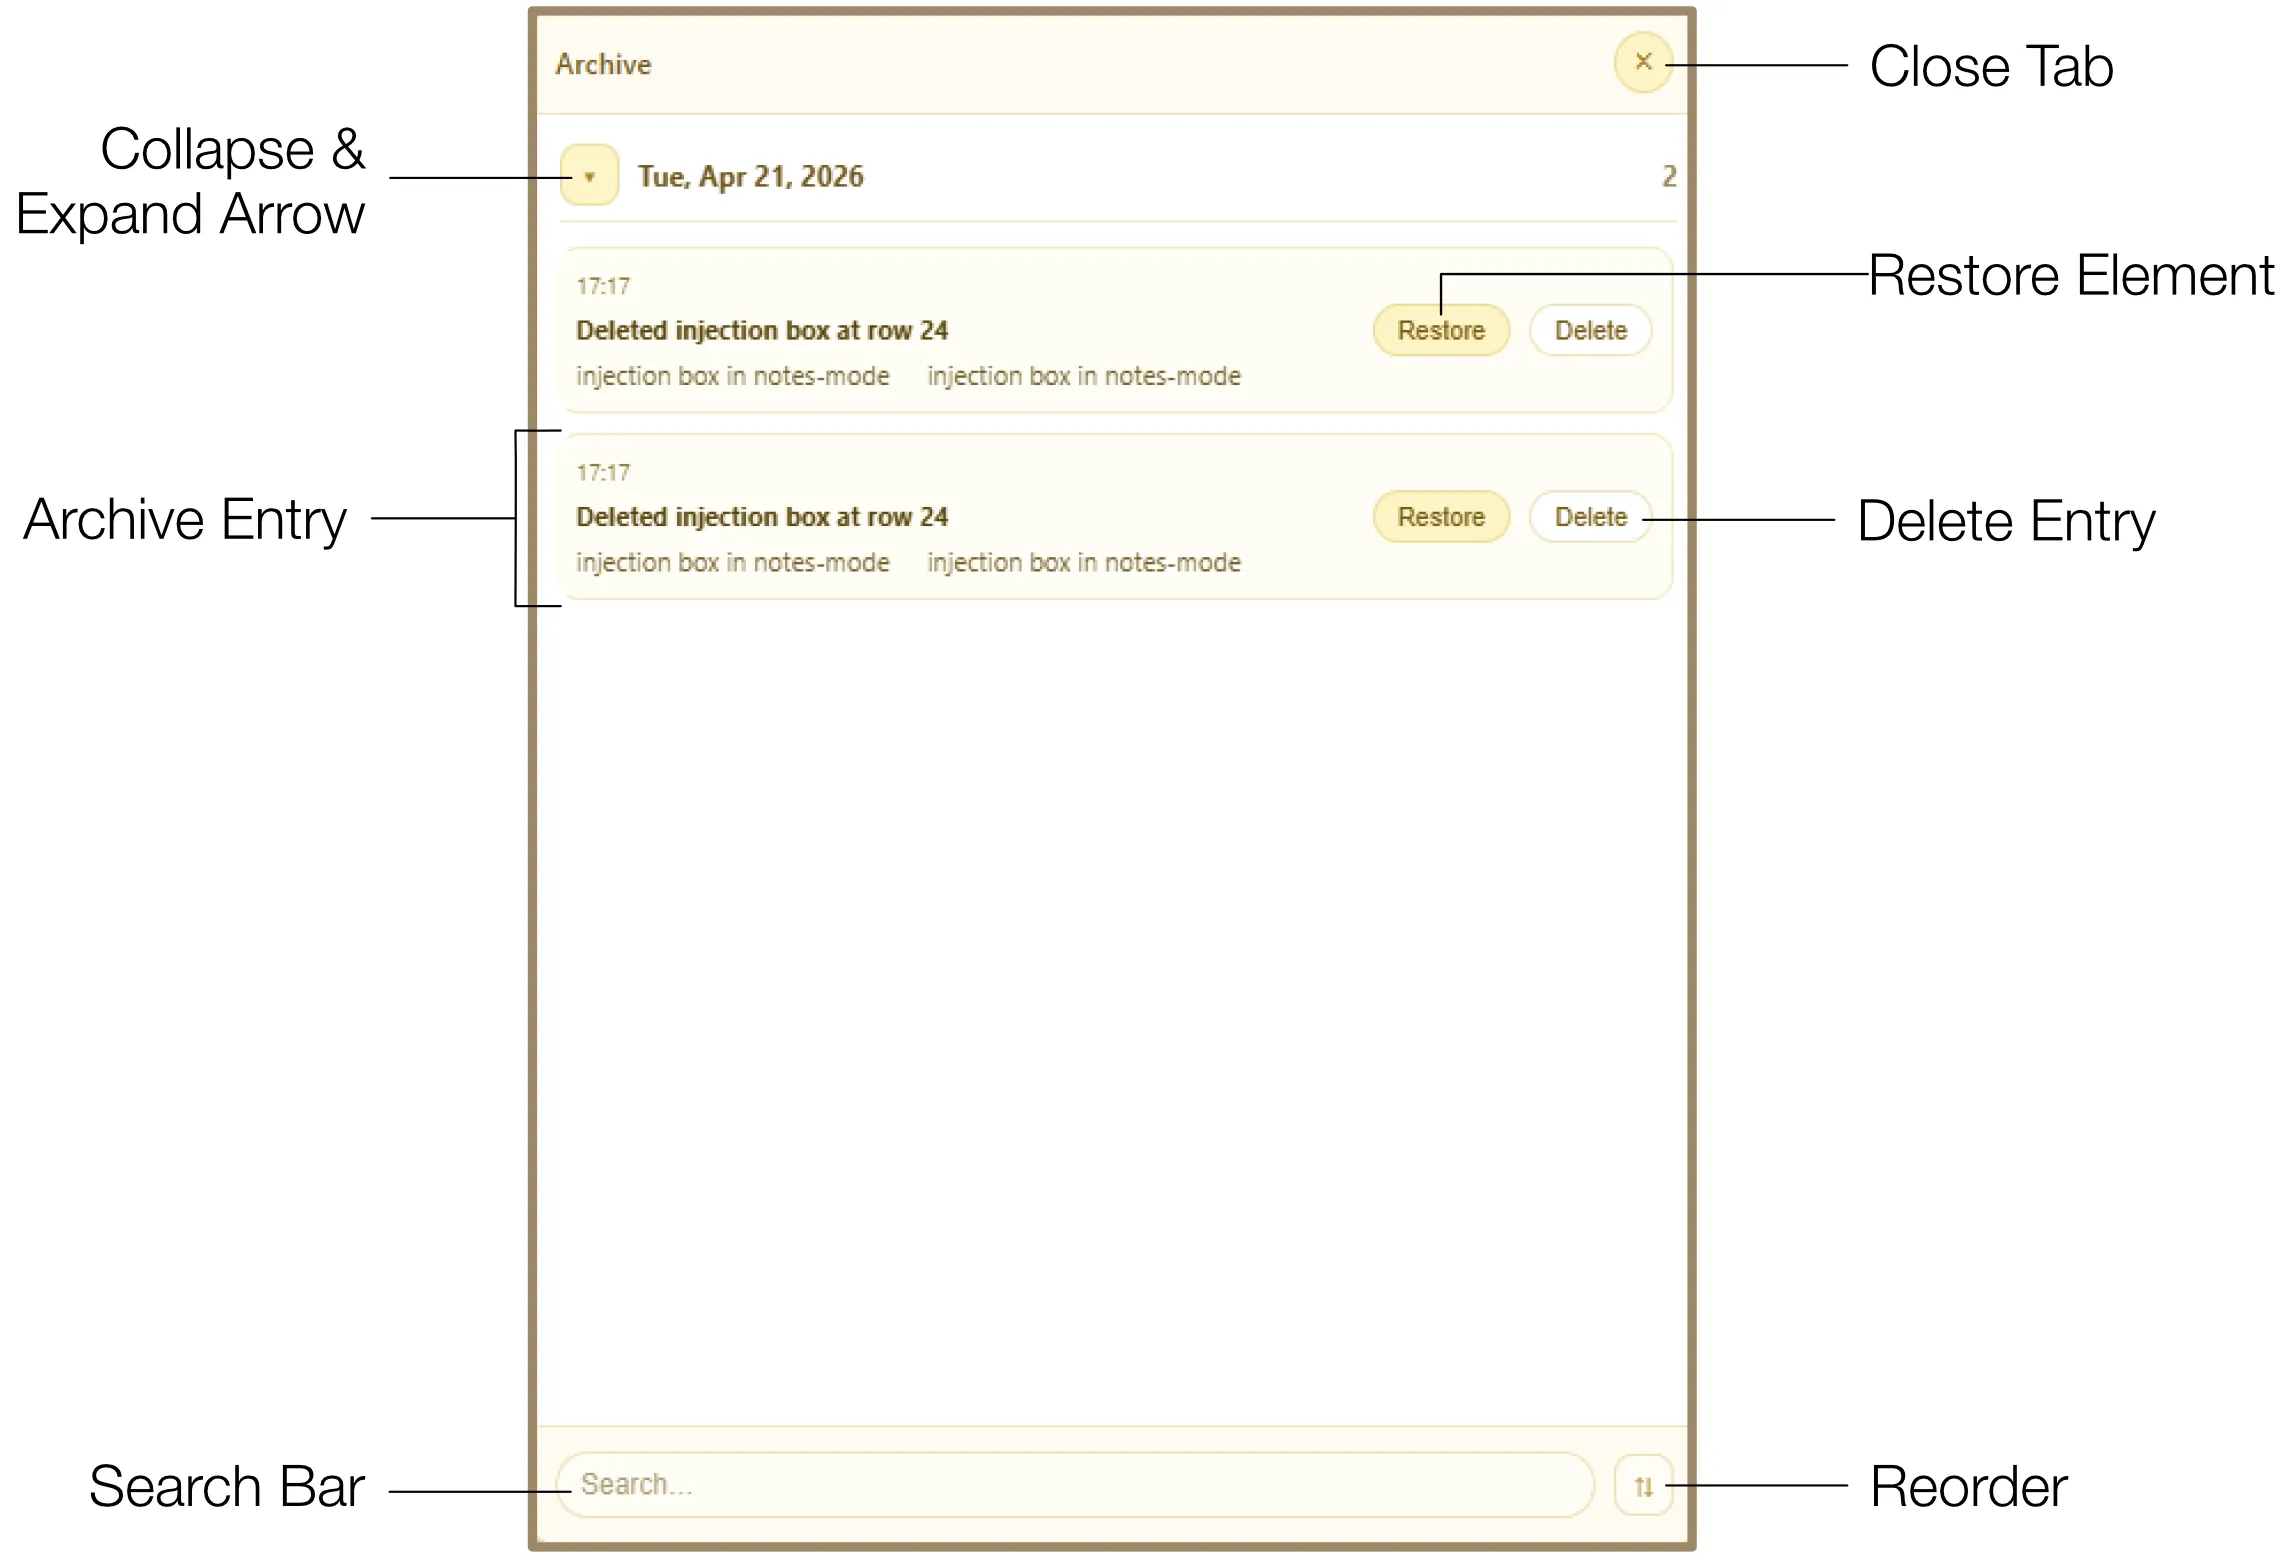
The Archive acts as a powerful safety net, capturing every significant deletion made within your project — line deletions, injections in their entire internal state, and metadata with timestamps. You can restore entries or permanently delete old data to keep your project file size small.
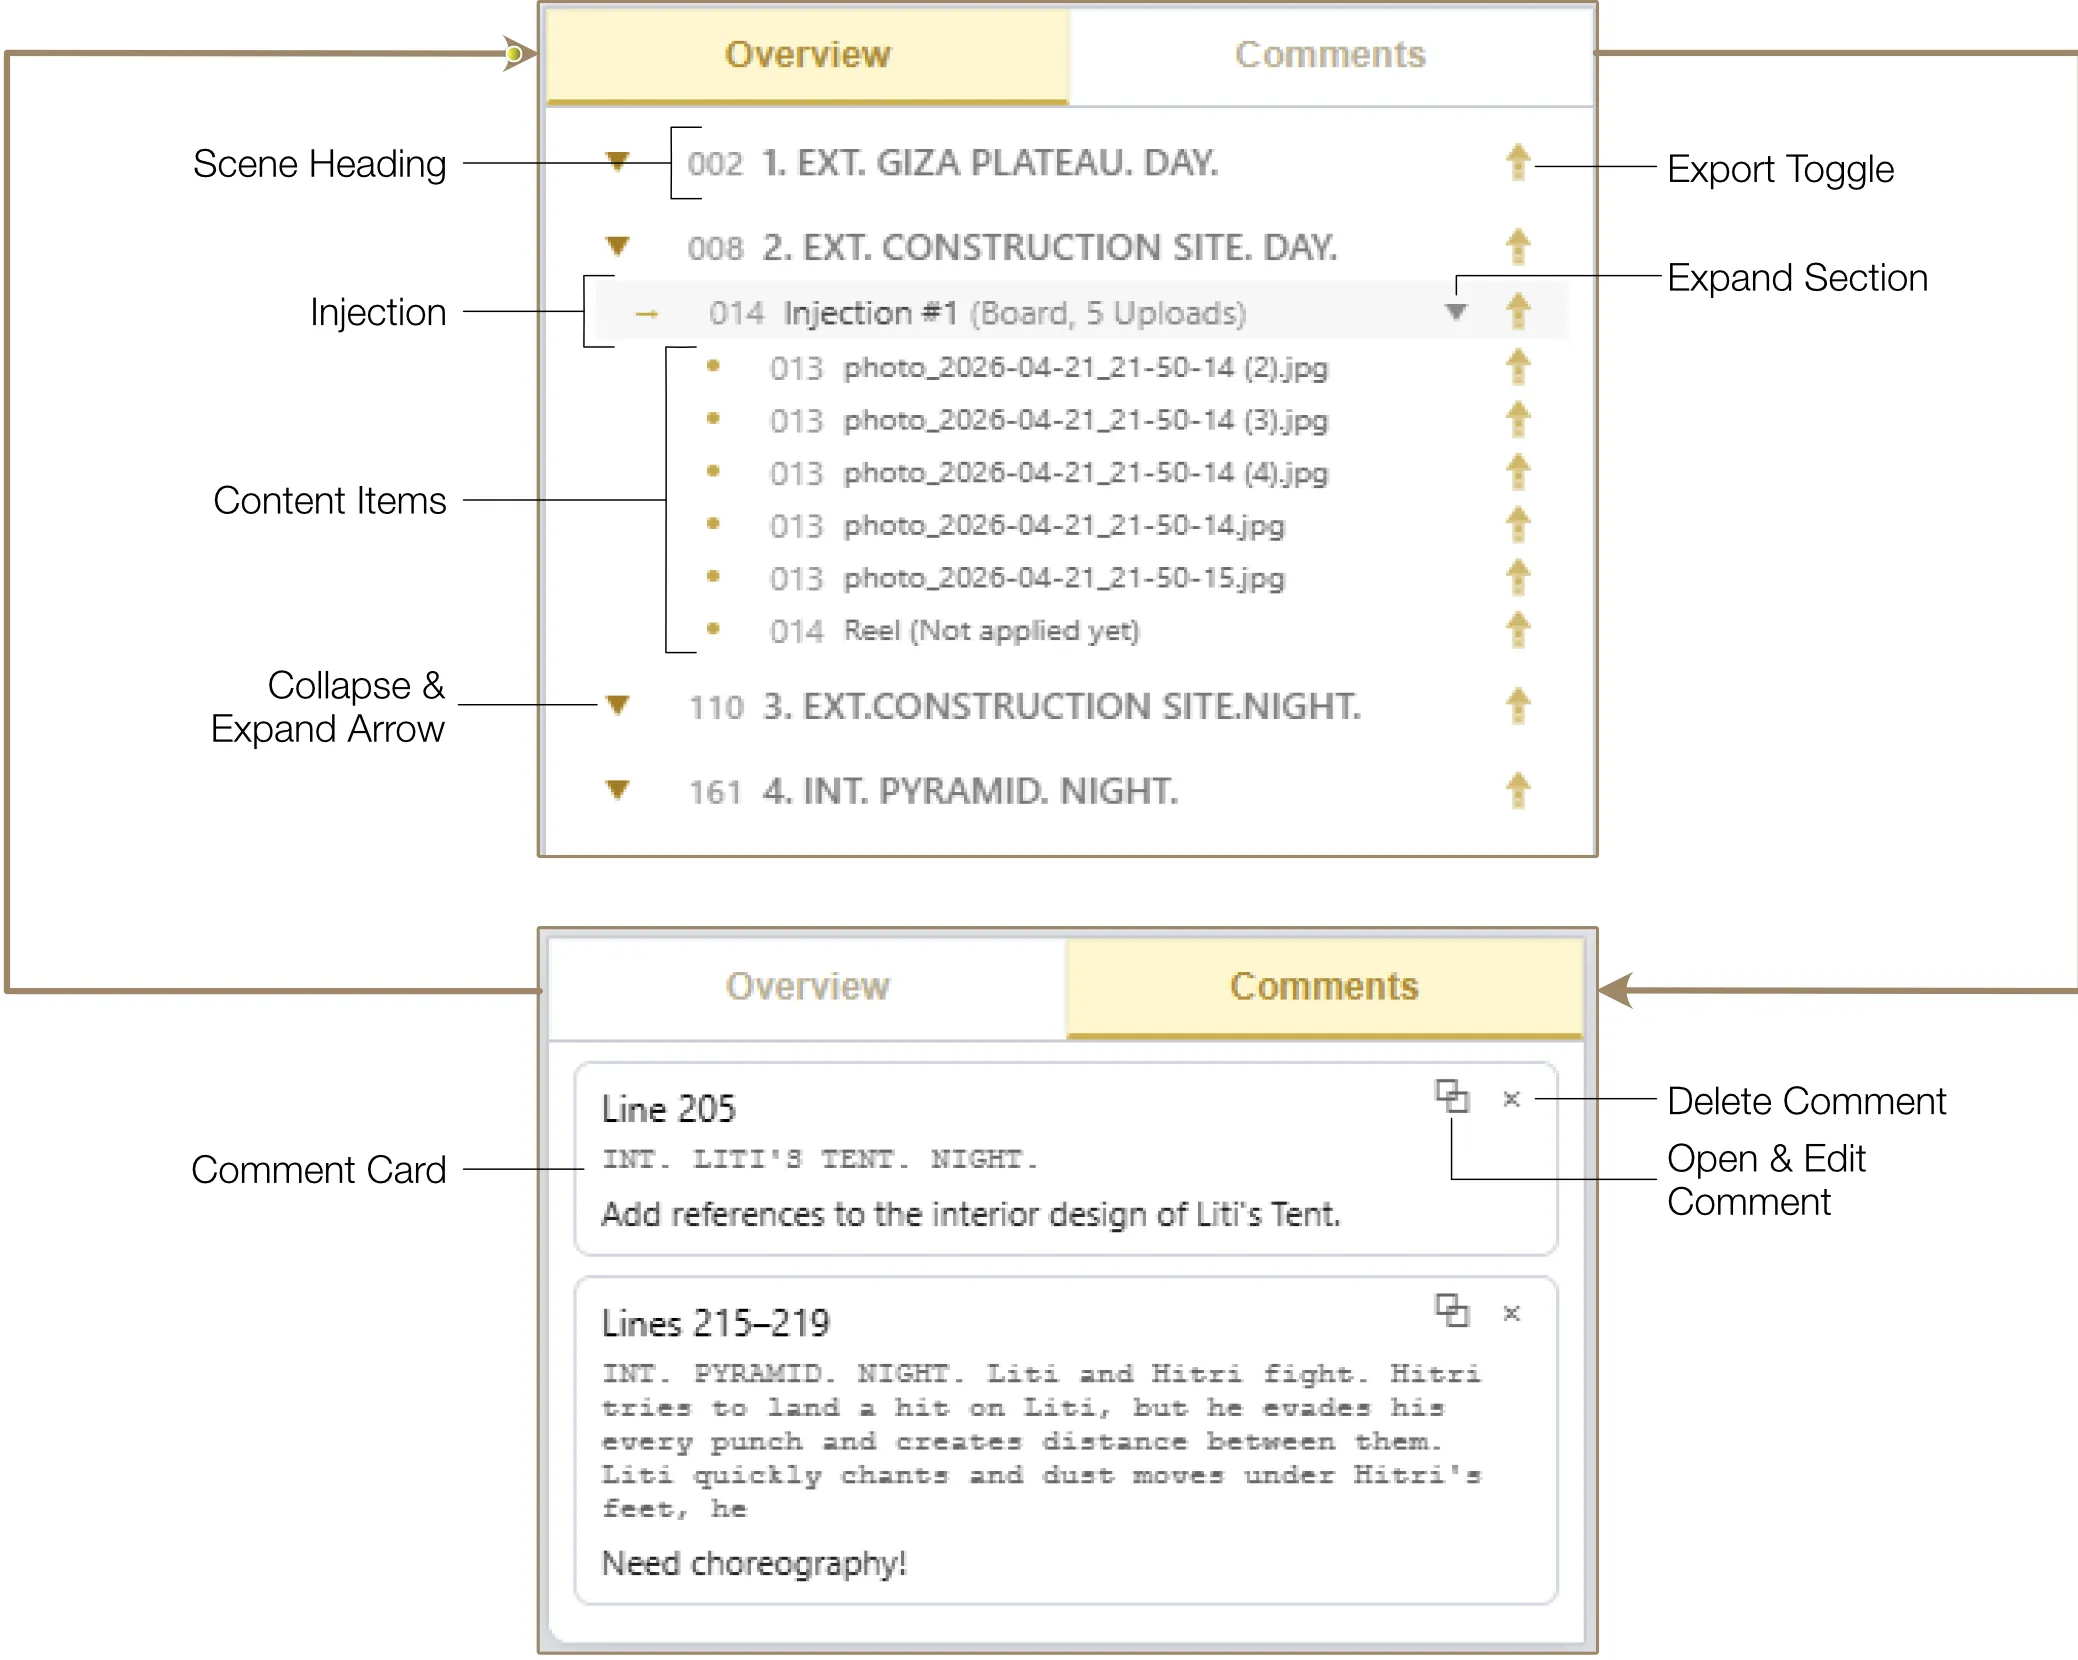
Overview
The Overview panel provides a structural map of your entire project. Every scene heading is listed as a primary branch, with injections and content appearing nested under their respective scenes. Double-click any item to scroll the script directly to that location.
3.6 Zoom & Shift
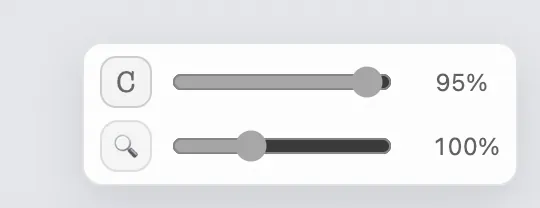
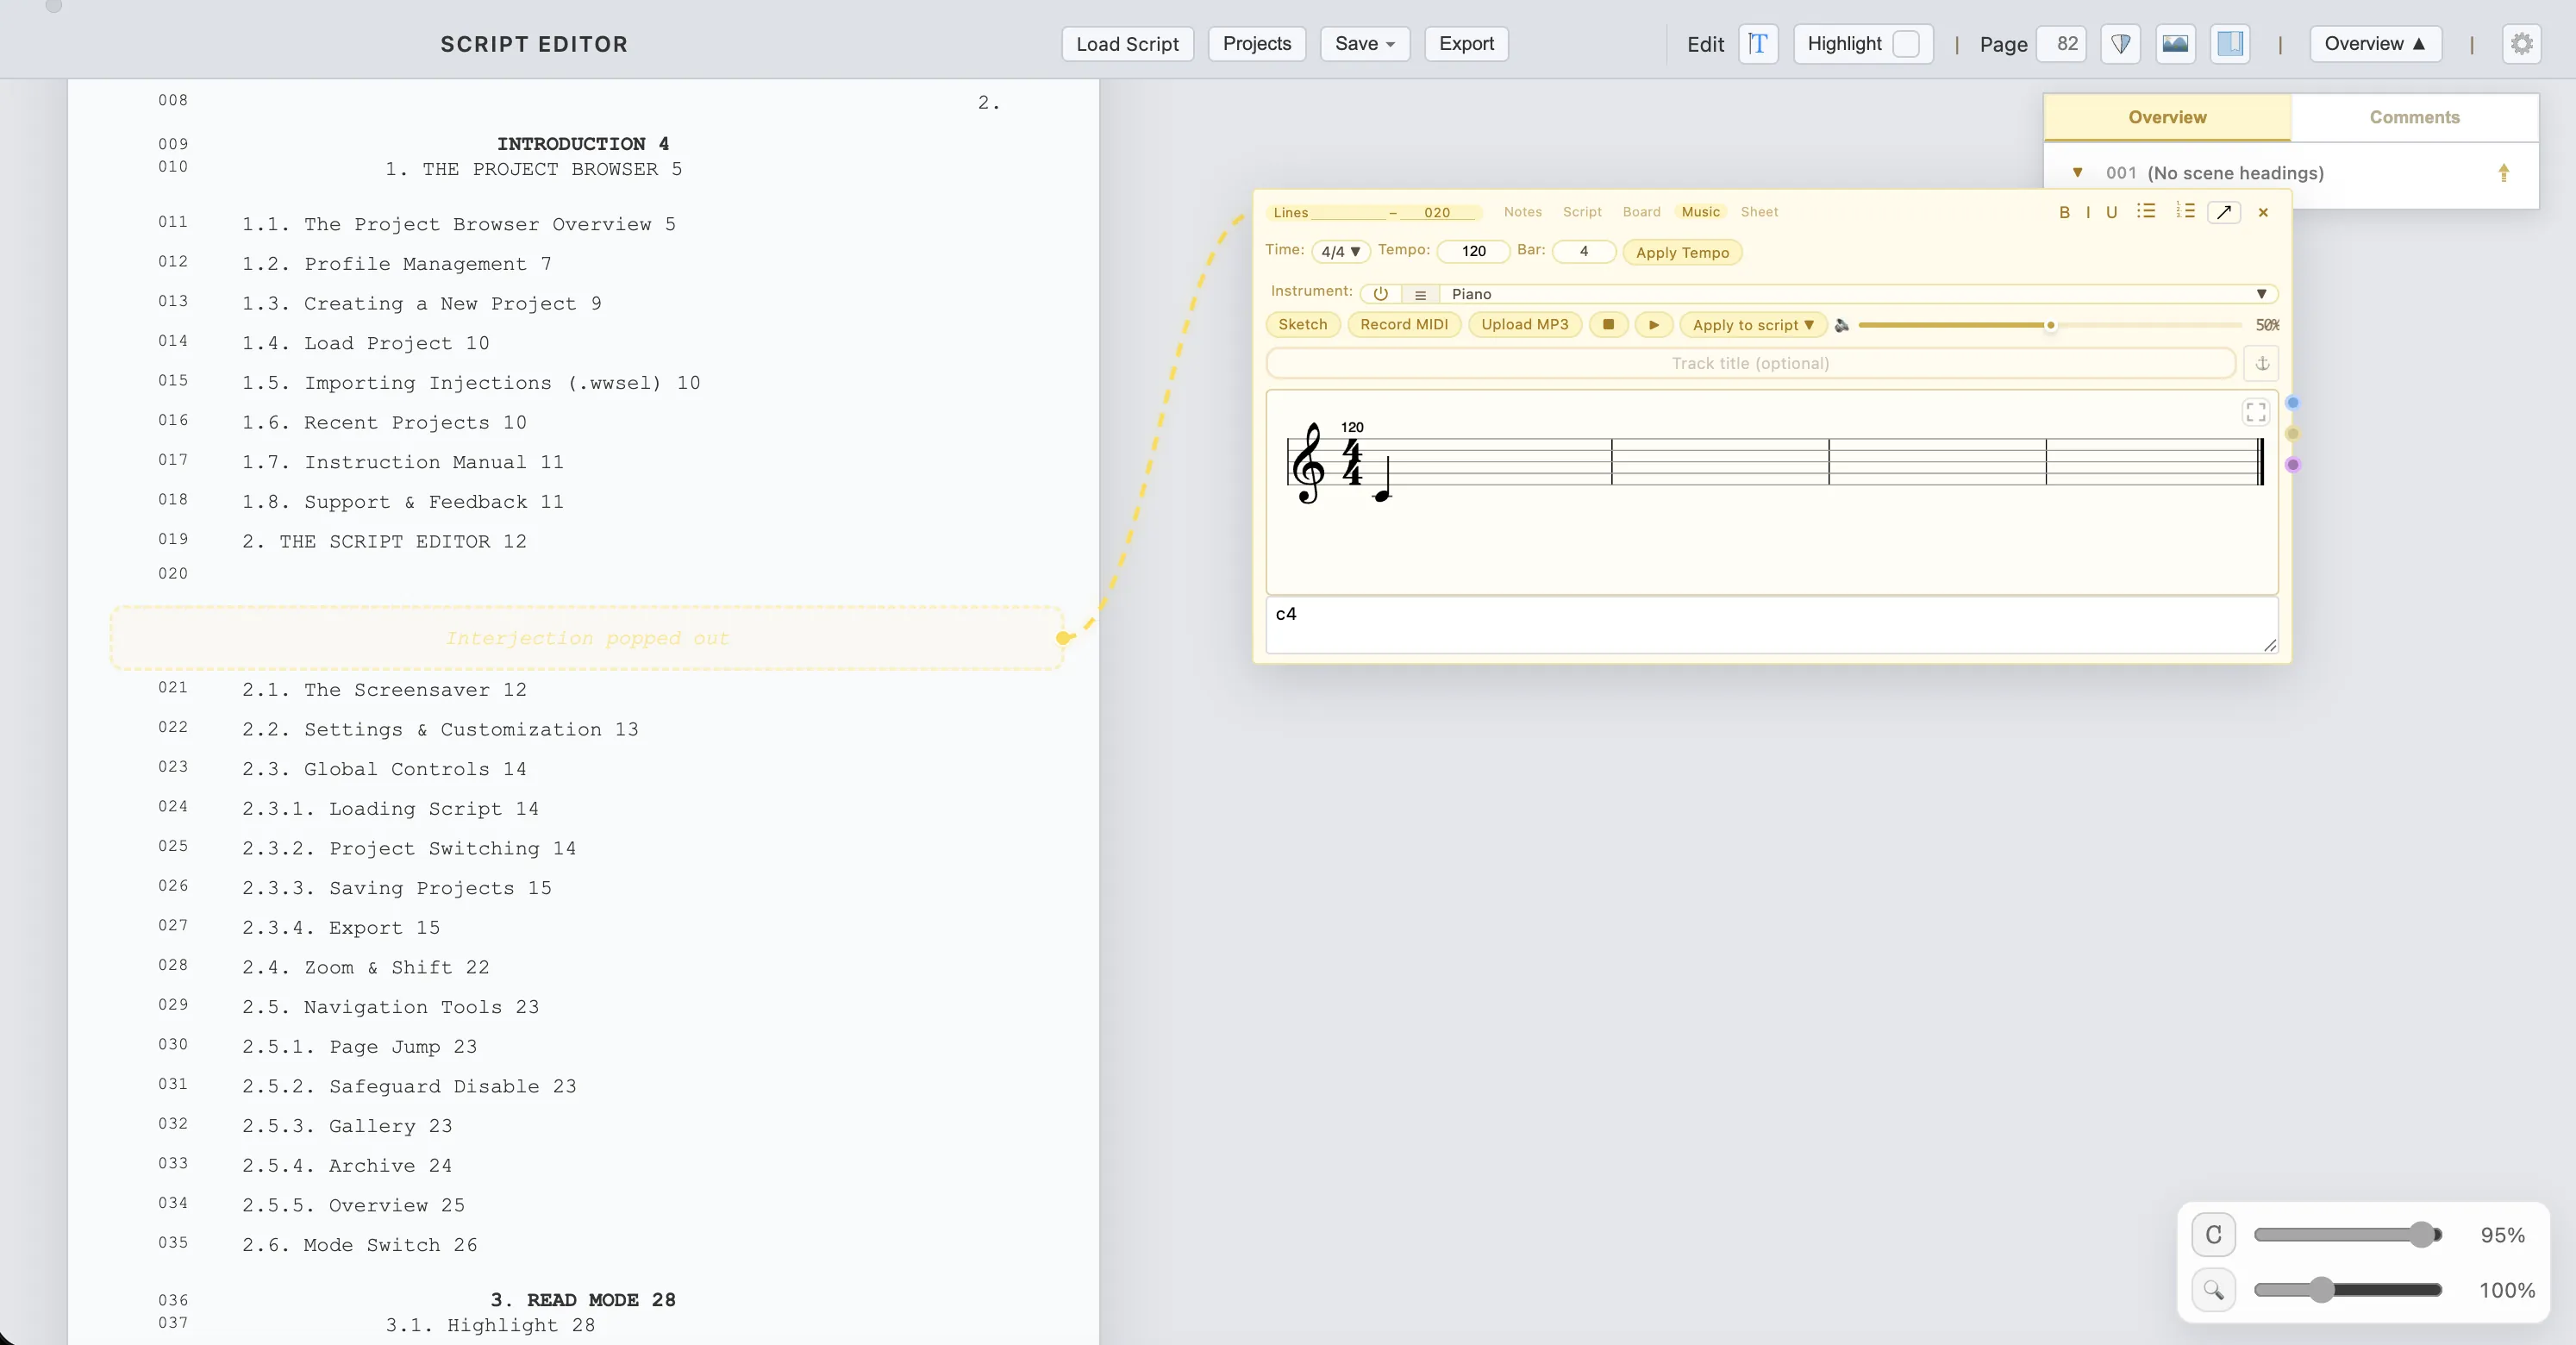
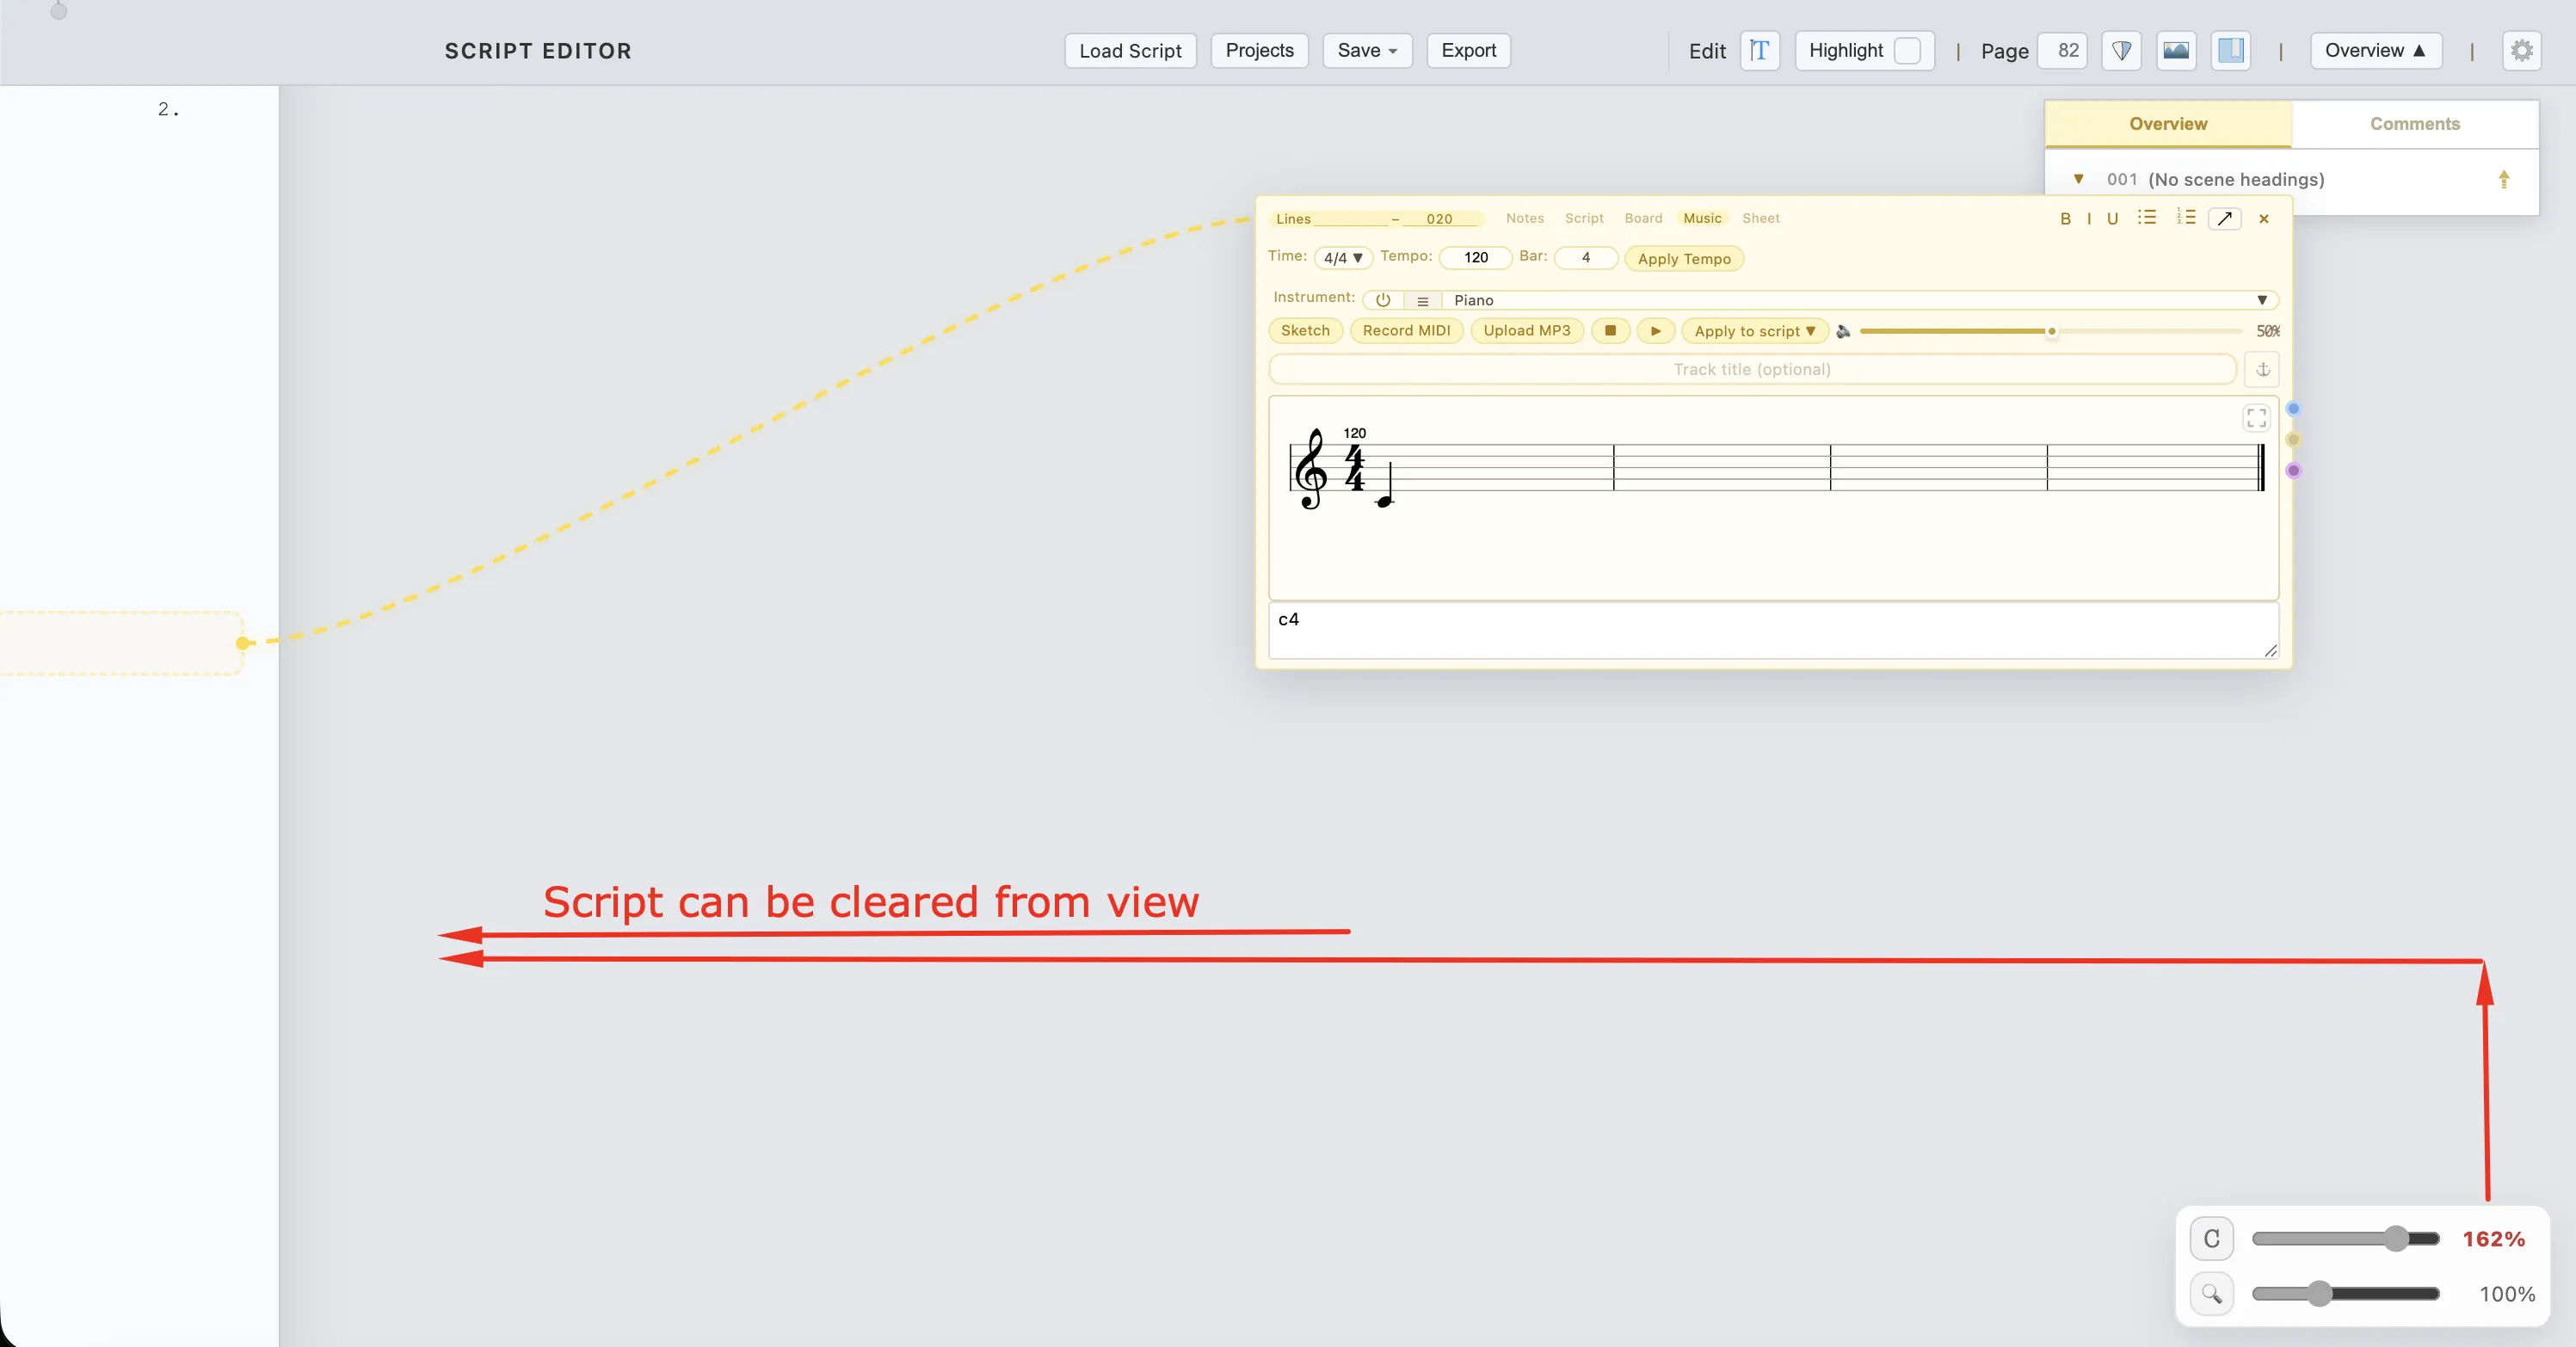
In the bottom-right corner, you will find the Zoom & Shift widget. Use the Zoom Slider to adjust the size of the script. When using injections located on side panels (e.g., Draw, Sheets), the Script Shift Slider appears — use it to shift the script to the left, preventing it from being covered.
Click the percentage value to toggle "Off-screen" mode for maximum tool space.
3.7 Screensaver
The software includes a cinematic Screensaver that provides a theatrical "rolling down the screen" effect, perfect for leaving the workspace active during breaks or presentations.
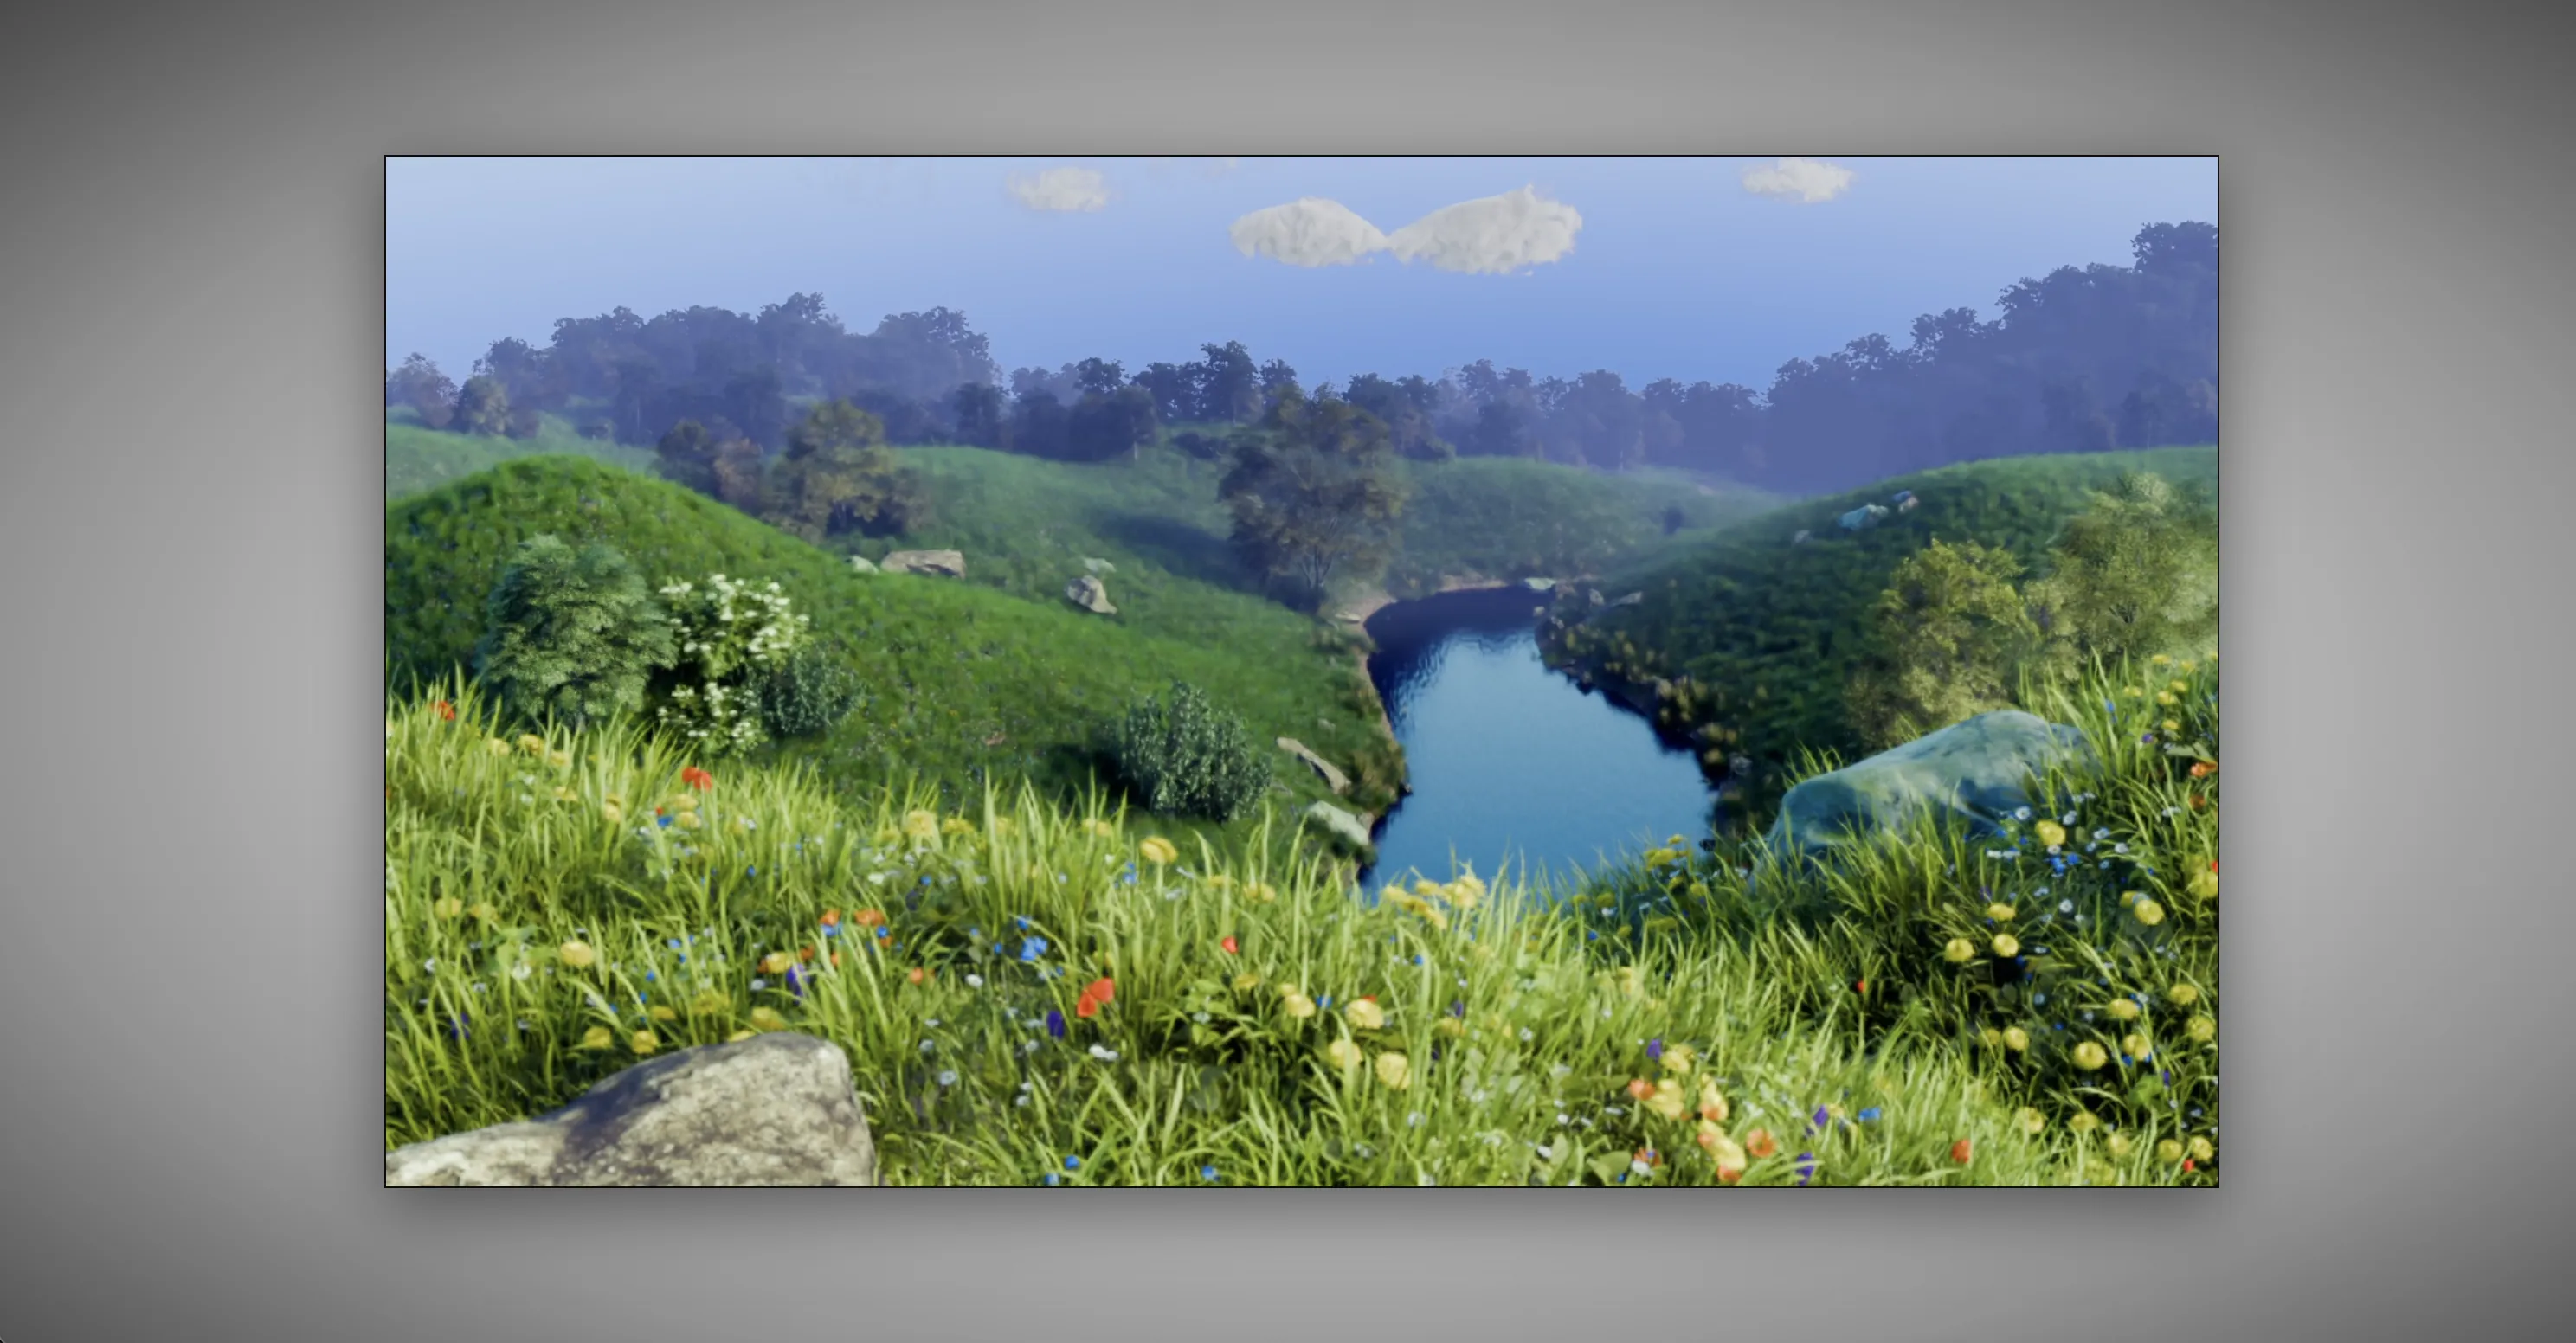
- Enable: Click and drag the small circle handle (the "rope") at the very top of the window down past the toolbar.
- Retract: Press the "Esc" key to roll the screen back up.
- Shortcut: Ctrl+Shift+L (or Cmd+Shift+L on Mac).
- Play / Pause: Click anywhere on the screensaver canvas.
- Mute: Press the "M" key on your keyboard.
- You can change the screensaver video and mute toggle from the Settings Panel.
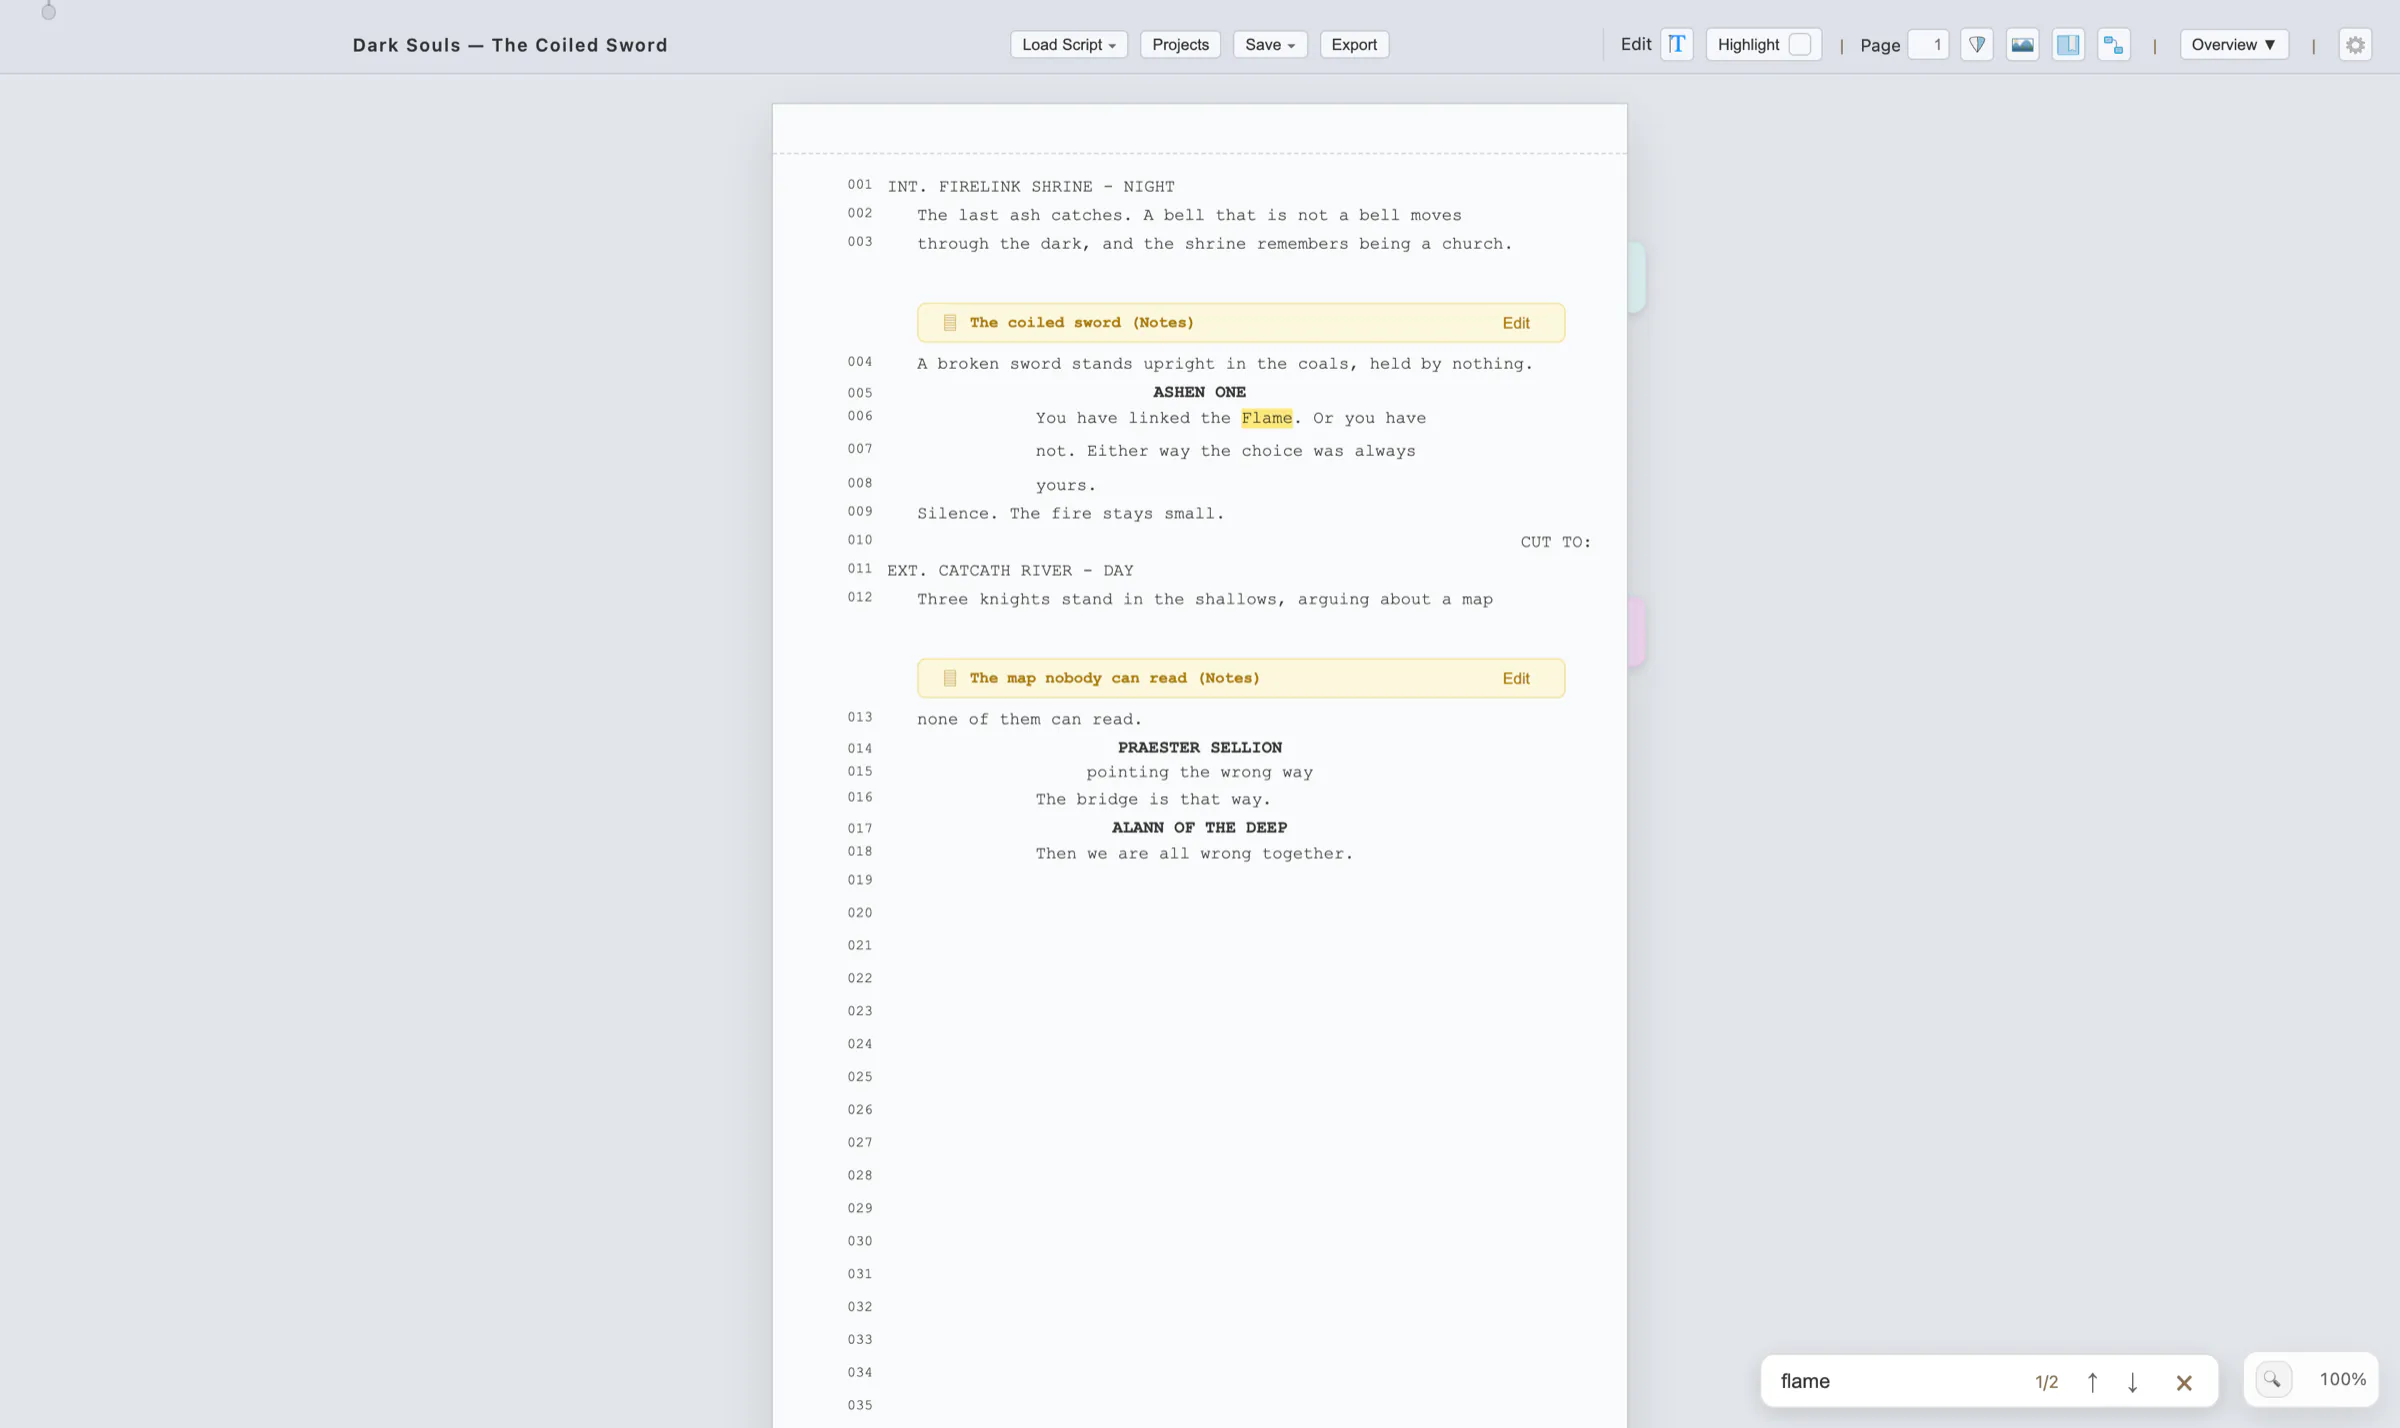
3.8 Find in Script
Press "Cmd+F" (Mac) or "Ctrl+F" (Windows) anywhere in the script to open the search field in the bottom-right corner. It works in Write, Read and Edit modes alike, and searches the whole rendered document — every script row plus the notes inside docked injection boxes — not just the current page. A box that has been popped out onto its own panel sits outside the script area and is not searched.

- Live matching: Every occurrence of what you type is highlighted in the script as you type it. Matching is case-insensitive and works across a phrase even when part of the line carries a highlight, a comment or bold formatting.
- Counter: The field shows your position as "current/total" (for example 3/17). If nothing matches, the counter reads 0/0 and the field is outlined to tell you so.
- Stepping: Press "Enter" to jump to the next match, "Shift+Enter" for the previous one, or use the up/down arrows beside the counter. The script scrolls so that the current match sits in the middle of the view, and that match is highlighted more strongly than the rest.
- Close: Press "Esc" or the close button. Closing clears the field and removes every highlight, leaving the document exactly as it was.
4. Write Mode
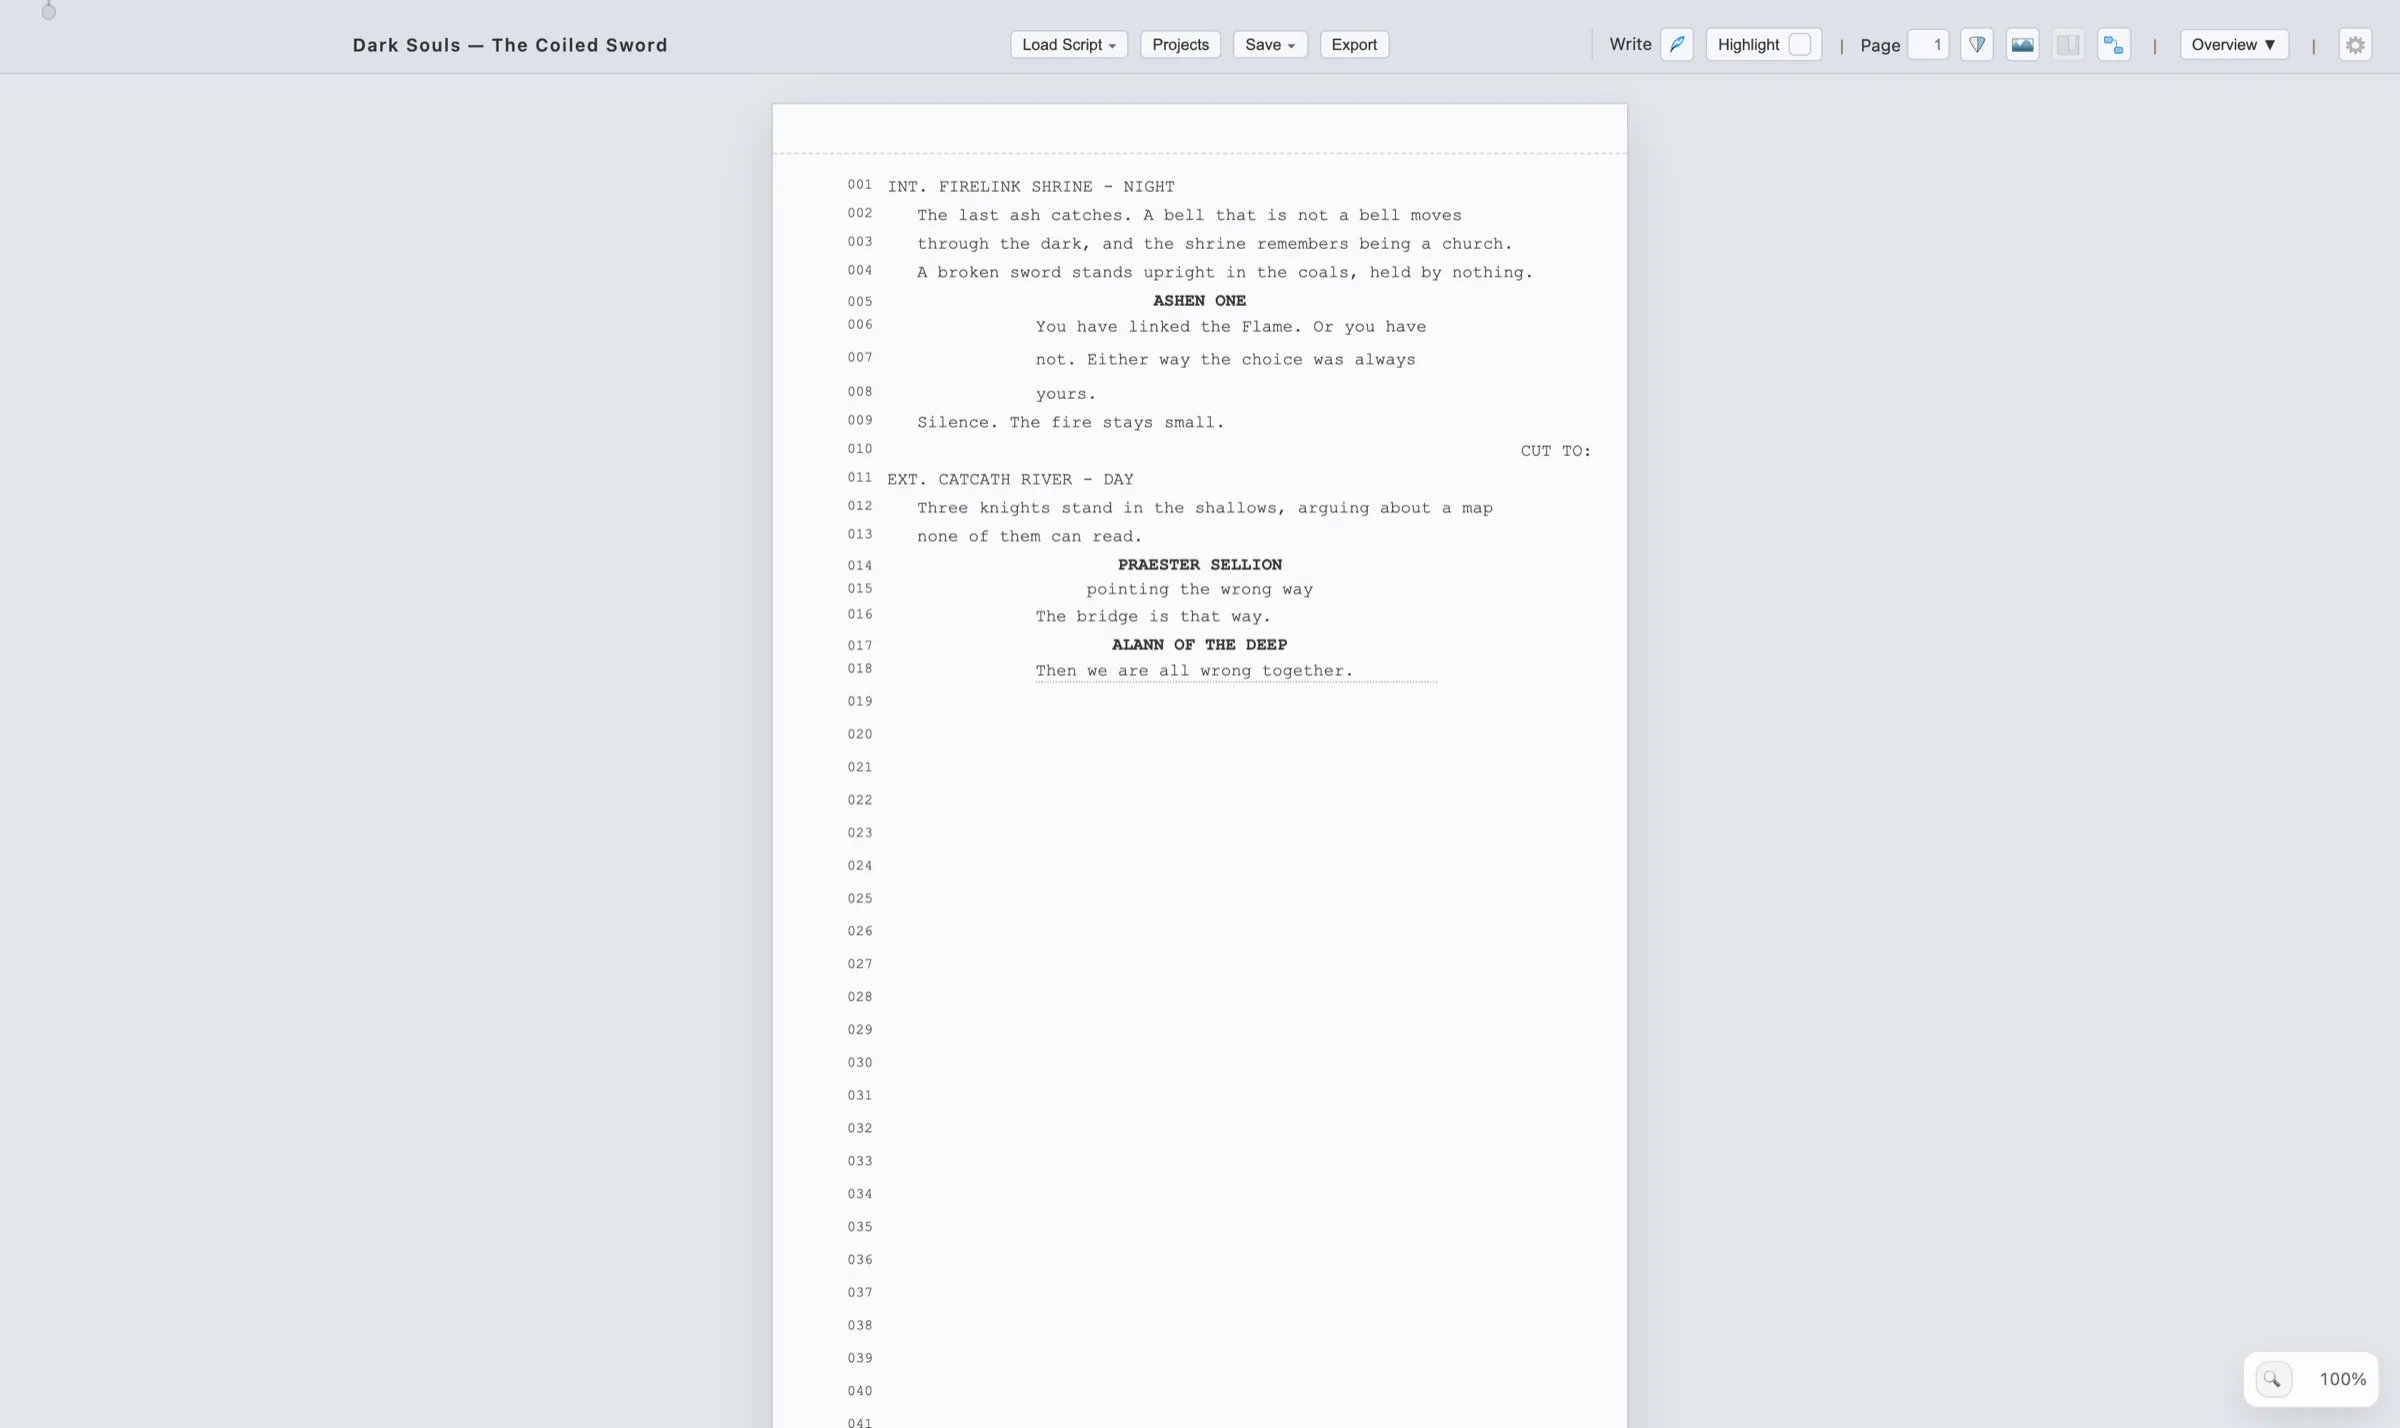
Write Mode is the continuous drafting surface. Instead of clicking into one numbered row at a time, you type the scene from top to bottom and the software handles block formatting, row splitting and page breaks while you go. The result is a plain screenplay page: Courier text, correct indents, dotted row-width guide, and nothing else on screen.
4.1 Starting a Script
There are two ways to arrive at a page worth writing on:
- Load a document first. Use "Load Script → Load document" to bring in a .pdf, .docx, .txt or .rtf file. The text is parsed into numbered rows, which you can then switch to Write Mode to keep drafting in.
- Start from nothing. Use "Load Script → Create blank page". The software builds one clean 54-row page, switches to Write Mode by itself, and puts the caret in row 001, ready for a scene heading.
To switch into Write Mode on an existing script, click the Mode icon and choose Write, or press "Tab" until the label reads "Write". The toolbar label and icon change with the mode, so you always know which surface you are on.
4.2 Screenplay Blocks & Automatic Flow
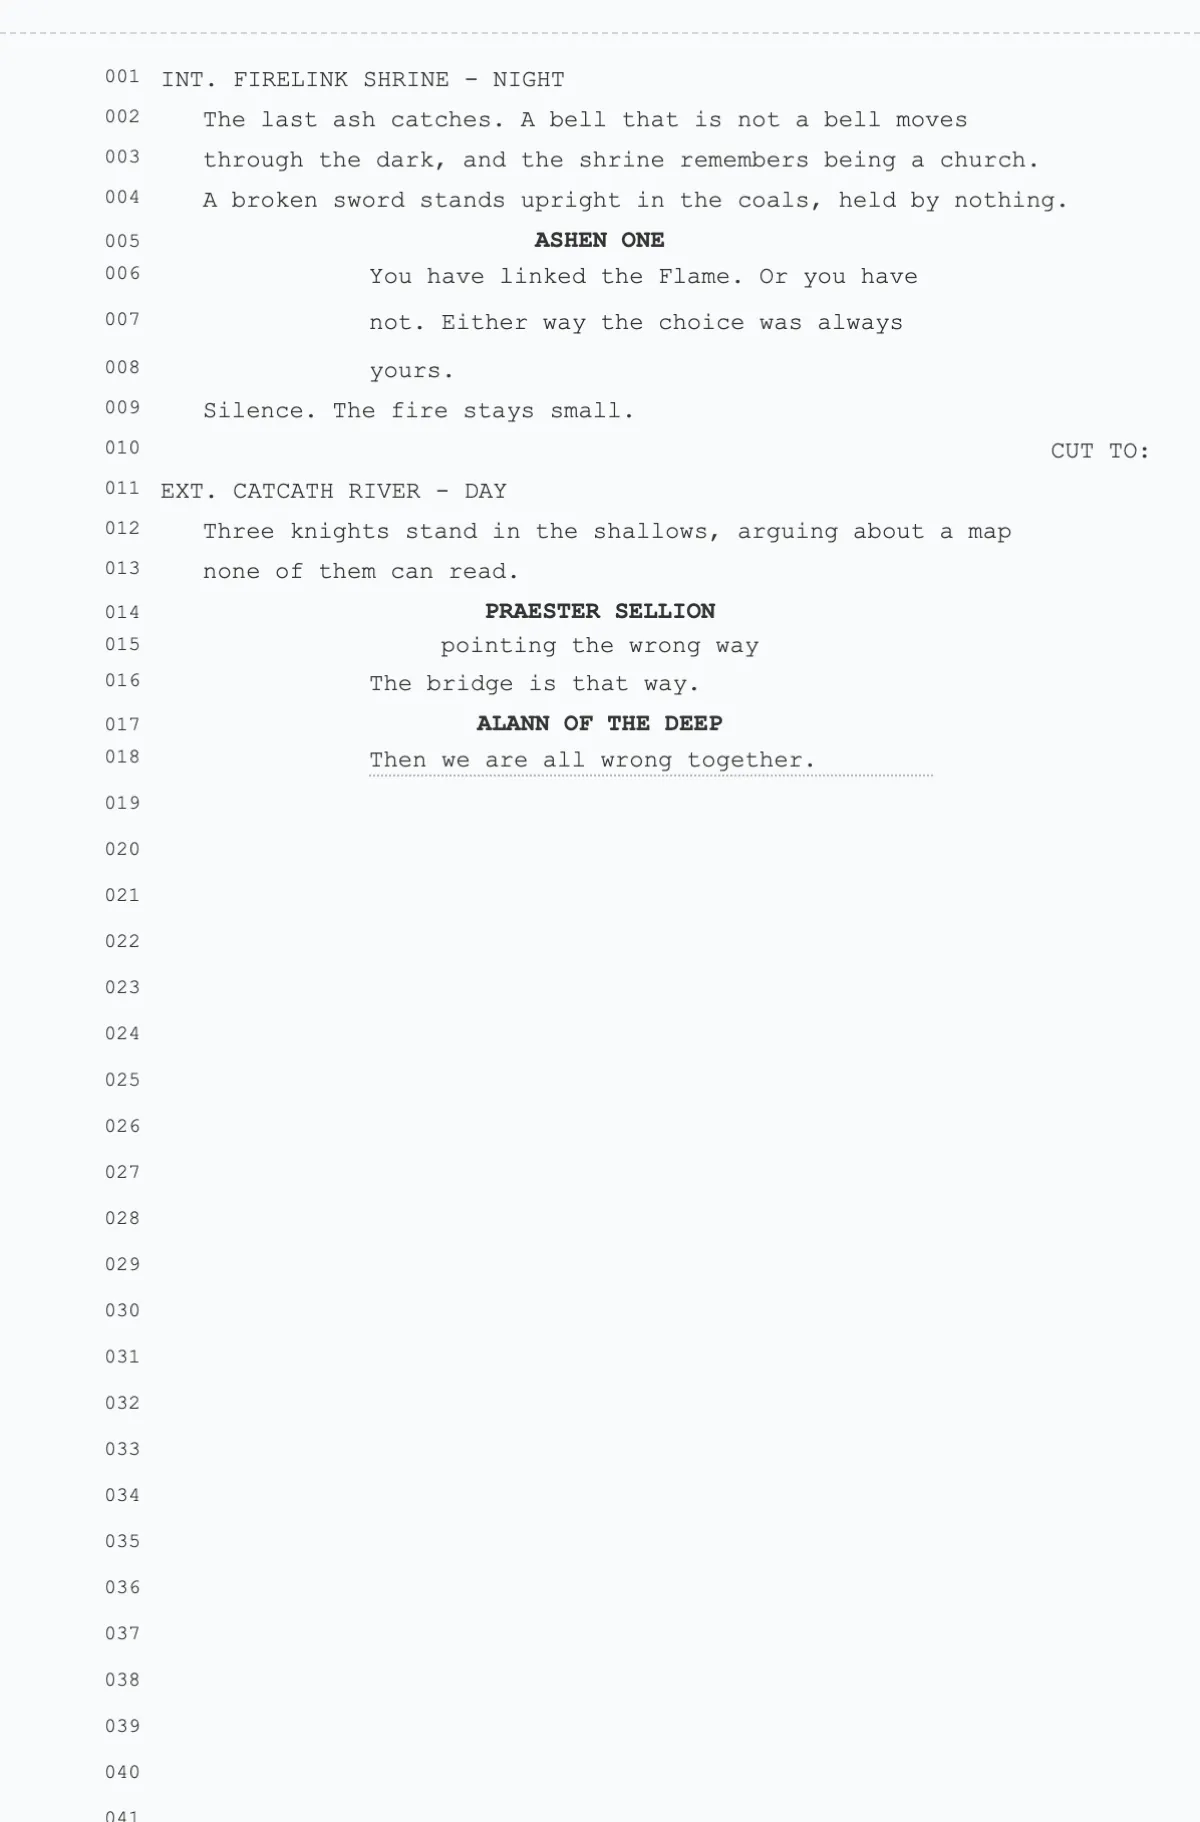
Every row in Write Mode carries one block type, and each type has its own industry-standard indent and case. Write Mode reads what you just typed and picks the next block for you, so a normal exchange needs no formatting decisions at all:
| Block | Looks like | Pressing Enter on an empty line gives you |
|---|---|---|
| Scene Heading | Flush left, capitals | Action |
| Action | Full width, sentence case | Action |
| Character | Centred on the dialogue column, capitals | Dialogue |
| Parenthetical | Narrow column, lower case | Dialogue |
| Dialogue | Indented column | Action |
| Transition | Pushed to the right margin, capitals | Scene Heading |
The rule is one-directional and only fires when you press Enter on a line with nothing after the caret. If there is still text on the current line, Enter simply splits the line where the caret is and keeps the same block type, because splitting an existing paragraph is not a formatting decision.
Applied and structural rows are not editable in Write Mode. Rows produced by an applied injection (applied notes, script replacements, music notation, board blocks) and page-number rows are locked here. That is deliberate: their text is generated from a box, so it has to be changed in the box, in Edit Mode.
4.3 Slash Commands
To set a block type explicitly, type a forward slash at the start of an empty line. A small menu opens under the line listing the screenplay blocks that match what you type; the command itself is shown beside each one.
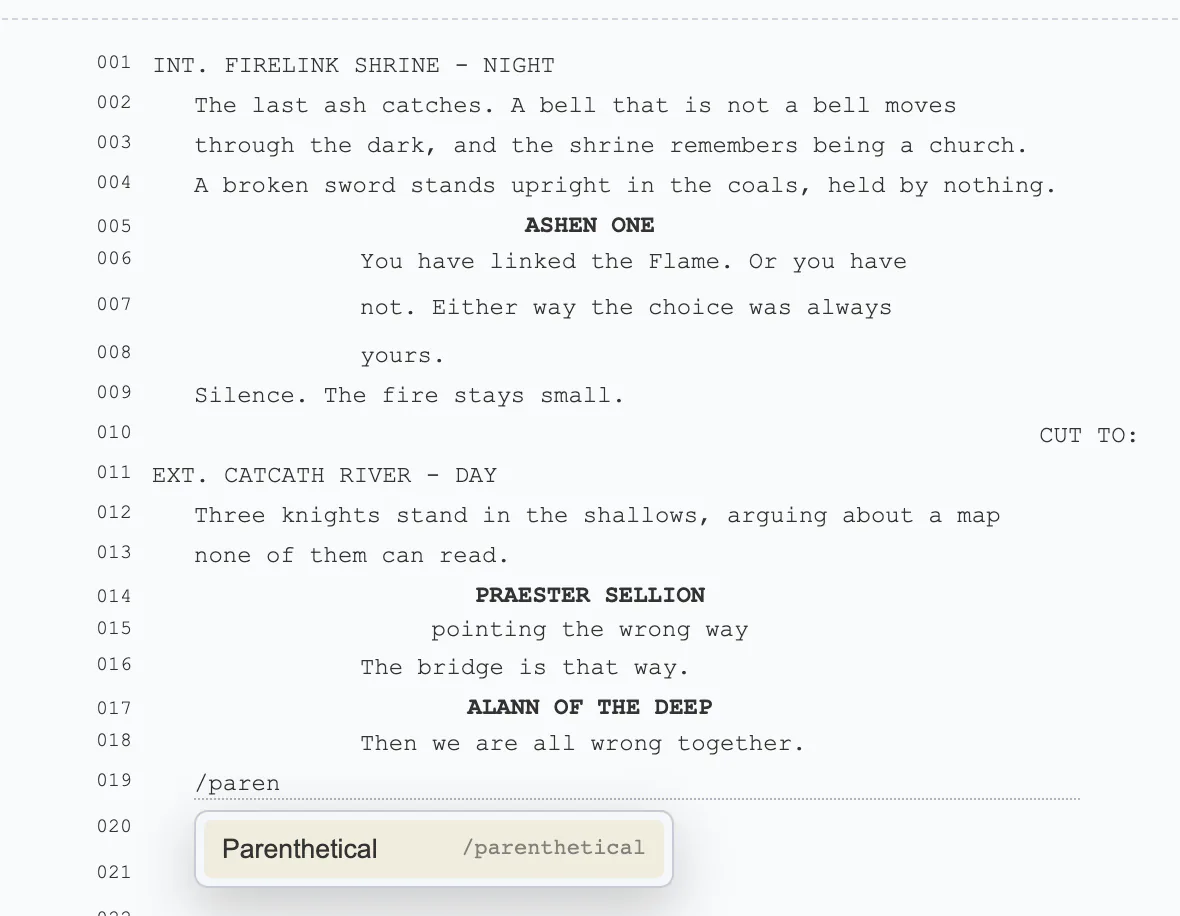
| Command | Also matches | Sets the row to |
|---|---|---|
/scene | /heading, /slug | Scene Heading |
/action | /act | Action |
/character | /char, /role | Character |
/dialogue | /dia | Dialogue |
/parenthetical | /paren | Parenthetical |
/transition | /trans | Transition |
- Arrow keys move through the list, Enter applies the highlighted block, Esc closes the menu without changing anything.
- Applying a command clears the slash text from the row and leaves the caret ready in the new block — you never have to delete the command yourself.
- If nothing matches what you typed, the menu closes and your text stays as it is.
4.4 Writing, Splitting & Merging Rows
Write Mode keeps one row equal to one screenplay line, which is what makes line numbers, comment ranges and exports behave. Three automatic behaviours carry the text across rows without you asking:
- Wrapping splits. When a line of action or dialogue grows past the row-width guide, the overflow moves into a new row of the same block type immediately. Rows stay single-line; the guide shows where the cut will happen.
- Enter splits at the caret. Pressing Enter mid-line breaks the row at the caret and pushes everything after it into a new row, which keeps the same block type. Pressing Enter at the end of a line creates the next block instead (see 4.2).
- Backspace merges. With the caret at the very start of a line and nothing selected, Backspace pulls that line's text up into the row above and removes the empty row. The caret lands at the join.
Deleting a whole selection works too: select across several rows and press "Delete" or "Backspace". The selected text is removed, the rows that become empty are cleaned up, and any comments attached to the removed rows are retargeted onto the surviving row rather than lost.
Multi-line breaks inside a block are real breaks, not soft wraps, so a two-line action block stays two numbered rows and survives save, undo and export.
4.5 Selection, Clipboard & Formatting
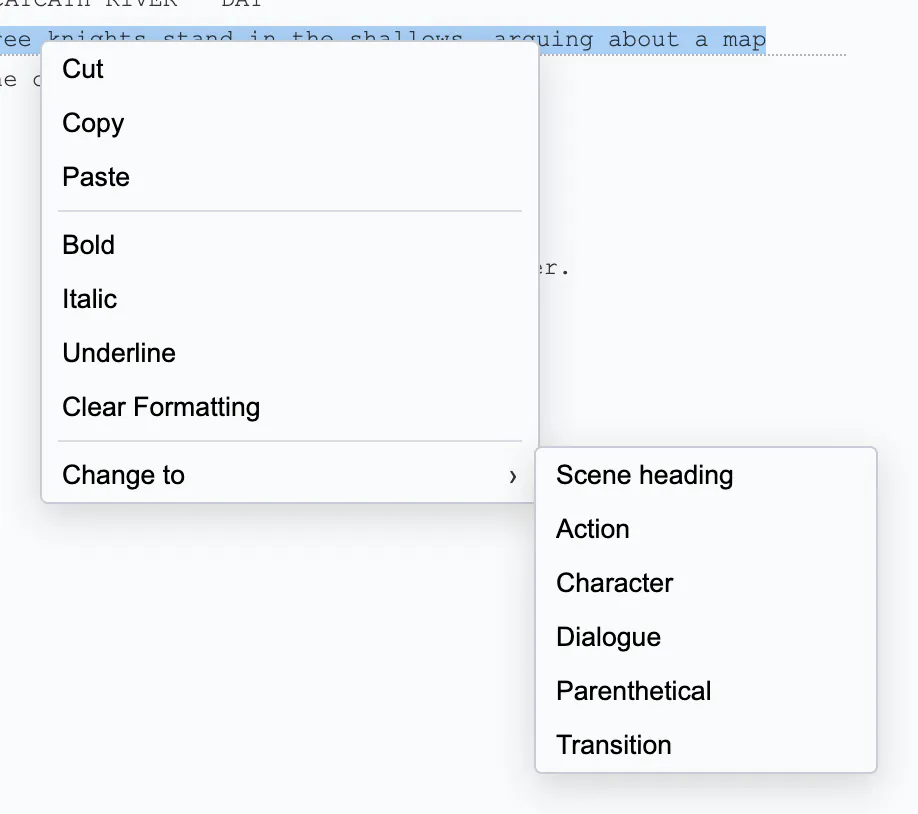
Select text by dragging with the mouse — a drag may cross row boundaries, which is how you grab a whole exchange at once — or with "Shift+Left/Right" inside a line. Right-click to open the Write Mode menu:
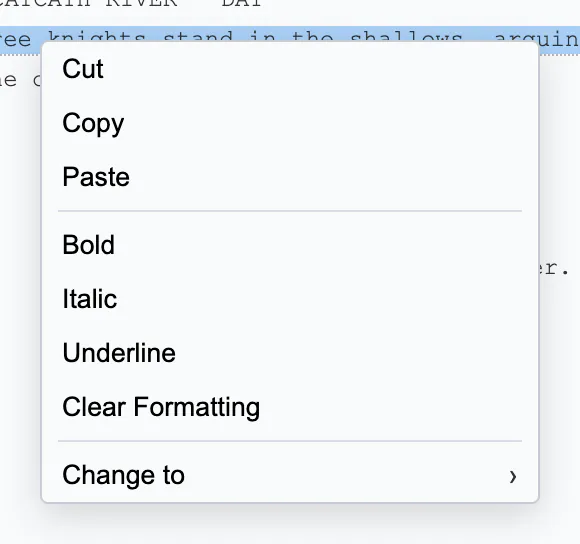
- Cut / Copy / Paste: work across rows. Cut and Copy are greyed out until something is actually selected.
- Bold / Italic / Underline / Clear Formatting: apply to the selection. The same commands are on "Cmd/Ctrl+B", "Cmd/Ctrl+I" and "Cmd/Ctrl+U".
- Change to…: the six screenplay blocks, applied to every row the selection touches. Select three rows of action and choose Character, and all three become character cues.
Formatting is part of the text history: undo after a bold step restores the exact markup it replaced, not just the characters.
4.6 Pages, Undo & Limits
- Pagination. A script page holds 54 text rows. When a split pushes a page over that limit, the overflow moves into the next page and a new page is created if there is no next page yet; when rows are removed, pages re-balance and an emptied page is taken away. Line numbers and page numbers renumber themselves after every change.
- Undo and redo. "Cmd/Ctrl+Z" and "Cmd/Ctrl+Shift+Z" (or "Cmd/Ctrl+Y") cover both kinds of change in one history: text inside a row, and structure between rows (splits, merges, block-type changes, selection deletes, page re-balancing). Undoing a split puts the original row back as one line; redoing it splits it again.
- What Write Mode does not do. It does not add or edit injections, and the Archive is disabled while you are in it — nothing is deleted by hand here, so there is nothing to recover. Switch to Edit Mode for boxes, comments, highlights and row surgery. Event Notes keep their sleeve and graph position while you write; if you delete rows they are attached to, they are reported as needing attention rather than silently vanishing.
- The row-length guide. The dotted rule at the end of an action row shows the screenplay width. Turn it off under Settings → Appearance → Write mode row-length guide.
5. Read Mode
Read Mode is a specialized locked read-only state designed for distraction-free review, table reads, and navigation. Script text and injections are set to read-only, preventing accidental edits while you scroll or present. Editing UI elements such as "Add Injection" buttons are hidden for a cleaner view.
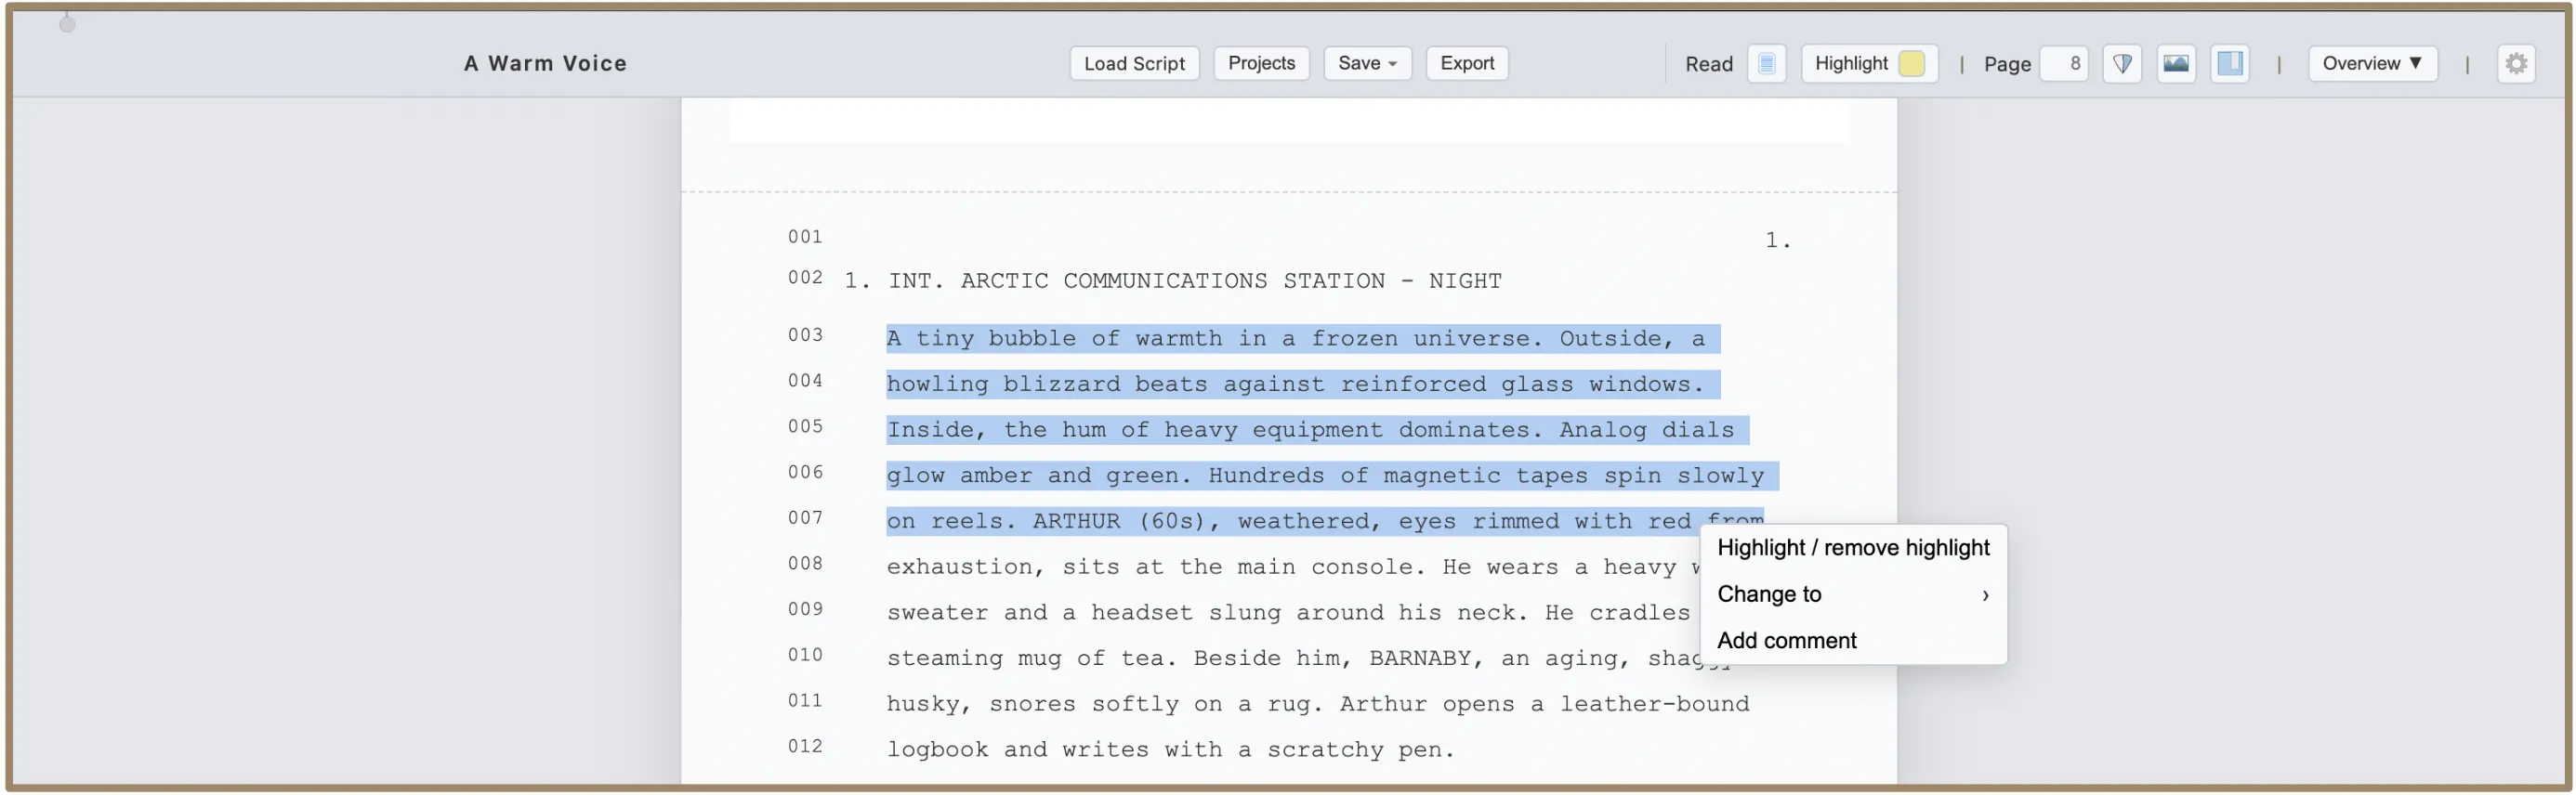
In Read Mode, you can still interact with the script for review purposes. Select any text and right-click to open the context menu with a list of available actions:
- Highlighting
- Change Line Type (Change to…)
- Commenting
Note: The text context menu is mode-specific. In Read Mode it offers Highlight, Change Line Type and Comment; in Write Mode it offers the clipboard and formatting commands described in 4.5; in Edit Mode, right-clicking a row number opens the row menu (add row, add injection, delete row).
5.1 Highlight
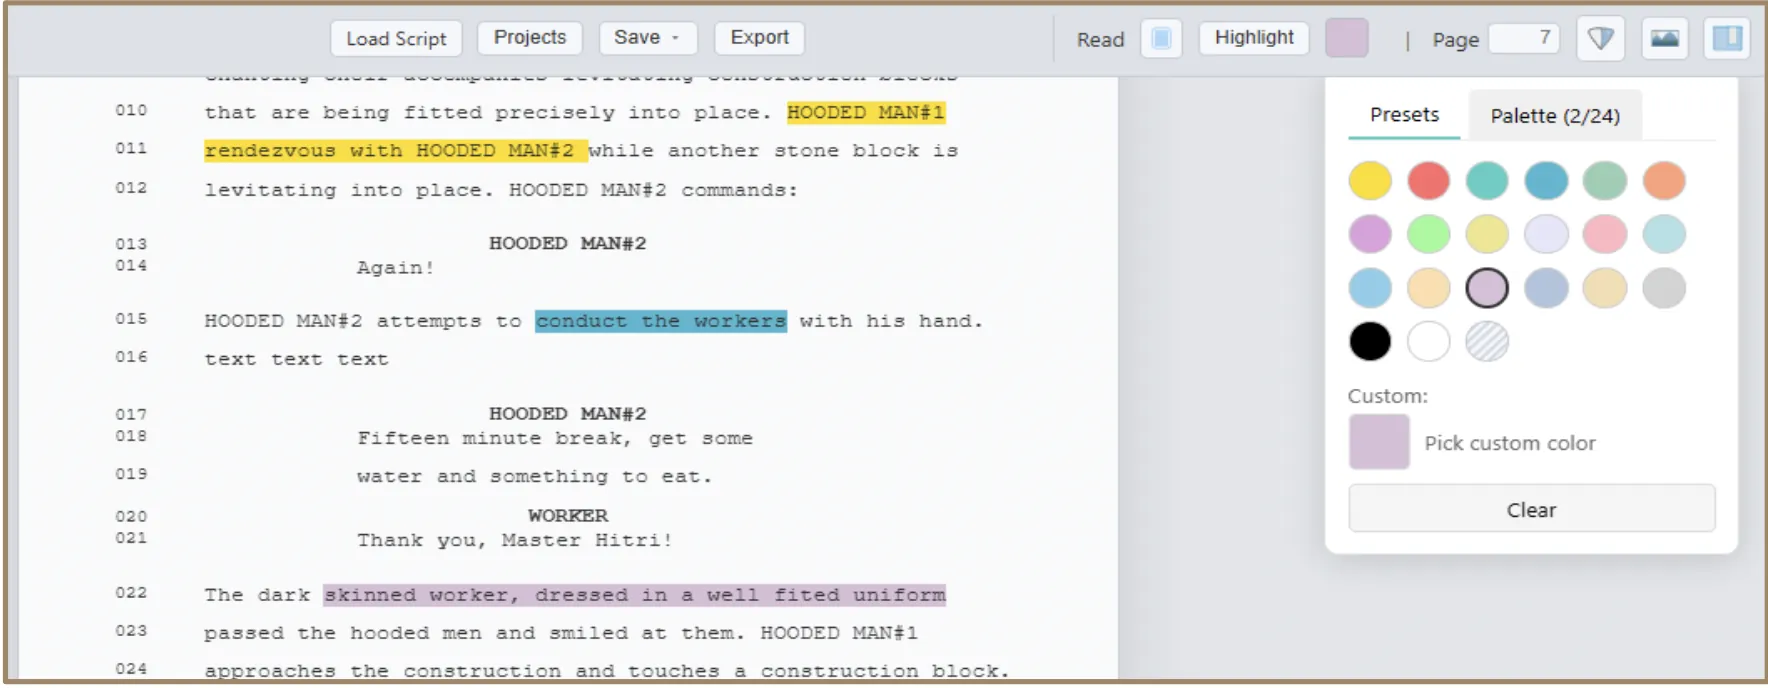
The software includes a robust highlighting system to help you mark important passages, track character arcs, or note production requirements.
Ways to Apply and Remove Highlights
- Shortcut: Select text and press the "H" key to toggle highlight on or off instantly.
- Context Menu: Right-click any selected text and choose "Highlight / remove highlight" from the menu.
- Toolbar: Select the text, click the Color Swatch button in the top toolbar, and choose a color to apply.
- Clear: Open the Color Swatch and click the "Clear" button to remove highlights from the selected range.
Color Customization
Click the Color Swatch button to open the Color Picker:
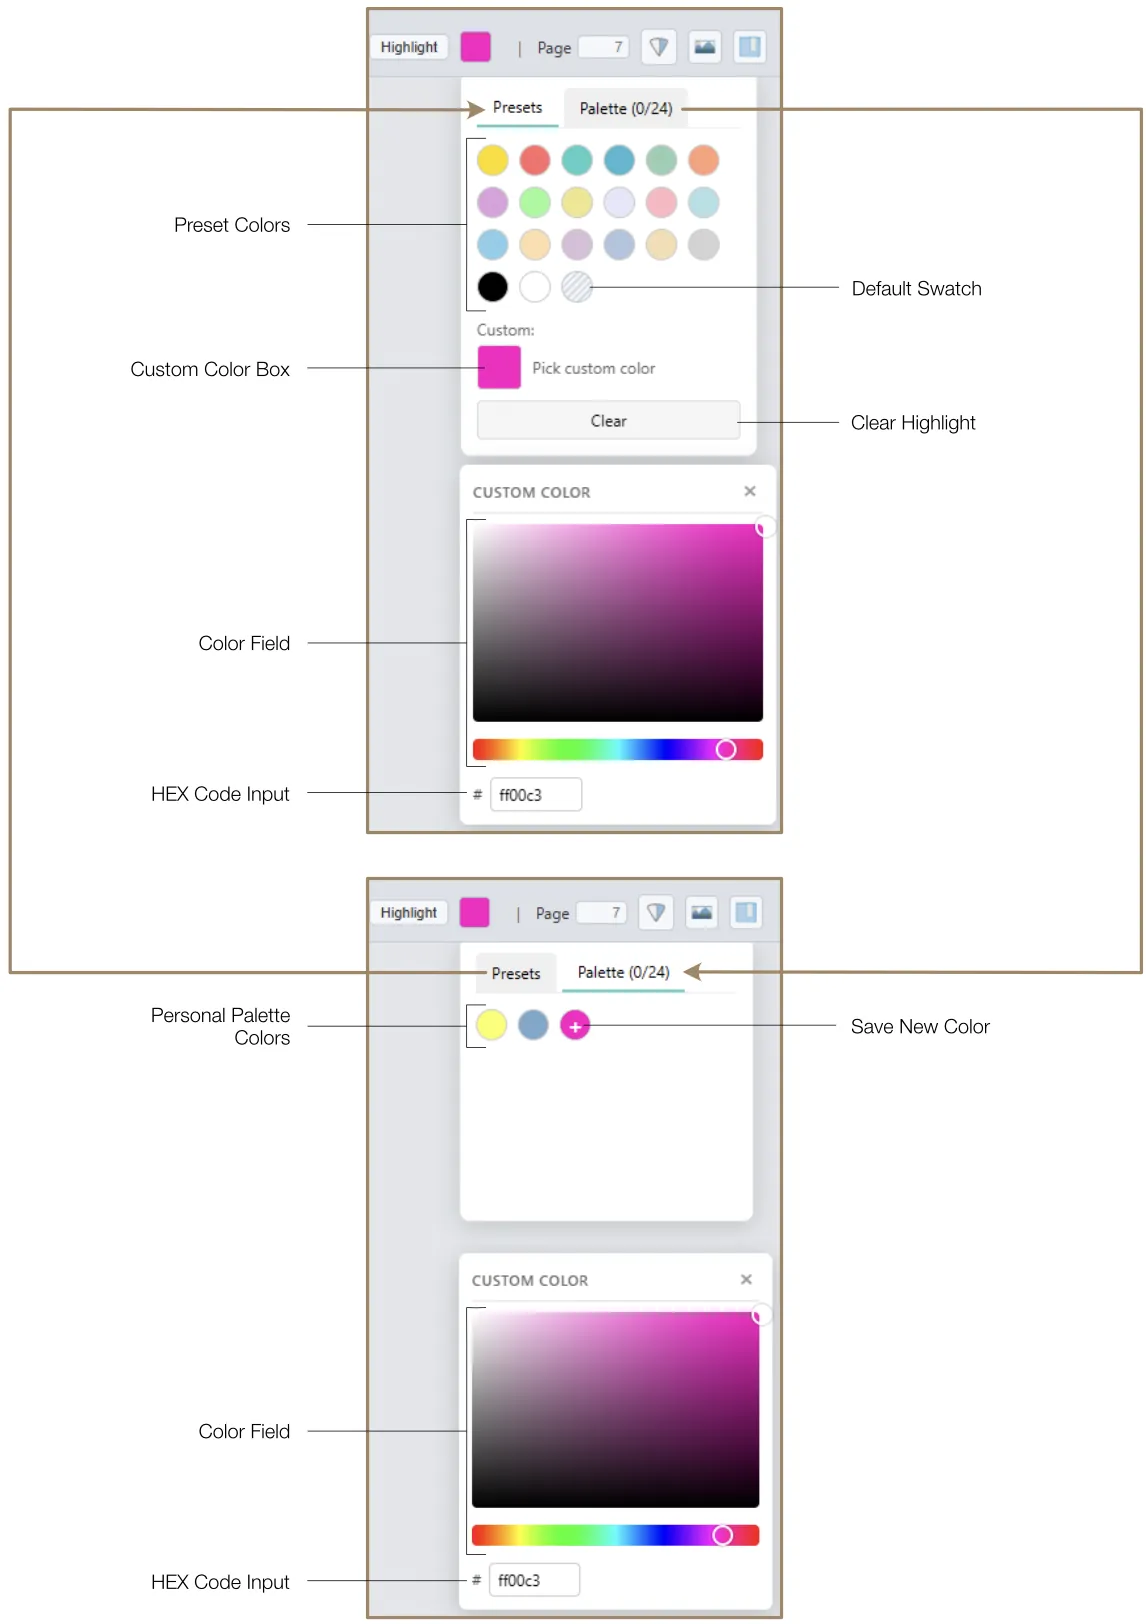
- Presets: A grid of standard production colors for quick selection.
- Default Swatch: Reset to the standard highlight color at any time using the textured Default Swatch.
- Custom Color: Select the Custom Color box and use the HSB Color Field to pick any specific hue. You can also enter precise HEX codes for consistent branding or production coding.
- Personal Palette: Save your favorite colors to your Personal Palette (up to 24 slots). Select a custom color, click the "Palette" tab, then click the "+" icon to save. Colors are saved to your profile and persist across sessions.
5.2 Change Line Types (Change to…)
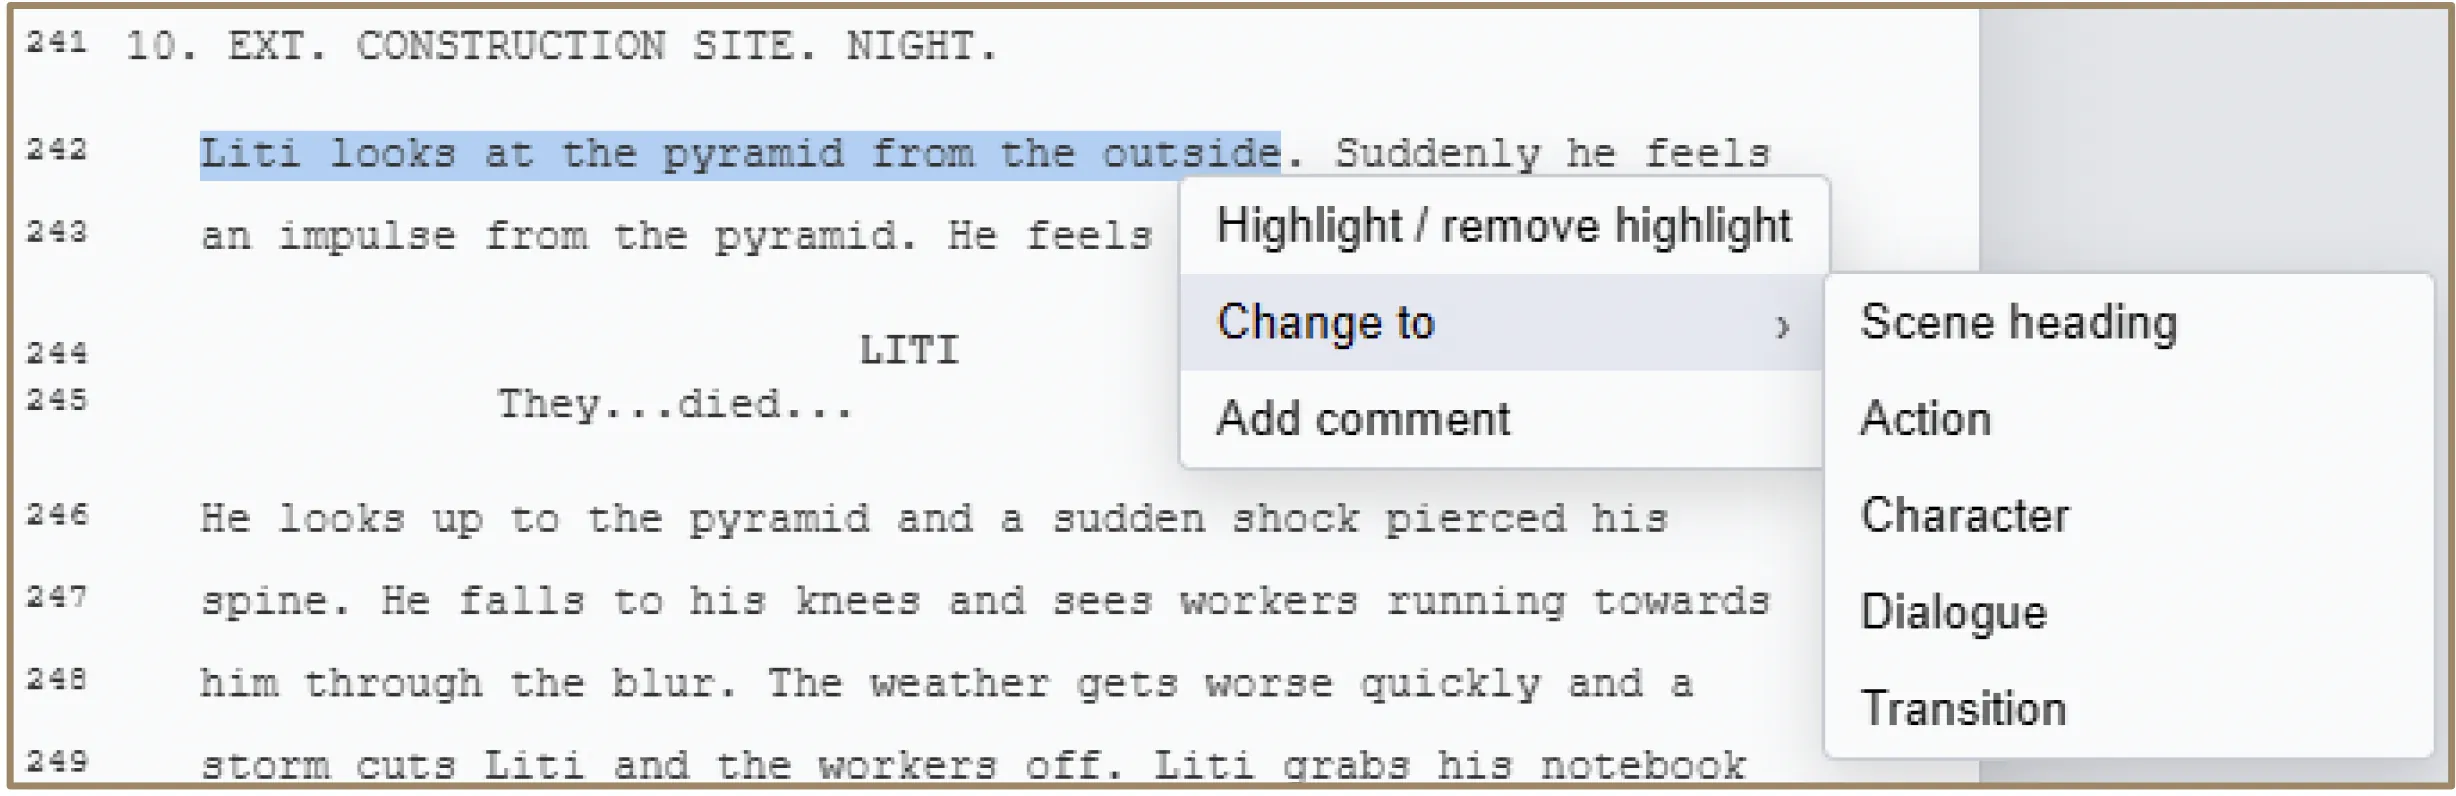
The software uses an intelligent screenplay parser to identify Scene Headings, Action, Characters, Dialogue, and Transitions. If a line is misidentified or you need to restructure a scene, you can manually reclassify any line.
How to Change Line Type
- Click and drag to select the text you want to change, then right-click.
- In the context menu, click "Change to". Choose the desired classification from the submenu:
- Scene Heading: For location and time-of-day markers.
- Action: For descriptive physical movements and scene descriptions.
- Character: To identify who is speaking.
- Dialogue: For the spoken words of a character.
- Transition: For markers like "CUT TO:" or "FADE OUT."
Intelligent Reflow
When you change the type of multiple lines, the software performs an Intelligent Reflow:
- Sequential lines converted to the same type may be merged into a single cohesive paragraph.
- The margins and indentation will be automatically adjusted to match the new type's screenplay standards.
- Line numbers will be automatically recalculated and updated throughout the script.
5.3 Comments
The software features a powerful commenting system that allows you to provide feedback, suggestions, and production notes directly on the script without altering the original text.
How to Add a Comment
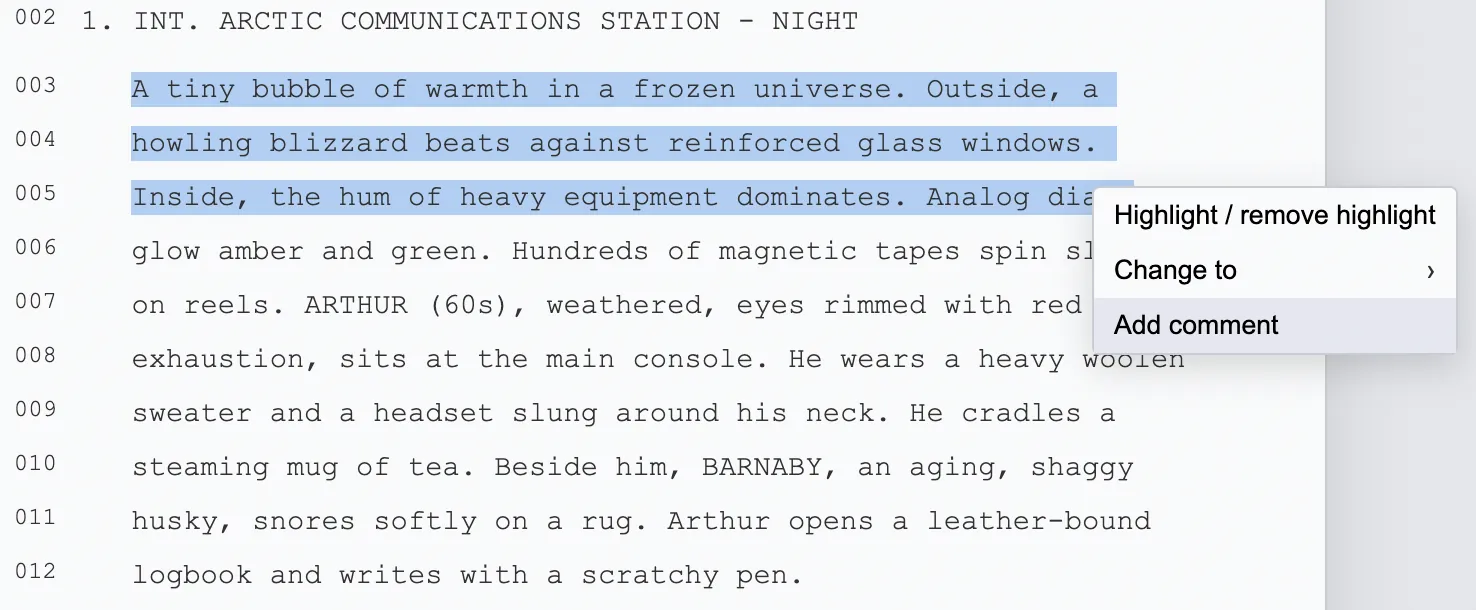
- Click and drag to select the specific passage of the script you wish to comment on.
- Right-click to open the context menu on your selection and choose "Add Comment".
- The Comment Window will open, showing the line numbers of the quoted text, the quoted text, formatting tools (Bold, Italic, Underline), and the field for your comment.
- Click "Save Comment" to add it to the project.
Every comment is automatically tagged with the name and color of the active Profile. This allows teams to track who made which suggestion.
Viewing and Managing Comments
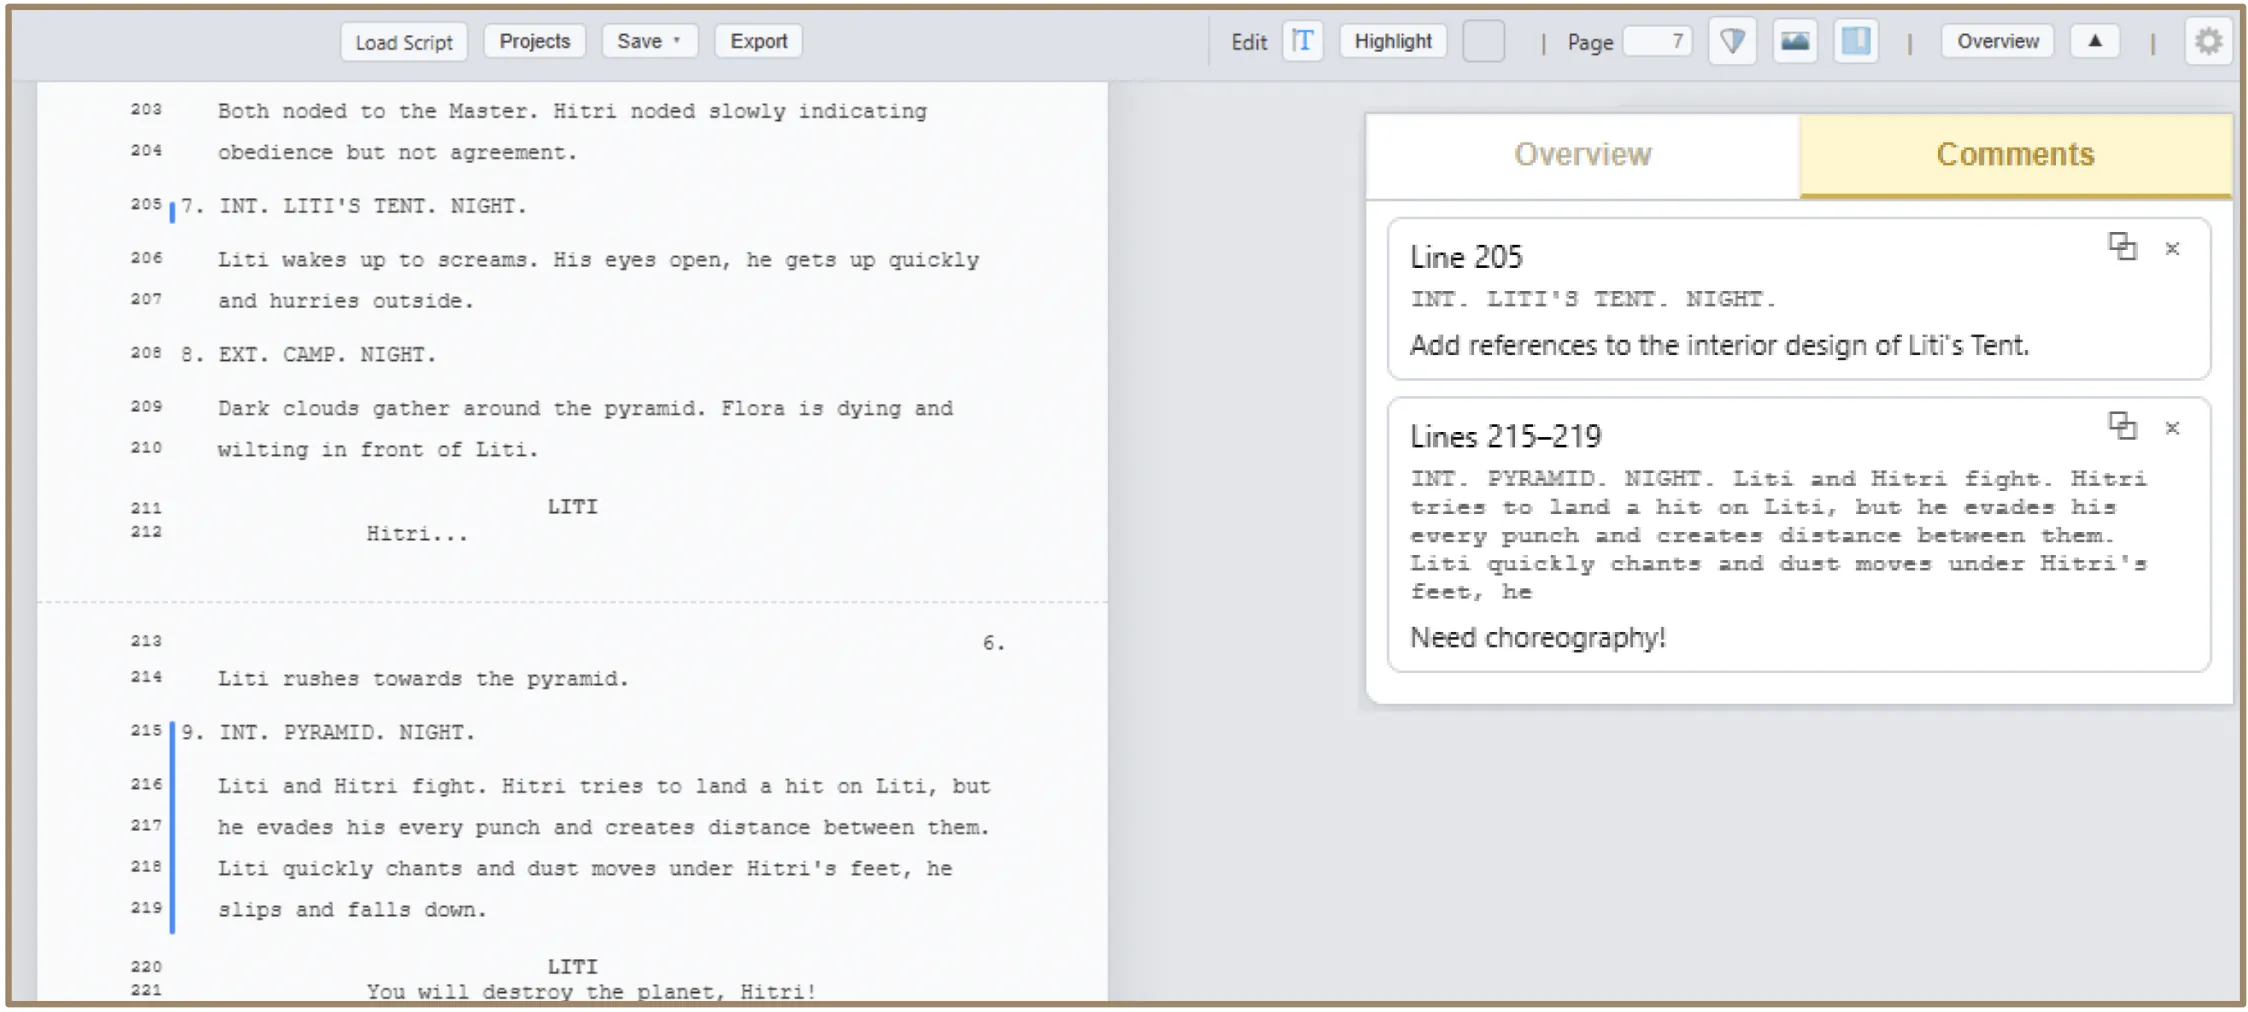
Once a comment is added, it is visible in two main areas:
- Overview > Comment Tab: All comments appear as cards with the line number(s), the quoted text, and your comment.
- Comment bars in script: Vertical color-coded bars appear in the left margin next to commented lines. The color can be changed in Profile Settings.
To scroll the script to the commented passage immediately, click any comment card in the Overview > Comment tab. To open and edit a comment, Ctrl+Click (or Cmd+Click on Mac) any vertical comment bar, or click the Expand Comment icon on the comment card. To delete a comment, click the Delete icon on the comment card.
Note: Only the author of a comment can edit its text or delete it.
6. Edit Mode
Edit Mode is the software's production workspace, designed for structuring and enriching a project you have already drafted. It is where a screenplay becomes a multi-dimensional project: technical and visual planning sitting alongside the dialogue and action. For writing new pages, see 4. Write Mode.
In this mode, the software is organized into two main functional groups: Injections and Script Changes.
- Injections: Modular containers injected directly into the flow of your script, holding both textual and non-textual assets (e.g., storyboards, musical scores, production tables).
- Script Changes: Direct interactions with the screenplay text. You can adjust dialogue and action, manage structure, insert or delete rows, and the editor handles professional script formatting automatically.
6.1 Injections: General Information
Injections are modular containers positioned between the lines of your script. They hold supplemental information that supports the scene without cluttering the primary screenplay text.
Add Injection
There are two primary ways to insert a new injection:
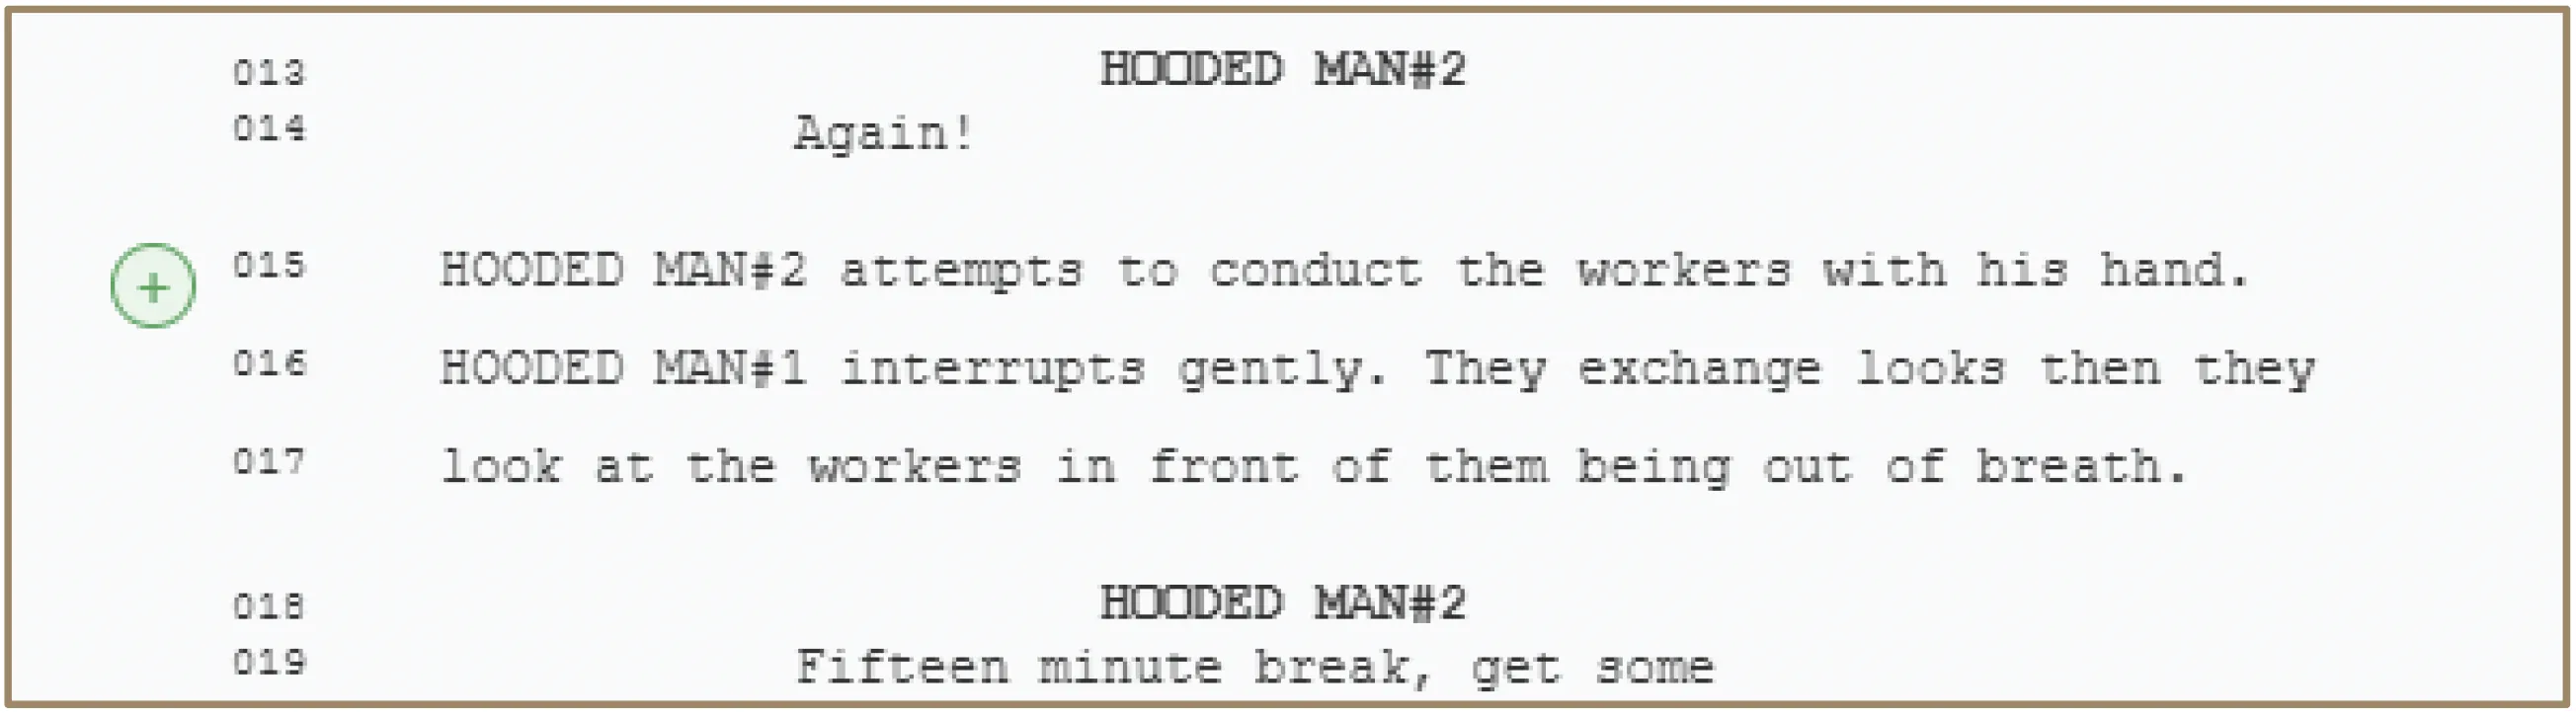
- Plus Icon (+): Hover the cursor between any two lines of the script. A small "+" icon appears in the margin. Clicking it instantly creates a new injection box at that location. The injection box is added on a new line below the selected line; the following lines are reorganized accordingly.
Injection Types
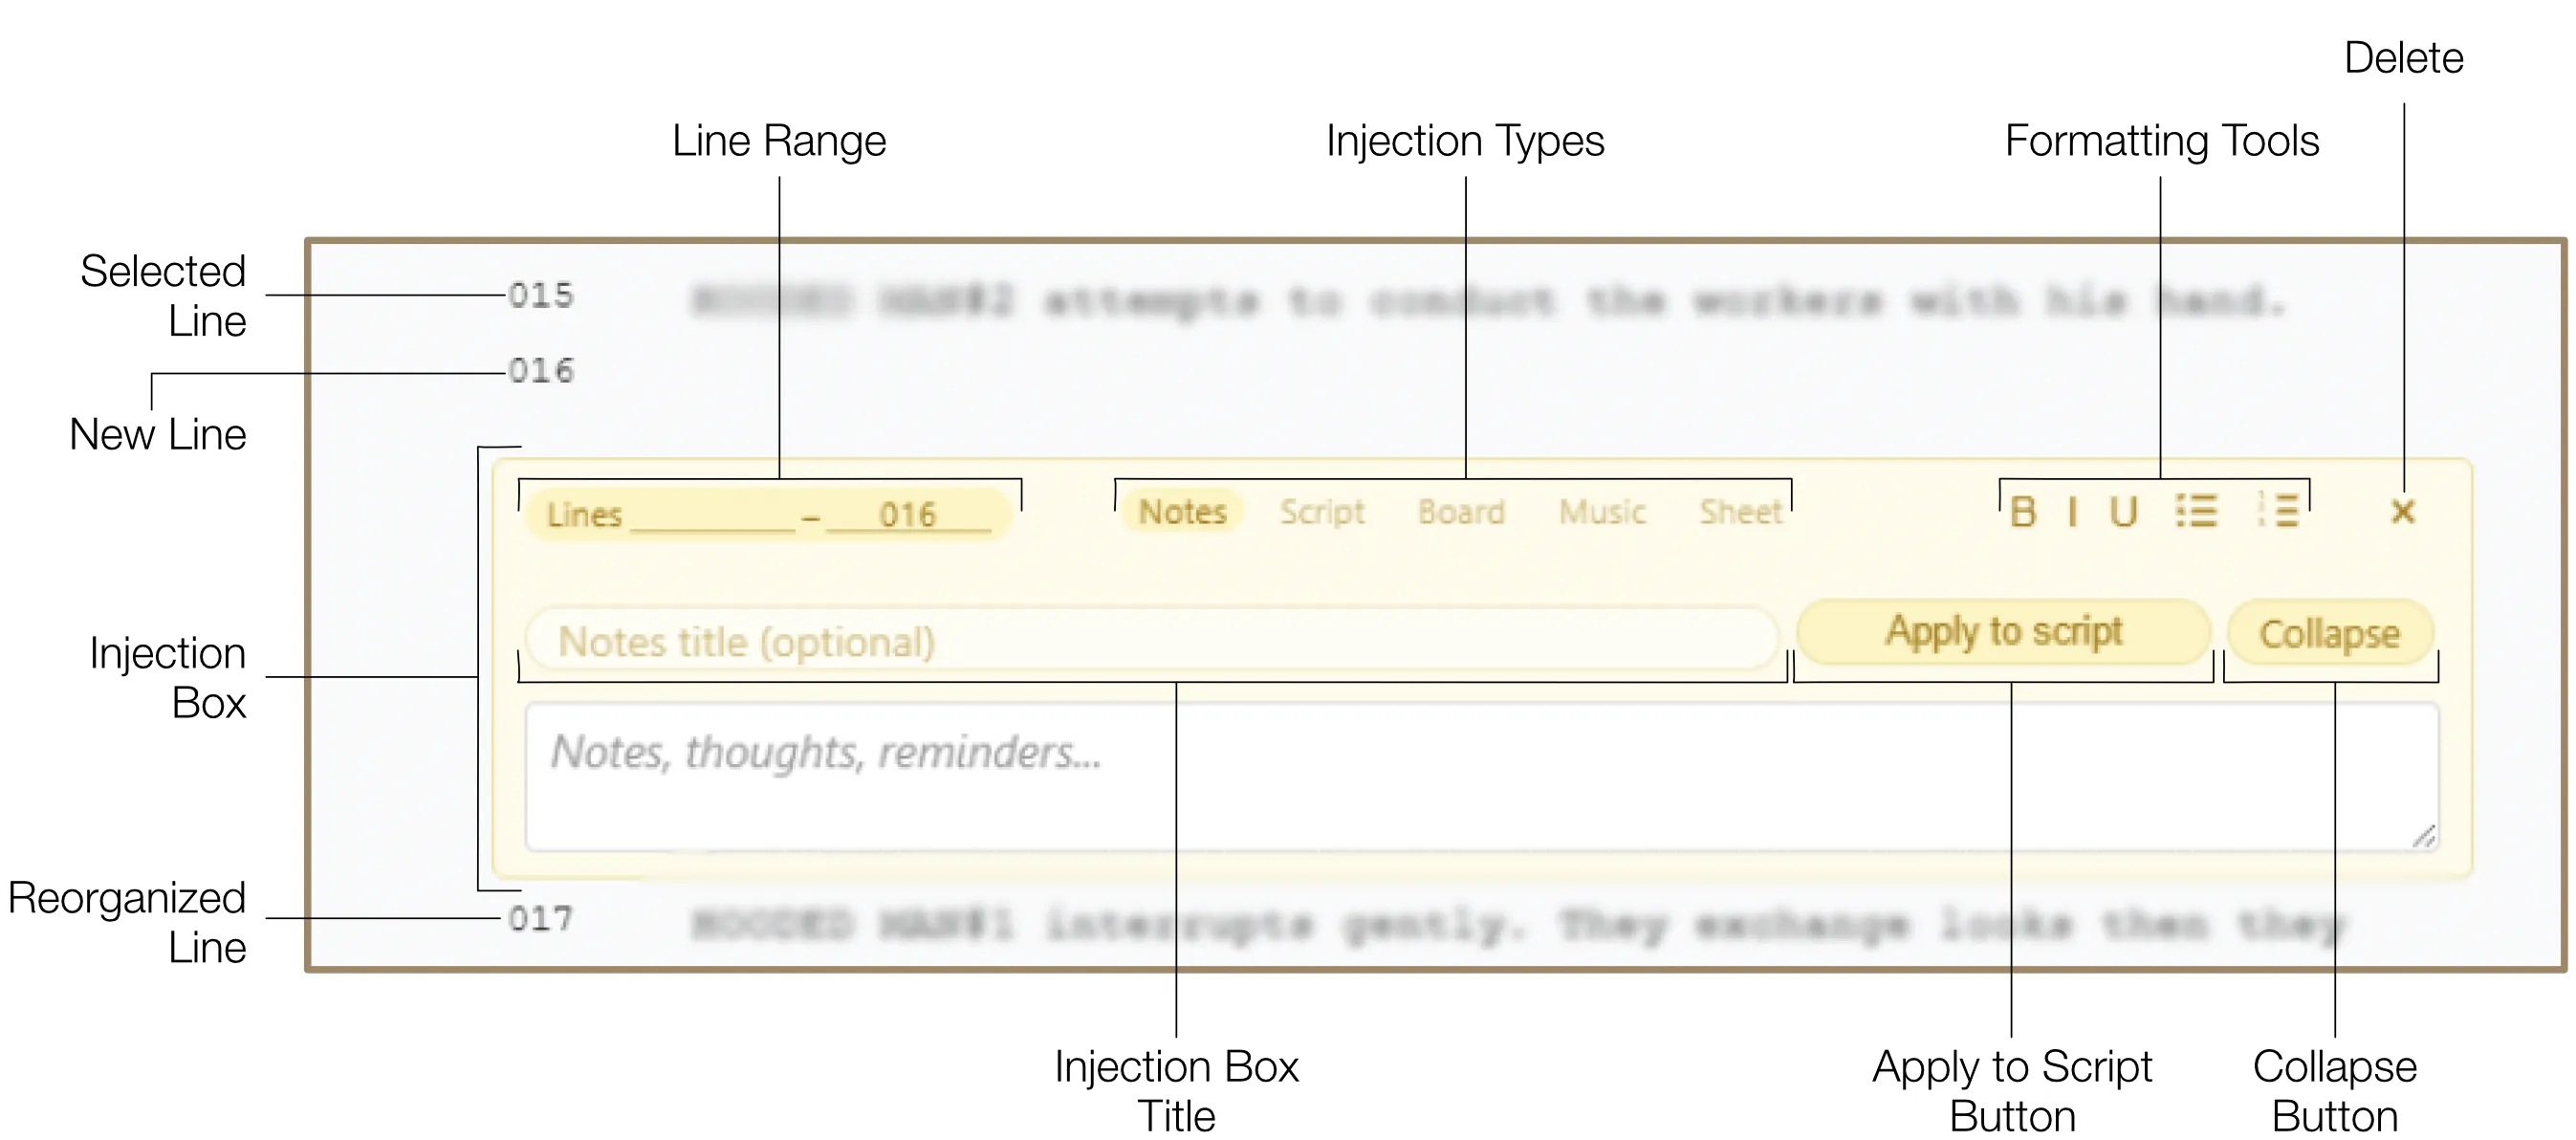
Injections can be switched between five specialized types via tabs at the top: Notes, Script, Board, Music, and Sheet. Each type is tailored to distinct tasks with unique functionalities.
General Settings
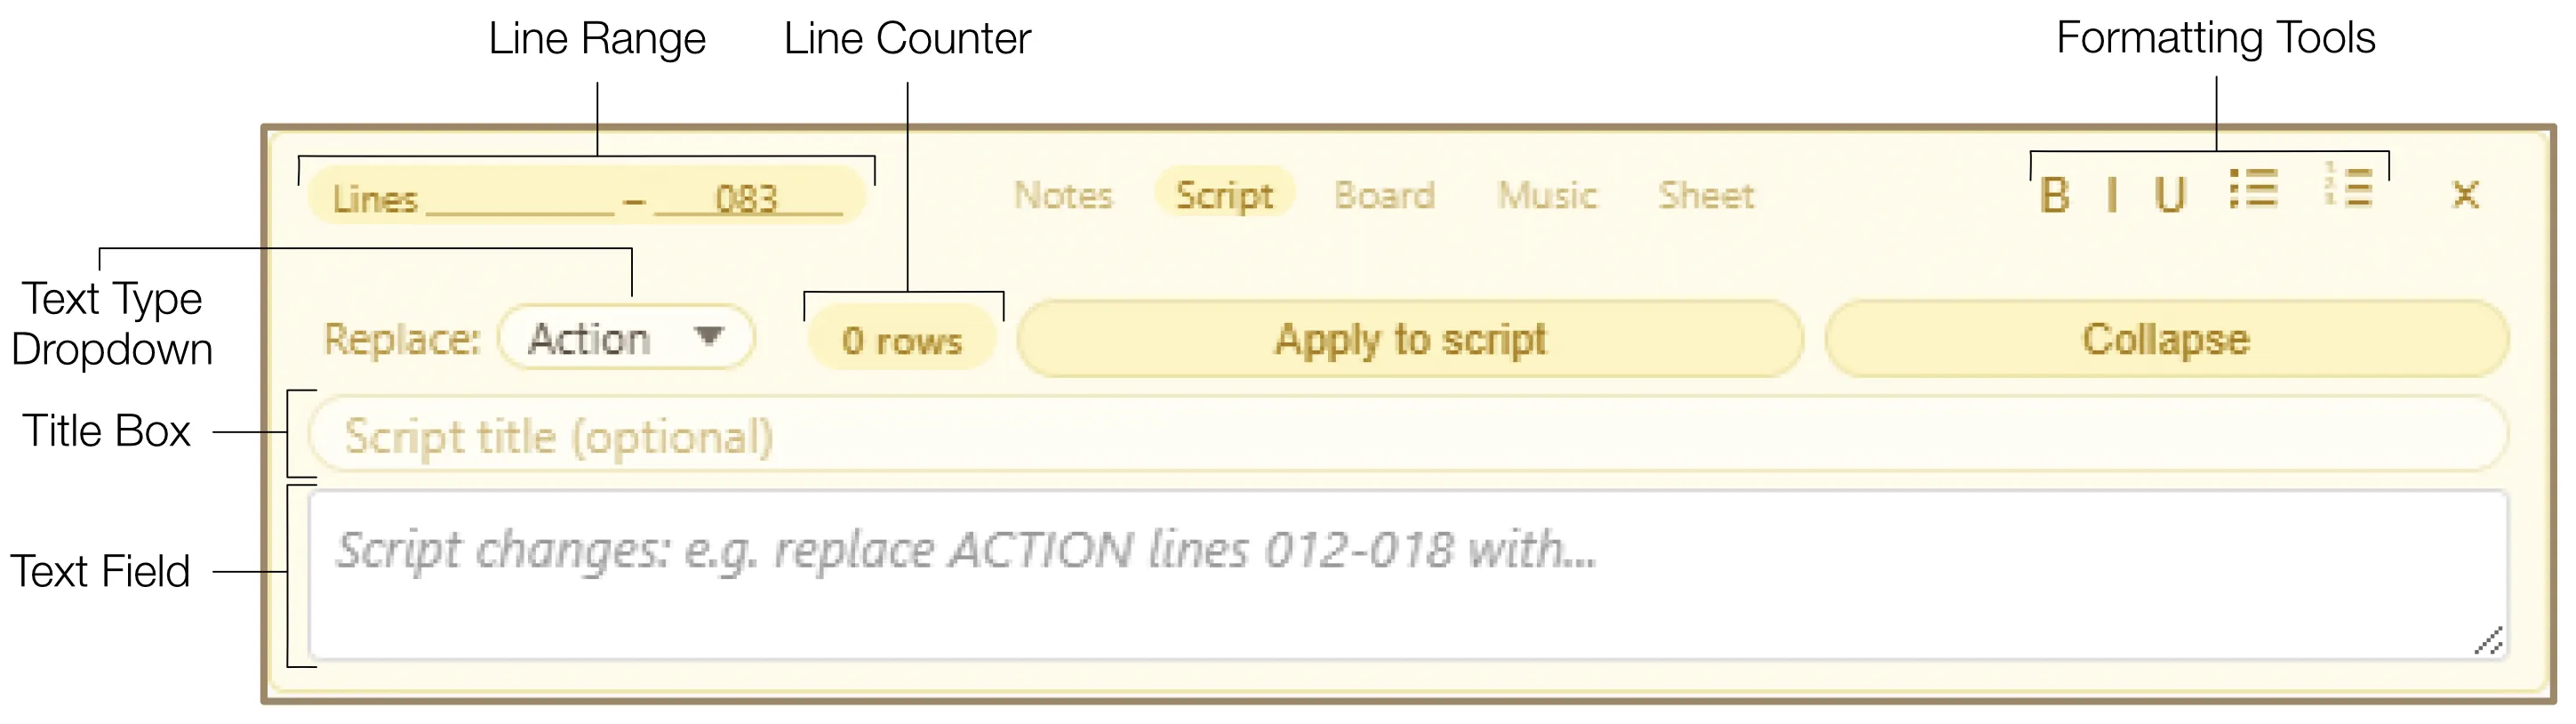
- Line Range: This field is visible across all injection types but is only functional when the injection is set to Script mode — there you can enter a "from" and "to" row number (for example, from row 010 to row 016) to replace those specific rows inside the script. For all other injection types this field has no effect; the applied content is placed in a newly created row directly above the injection box instead.
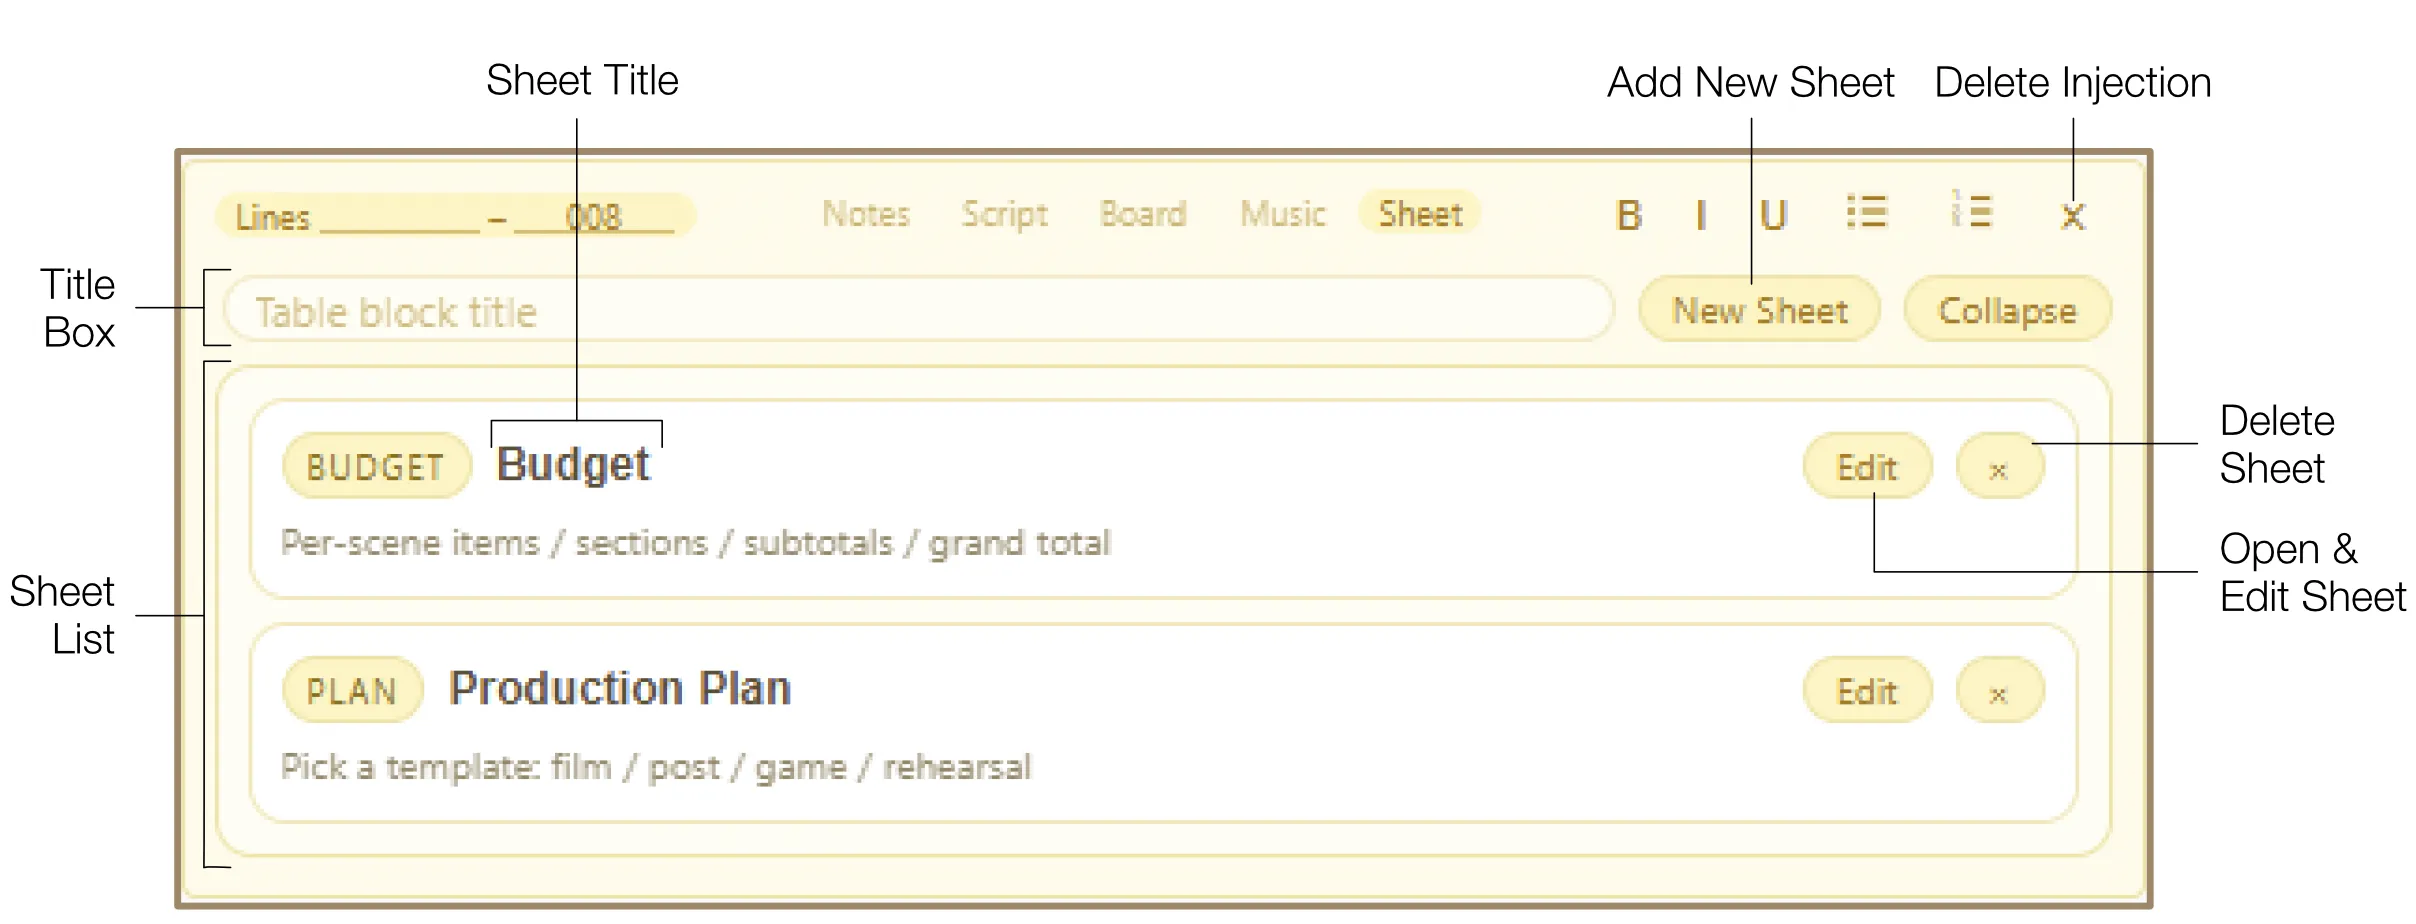
- Title Box: Optionally give your injection a title for better organization and collapsed view navigation.
- Collapse / Expand: Click the Collapse button to save vertical space. A collapsed injection appears as a yellow bar showing the title and type. Click "Edit" on the bar to expand it back.
- Apply to Script: Click the "Apply to Script" button to save the injection contents to the script. Special case: Sheet injection cannot be applied to the script because of its large size.
- Delete: Click the Delete icon to remove an injection box. If the Delete Safeguard is active, hold the button for 2.5 seconds to confirm. Deleted injections remain available in the Archive.
6.2 Script Changes
This functional group covers all direct interactions with the screenplay text. Edit Mode gives you full authority over the content and architecture of your script, from writing dialogue to managing the sequence of rows.
Manual Row Management
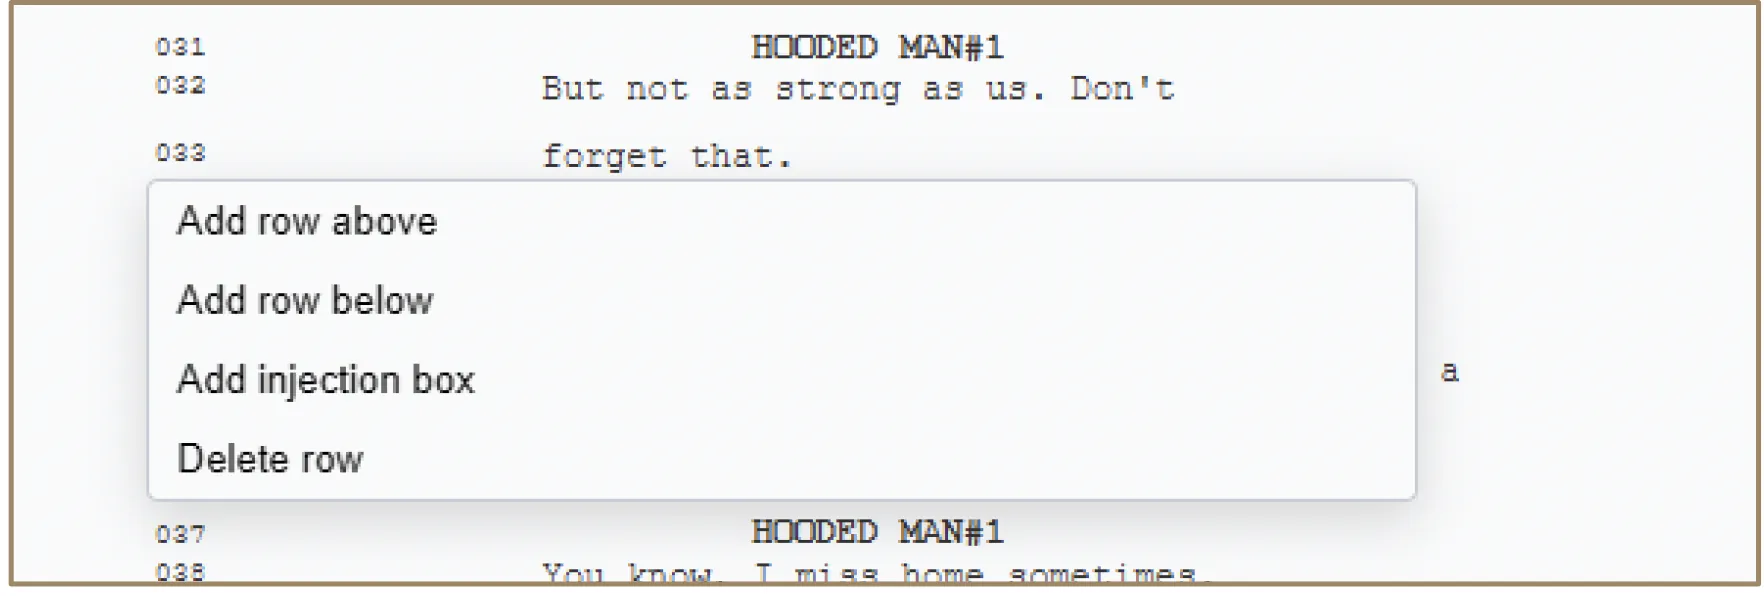
You can manually alter the structure of your script using the Context Menu, accessible by right-clicking any line number in the gutter:
- Insert Row Above / Below: Quickly add empty rows to expand a scene or insert new beats.
- Delete Row: Remove unwanted lines. The Delete Safeguard requires you to hold the "Delete row" button for 2.5 seconds. You can deactivate it by toggling the Safeguard icon in the top toolbar.
Whenever rows are added or removed, the entire script is instantly renumbered to maintain a perfect chronological sequence.
Direct Corrections
To write in lines directly, click any line and start typing. Use the Up Arrow and Down Arrow keys to jump between script rows while maintaining your horizontal cursor position. The software calculates and applies the correct margins and spacing rules for different text types, maintaining industry standard formatting throughout the document. Changes to Scene Headings are updated live in the project Overview.
This function is designed for small corrections affecting one line at a time. For larger changes, use the Script injection. To change text types, use the Script injection's Text Type dropdown or the Read Mode context menu.
7. Injection Boxes
Injection boxes are modular containers positioned between the lines of your script. They are designed to hold supplemental information that supports the scene without cluttering the primary screenplay text. Each injection box can be collapsed to a compact bar showing its title and type, helping you keep the workspace tidy while preserving access to rich production data.
There are five specialized injection types, each tailored to a distinct production task:
Note on Line Range: The "from" and "to" row field (for example, from row 010 to row 016) is visible across all injection types but is only functional when the injection is set to Script mode. Only Script can replace specific rows inside the script using this range. For Notes, Music, and Board injections this field has no effect — their applied content is placed in a newly created row directly above the injection box instead.
7.1 Notes Injection
The Notes injection is a flexible, rich-text workspace designed for brainstorming, research, and general reminders. It serves as a creative scratchpad embedded directly within the script's flow. Applied notes appear in italics with a distinct background color and can be color-coded using the Color Dot marker for easy categorization (e.g., set design vs. actor cues). The same text can instead be applied as an Event Note, which lives beside the script rather than inside it.
7.2 Script Injection
The Script injection is a powerful drafting tool for experimenting with alternative versions of a scene. This is the only injection type where the "from" and "to" row field works — you specify exactly which rows of the script should be replaced (for example, from row 010 to row 016) and write your new version in the text field. The software automatically counts how many rows are needed and applies industry-standard formatting. Replaced rows are tagged with a reference to the source injection and moved to the Archive for safety.
7.3 Board Injection
The Board injection provides a professional interface for integrating visual references, storyboards, and videos directly into the script's chronological flow. You can upload images (JPEG, PNG, SVG) and videos (MP4, MOV), add existing assets from the Project Gallery, or create your own sketches using the built-in drawing tools. When applied, the visuals appear in single, reel, or grid layout.
7.4 Music Injection
The Music injection is a musical composition and playback tool integrated directly into the script editor. You can upload MP3 and WAV files, record live MIDI performances using a virtual or physical keyboard, or type music notation manually using abbreviations and shortcuts. Music boxes can be connected in sequence or parallel, and applied to the script as notation or as an audio waveform player.
7.5 Sheet Injection
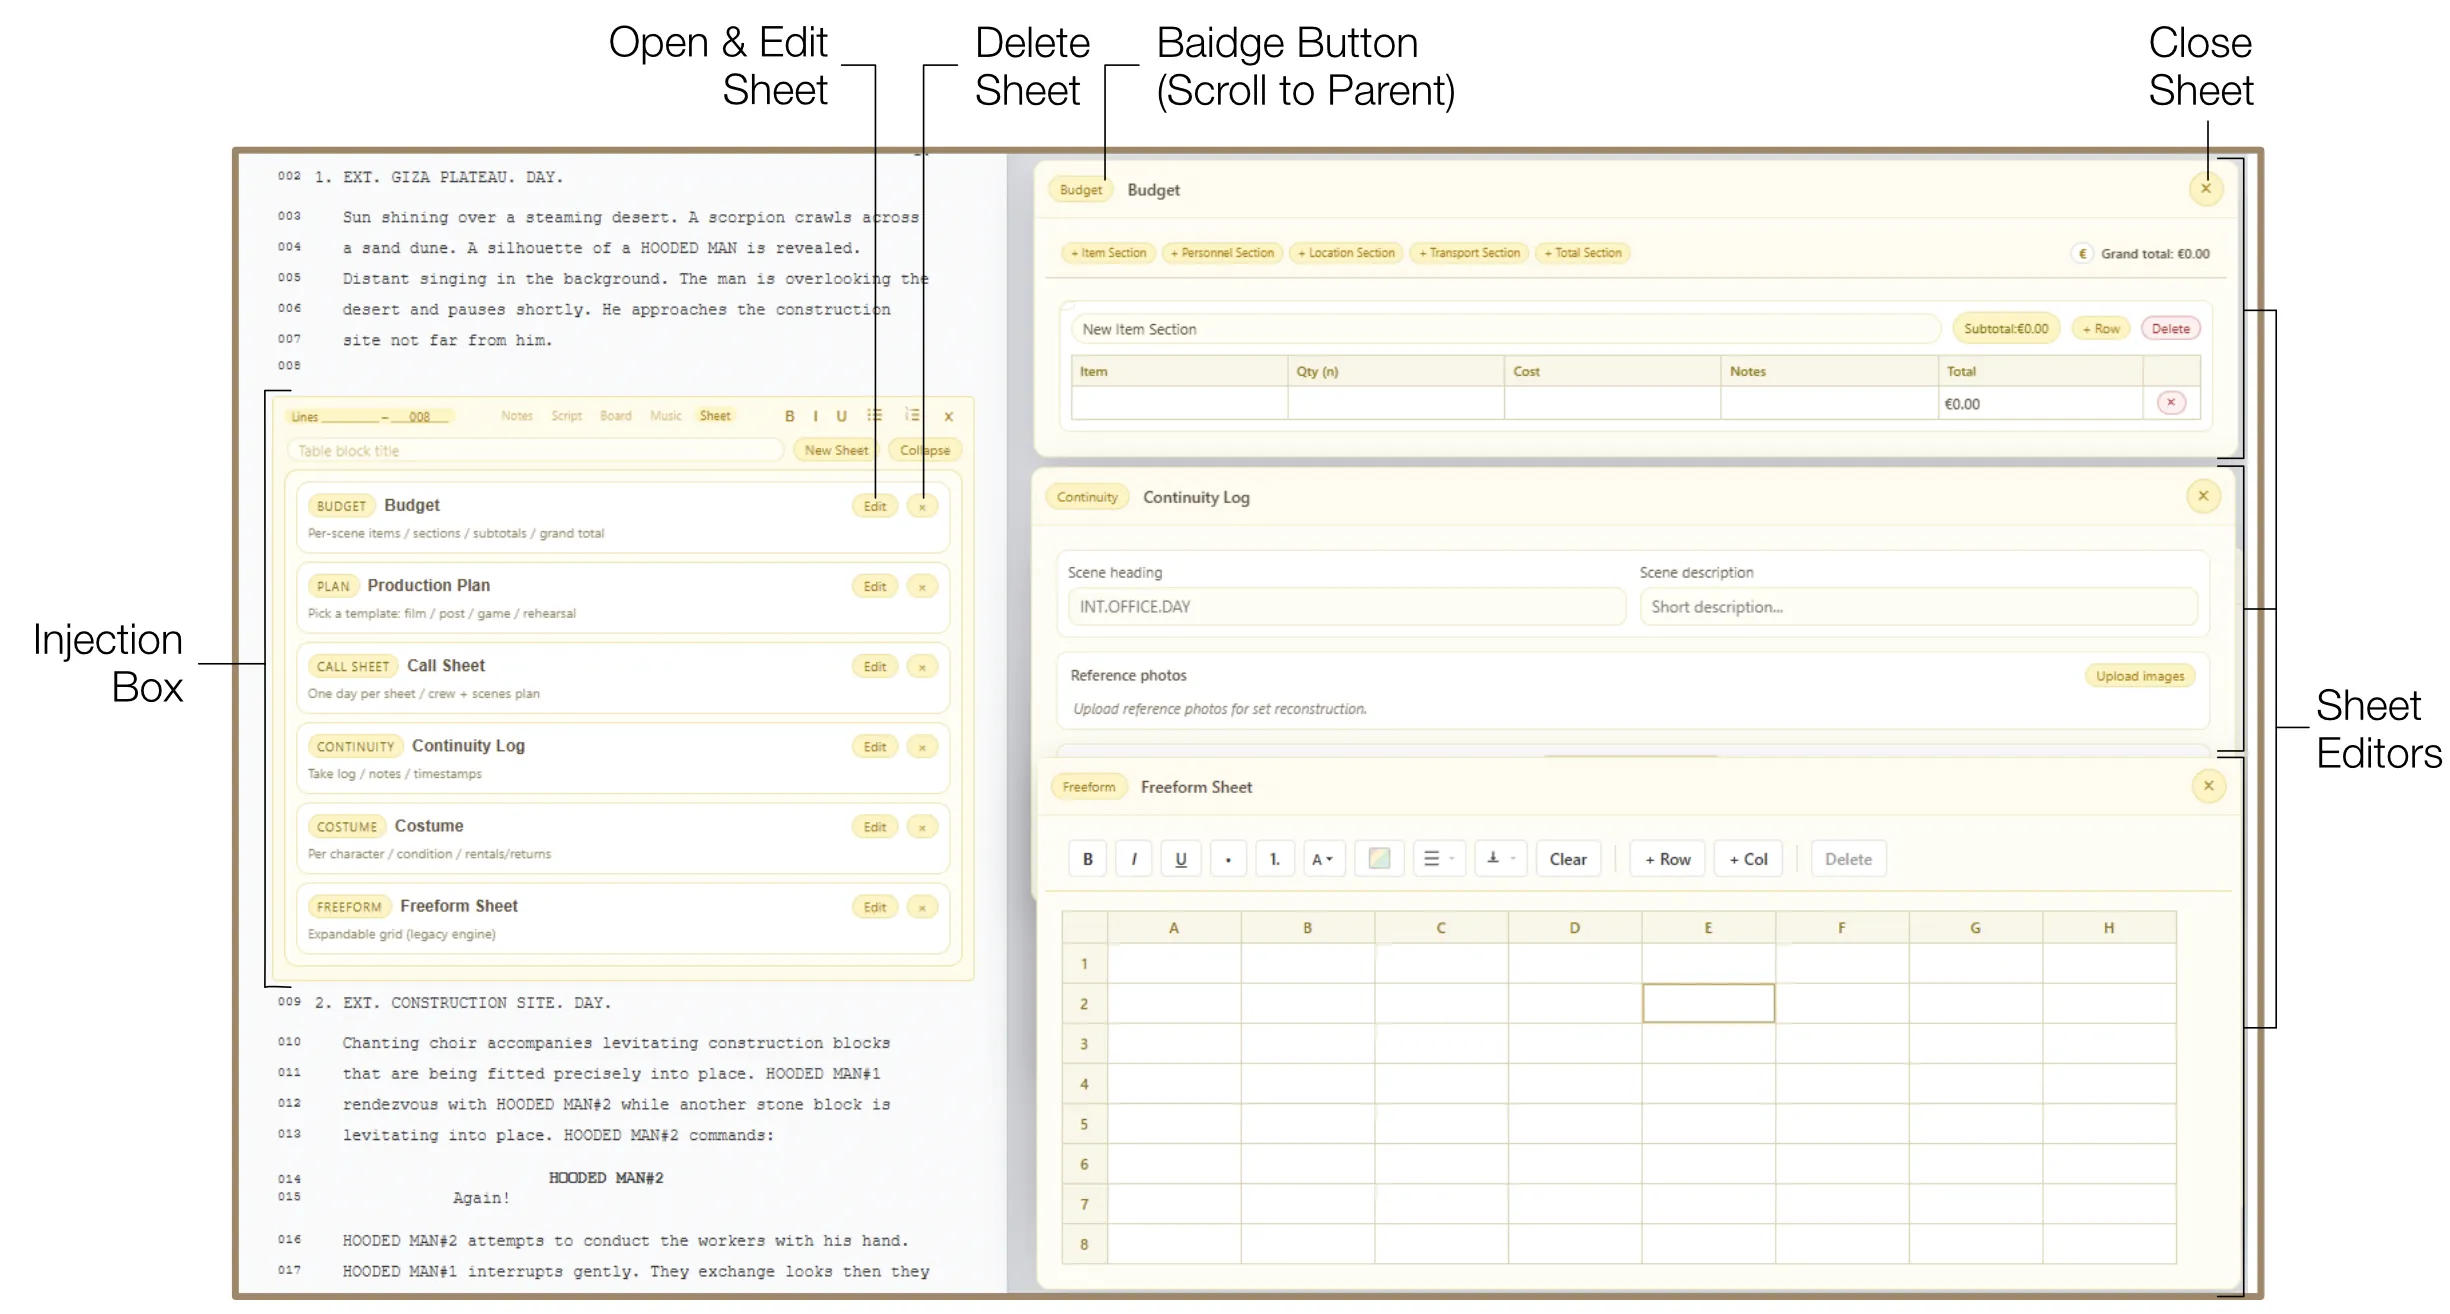
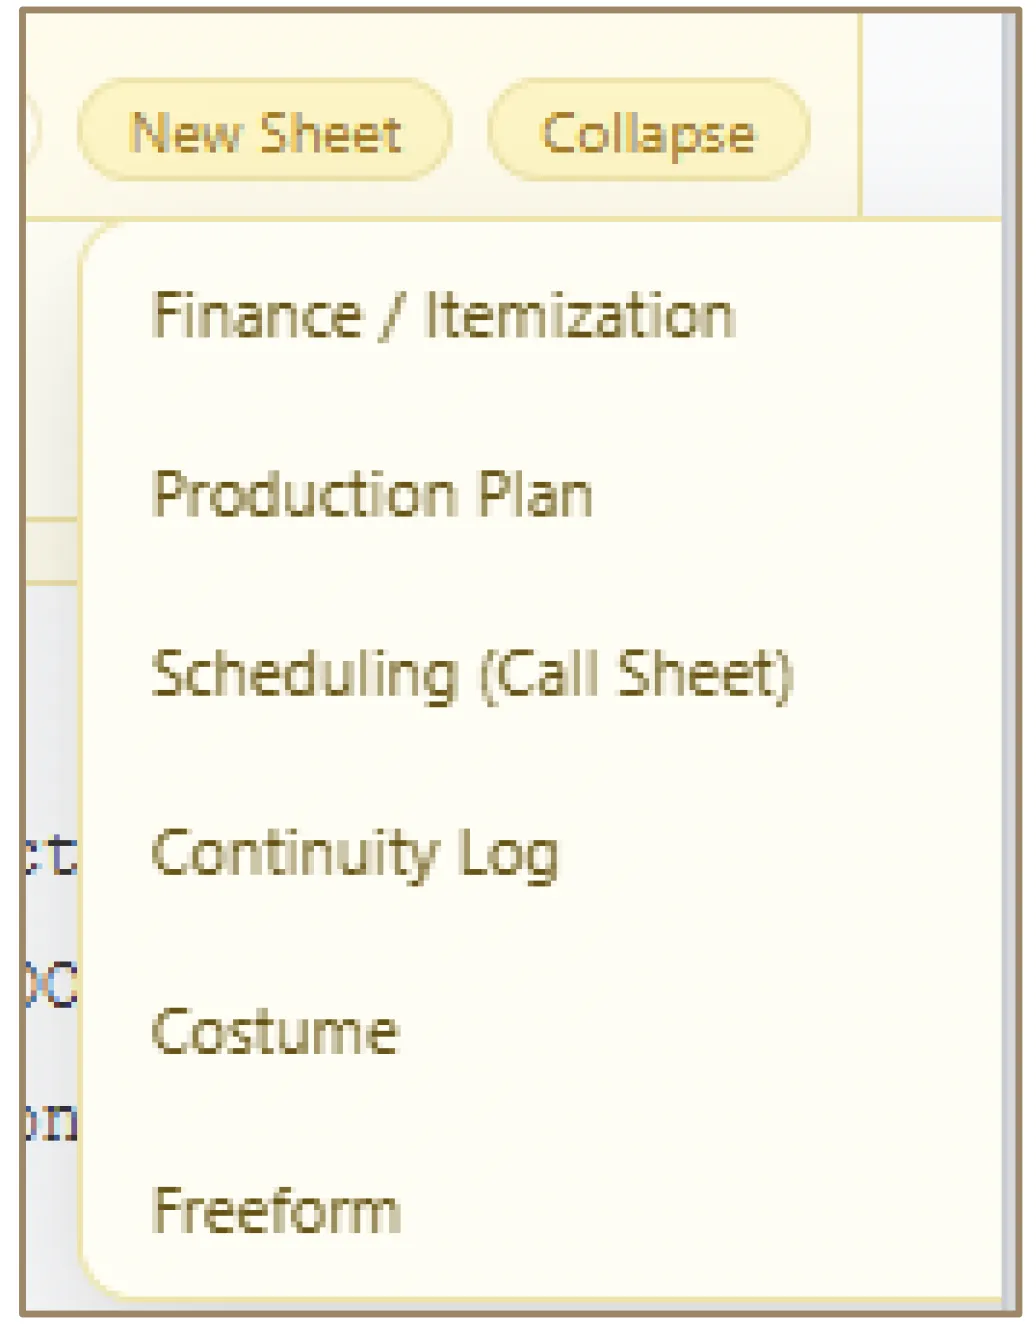
The Sheet injection provides a professional, structured workspace for spreadsheet management directly within your project. It supports six specialized spreadsheet types: Budget, Production Plan, Scheduling (Call Sheet), Continuity Log, Costume, and Freeform. Unlike other injection types, Sheet injections cannot be applied to the script because of their size; instead, data is exported in CSV or PDF format.
8. Notes Injection
The Notes injection is a flexible, rich-text workspace designed for brainstorming, research, and general reminders that support your writing process. It serves as a creative scratchpad embedded directly within the script's flow without being part of the screenplay.
8.1 Adding Notes
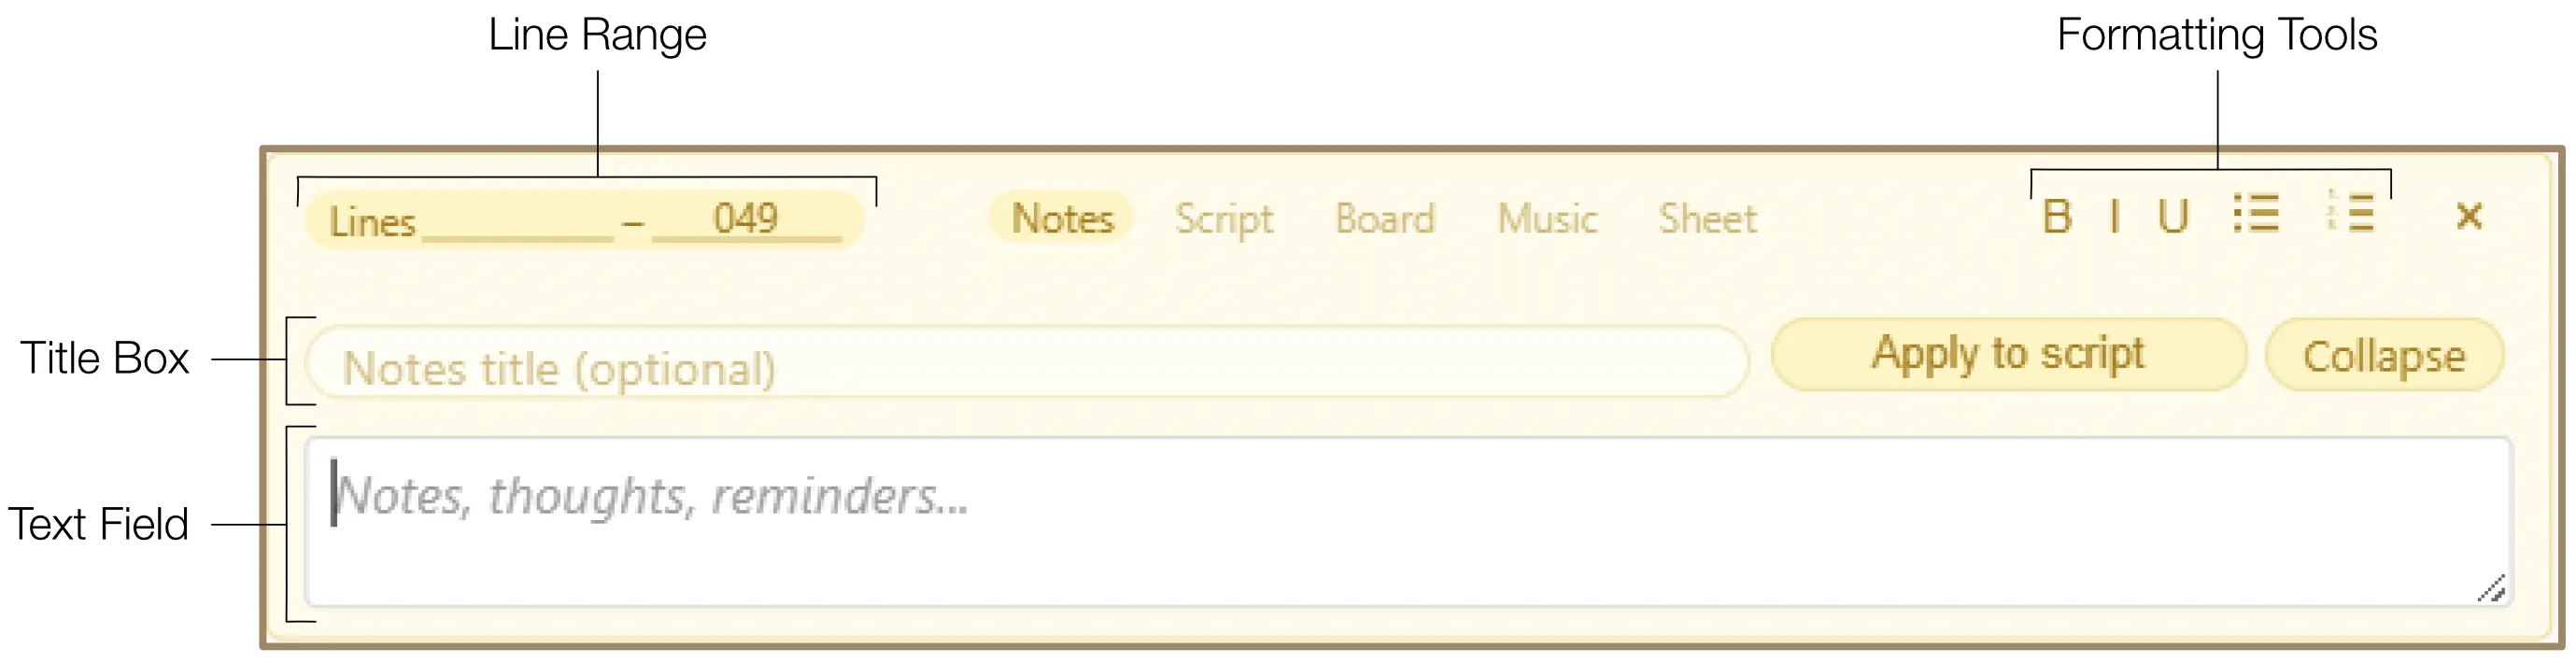
Type your notes, thoughts, and reminders into the Text Field. The notes area includes a dedicated toolbar for styling text with Bold, Italic, and Underline formatting. You can also organize your thoughts using Bulleted or Numbered Lists for better clarity.
8.2 Applying Notes to Script
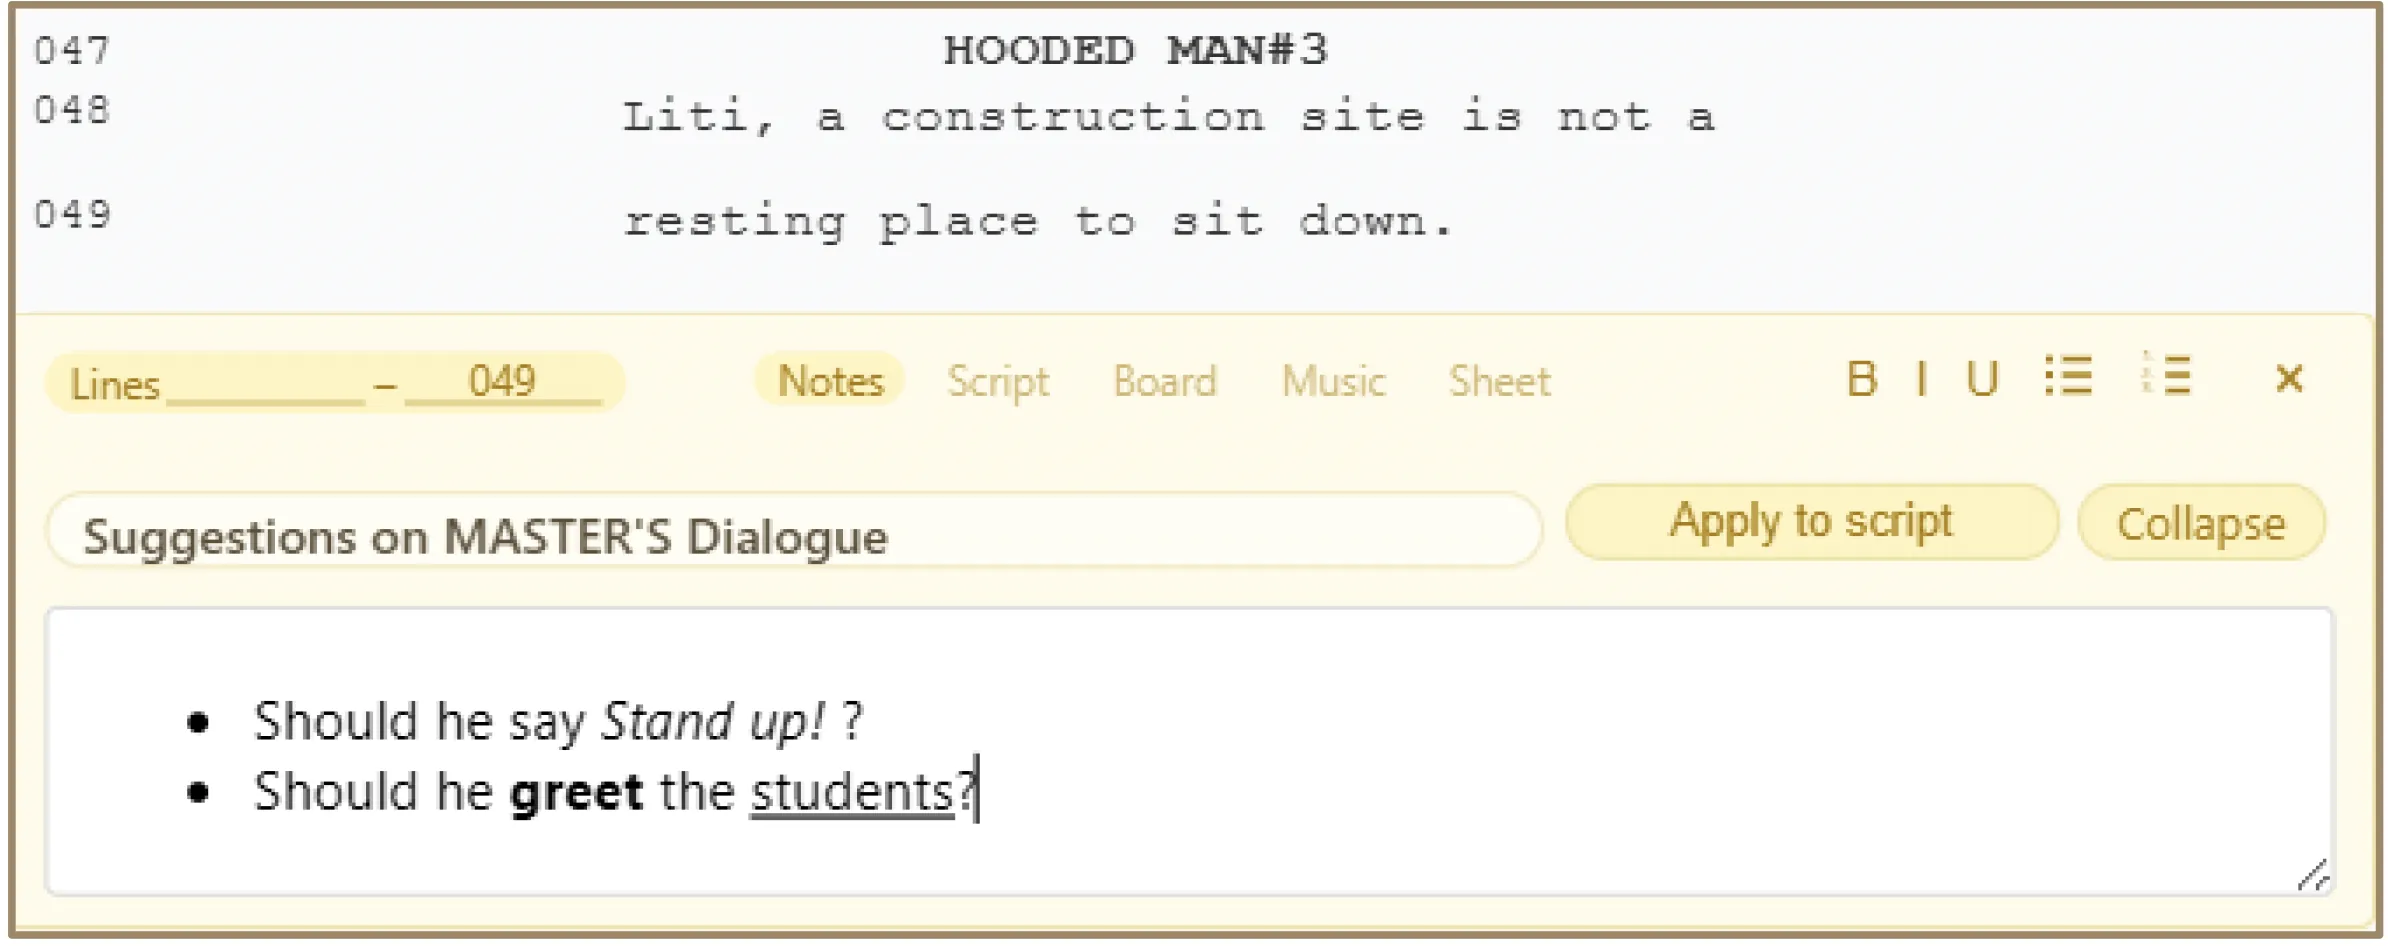
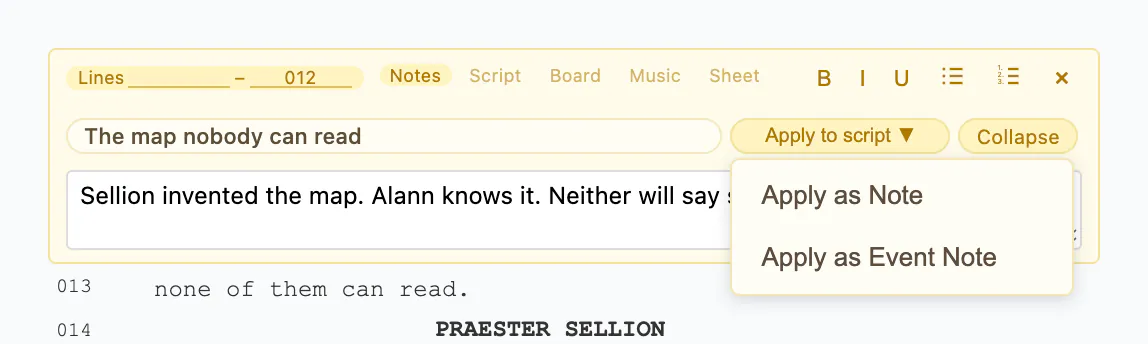
"Apply to script" is a dropdown with two destinations for the same text:
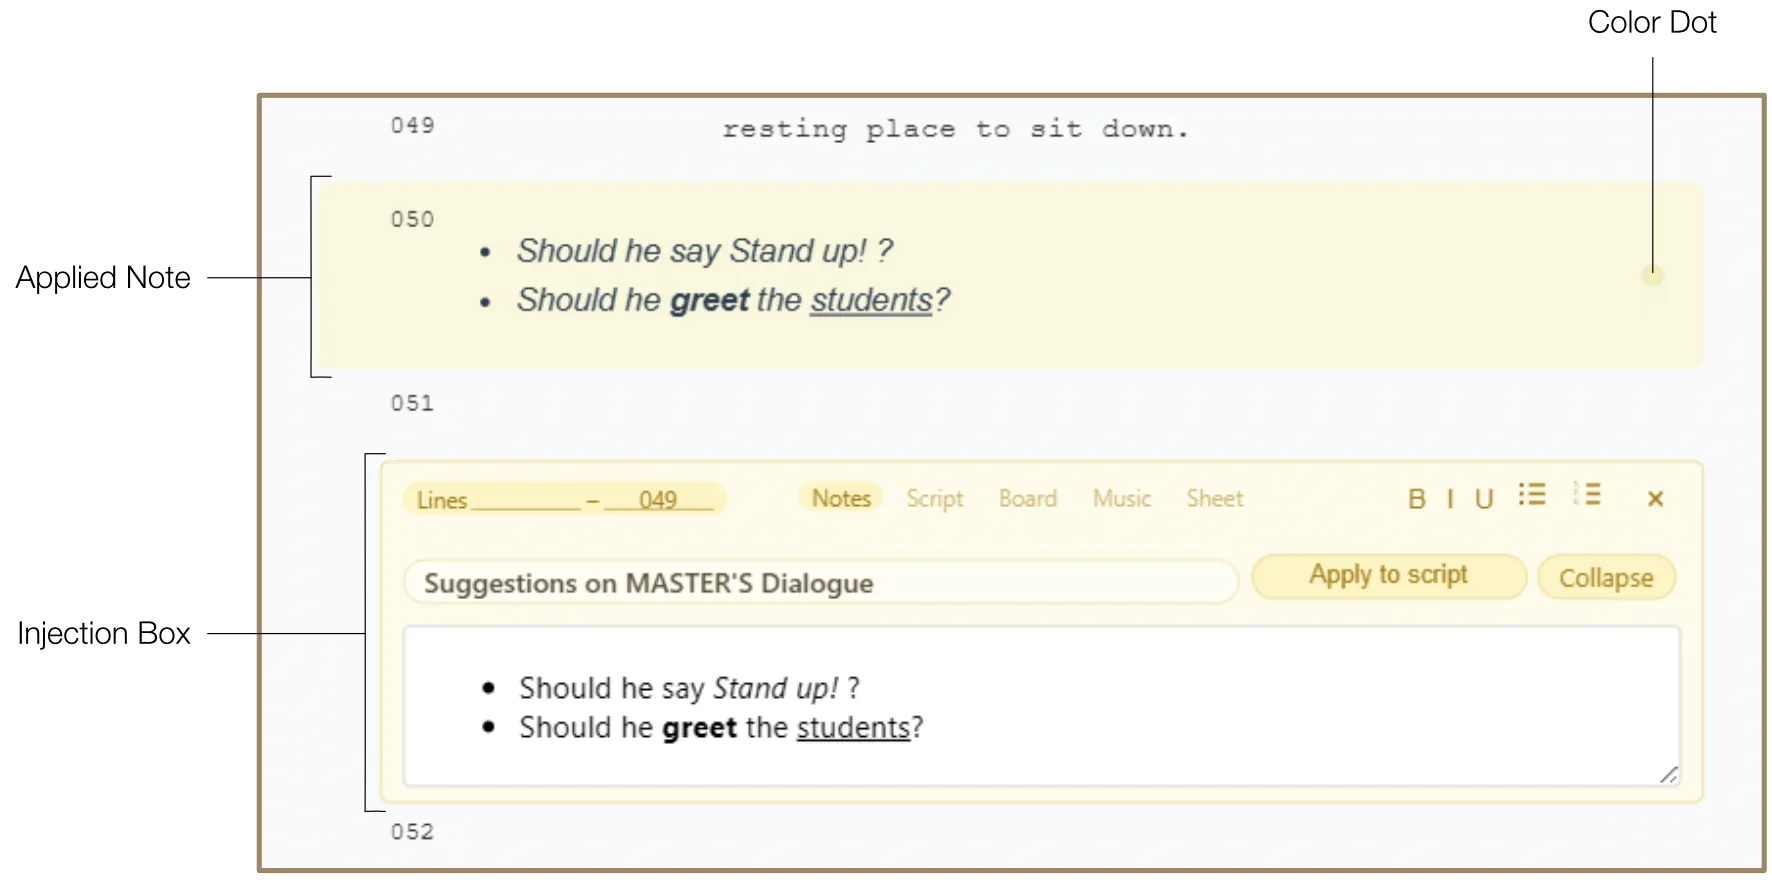
- Apply as Note: converts your notes into a Note within the main script area. Applying Notes does not delete the injection box — the box moves to a newly created row directly above the injection box, allowing you to continue refining your ideas while the key information is visible in the primary script view. Applied Notes are automatically displayed in italics and with a specific background color to differentiate them from standard action or dialogue lines.
- Apply as Event Note: sends the text to the Event layer instead of the screenplay. A coloured sleeve appears beside the lines the note covers, and the note becomes a card in the Event Graph. The injection box stays exactly where it is and can be applied again. See 13. Event Notes & Event Graph.
8.3 Color-Coded Markers
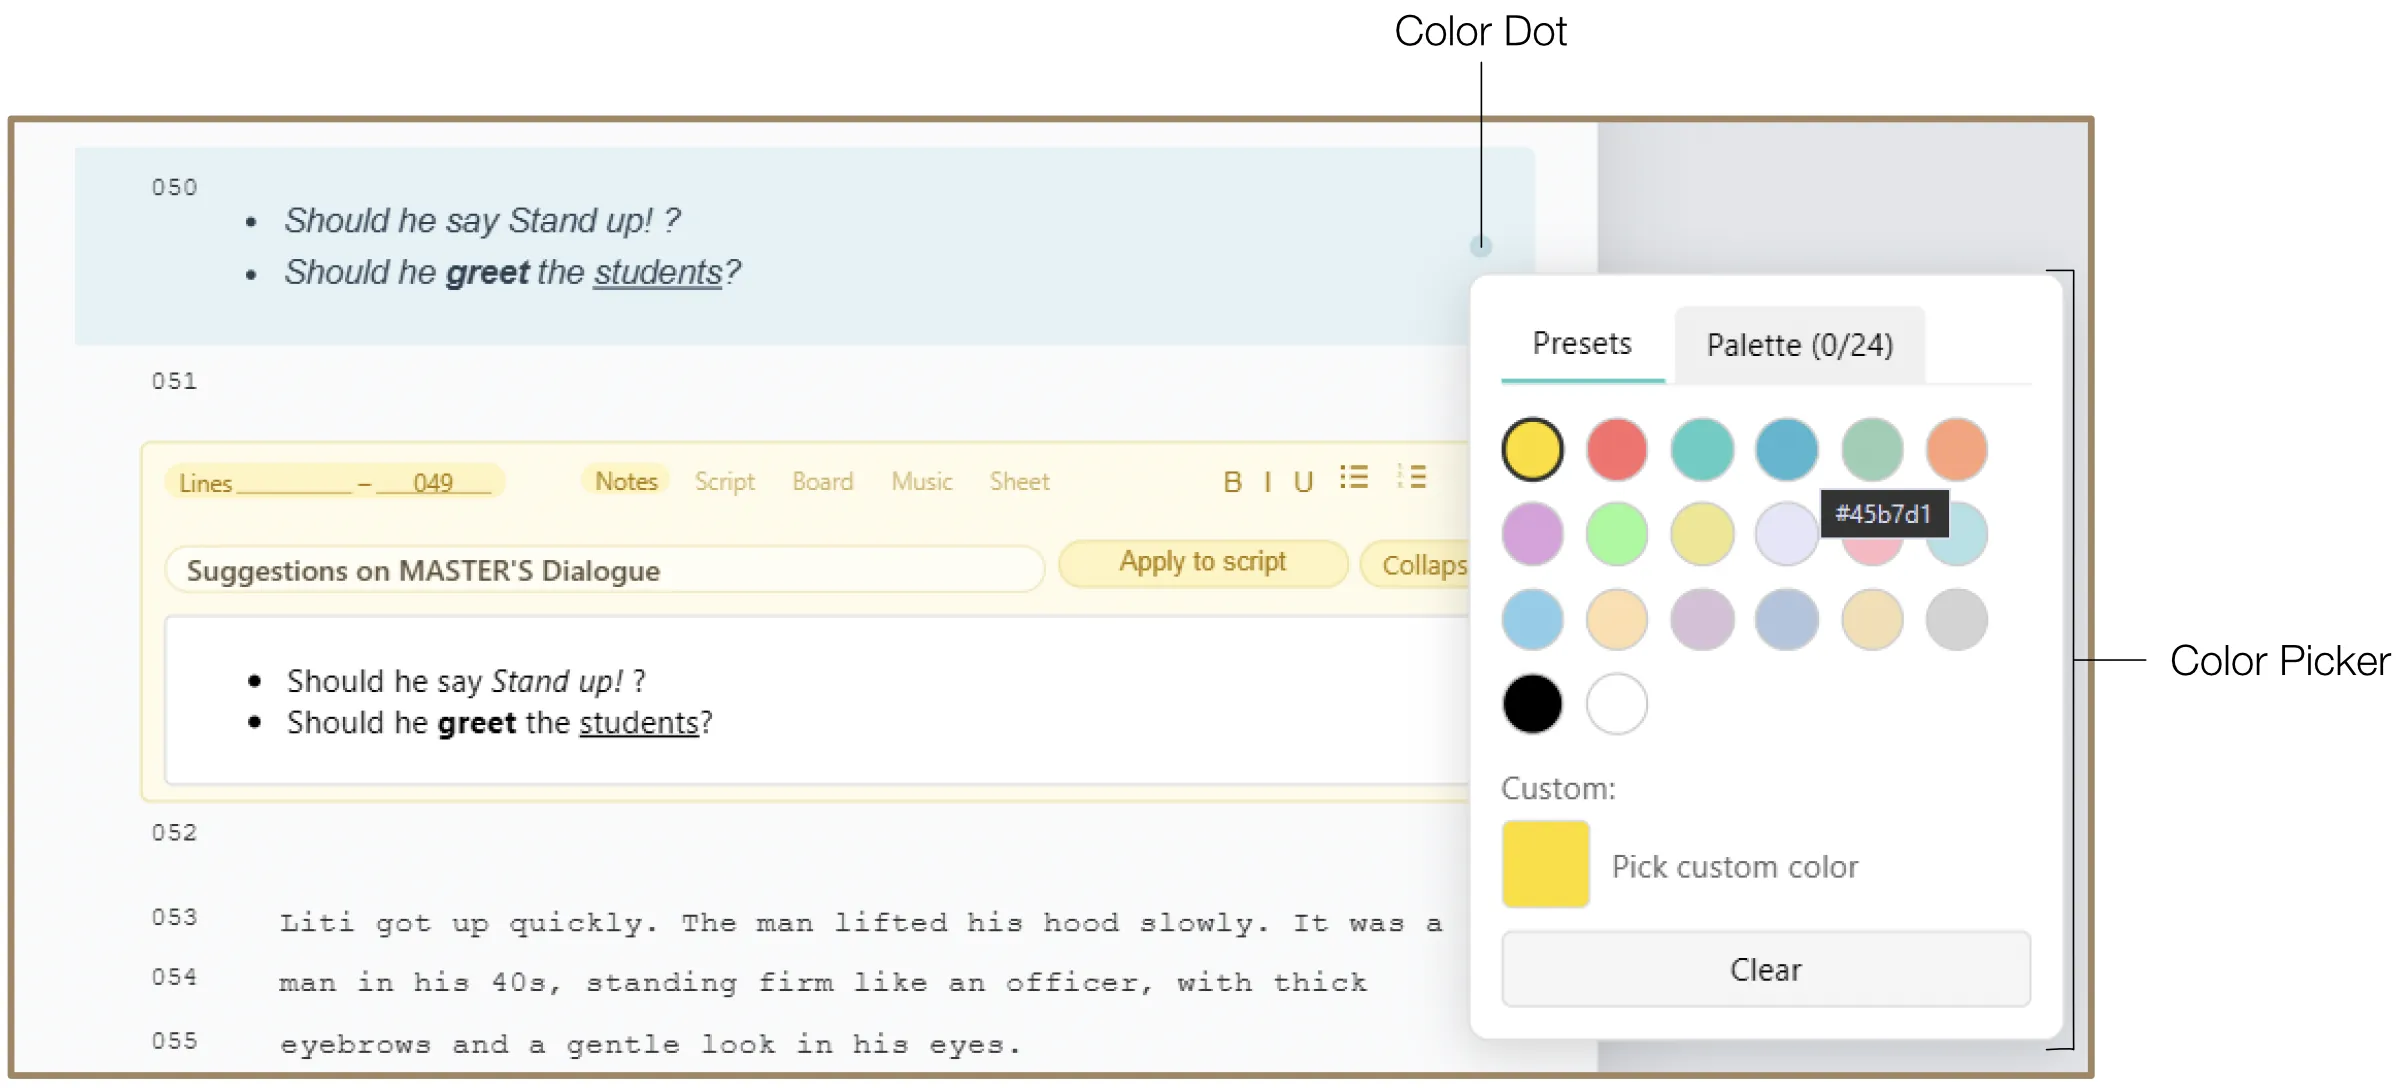
Each applied Note features a Color Dot next to its line number. Clicking this dot lets you change the Note's color, helping you categorize different types of information (e.g., set design vs. actor cues). The Color Picker offers preset colors, custom HSB/HEX selection, and a Personal Palette.
9. Script Injection
The Script injection is a powerful drafting tool designed for experimenting with alternative versions of a scene. It allows you to write, refine, and reclassify script snippets in a sandbox environment before integrating them into the project.
9.1 Line Range Replacement
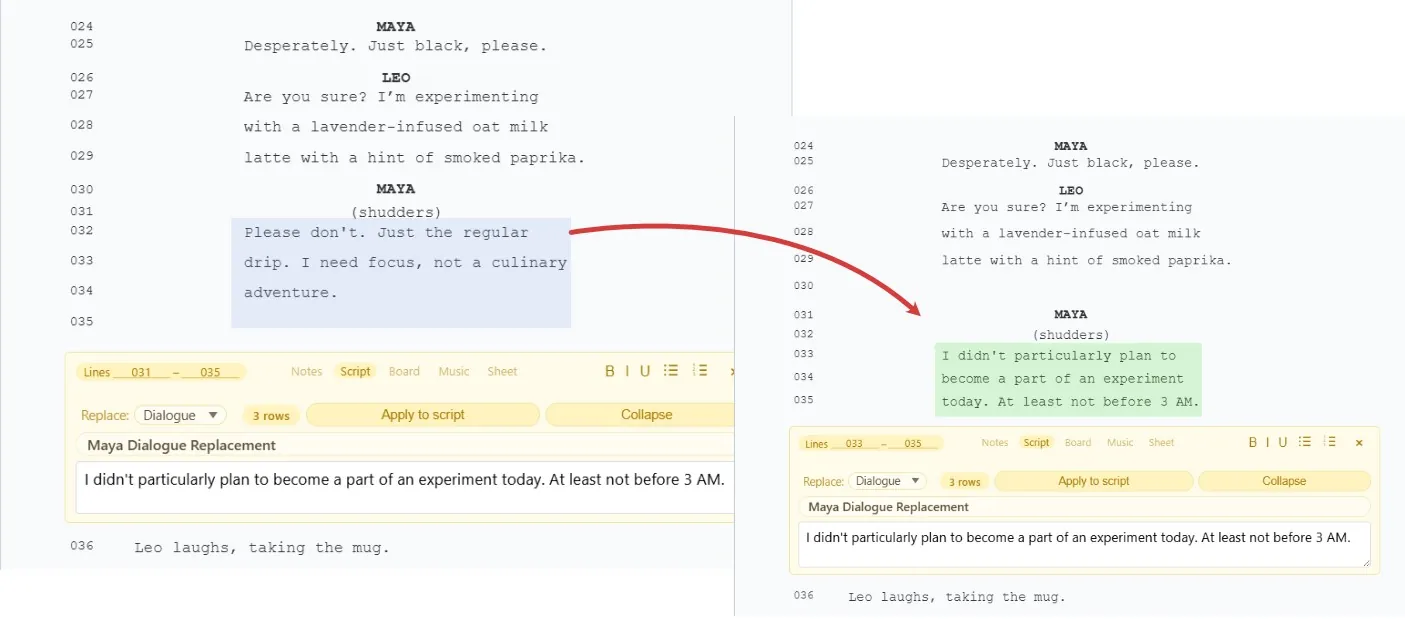
The Script injection is the only injection type where the Line Range field is functional. By setting a "from" and "to" row number in the header (for example, from row 010 to row 016), you tell the software exactly which rows inside the script should be replaced with the new version you write in the text field. This allows you to swap out dialogue, action lines, or any other script content — row by row — without affecting anything outside that range.
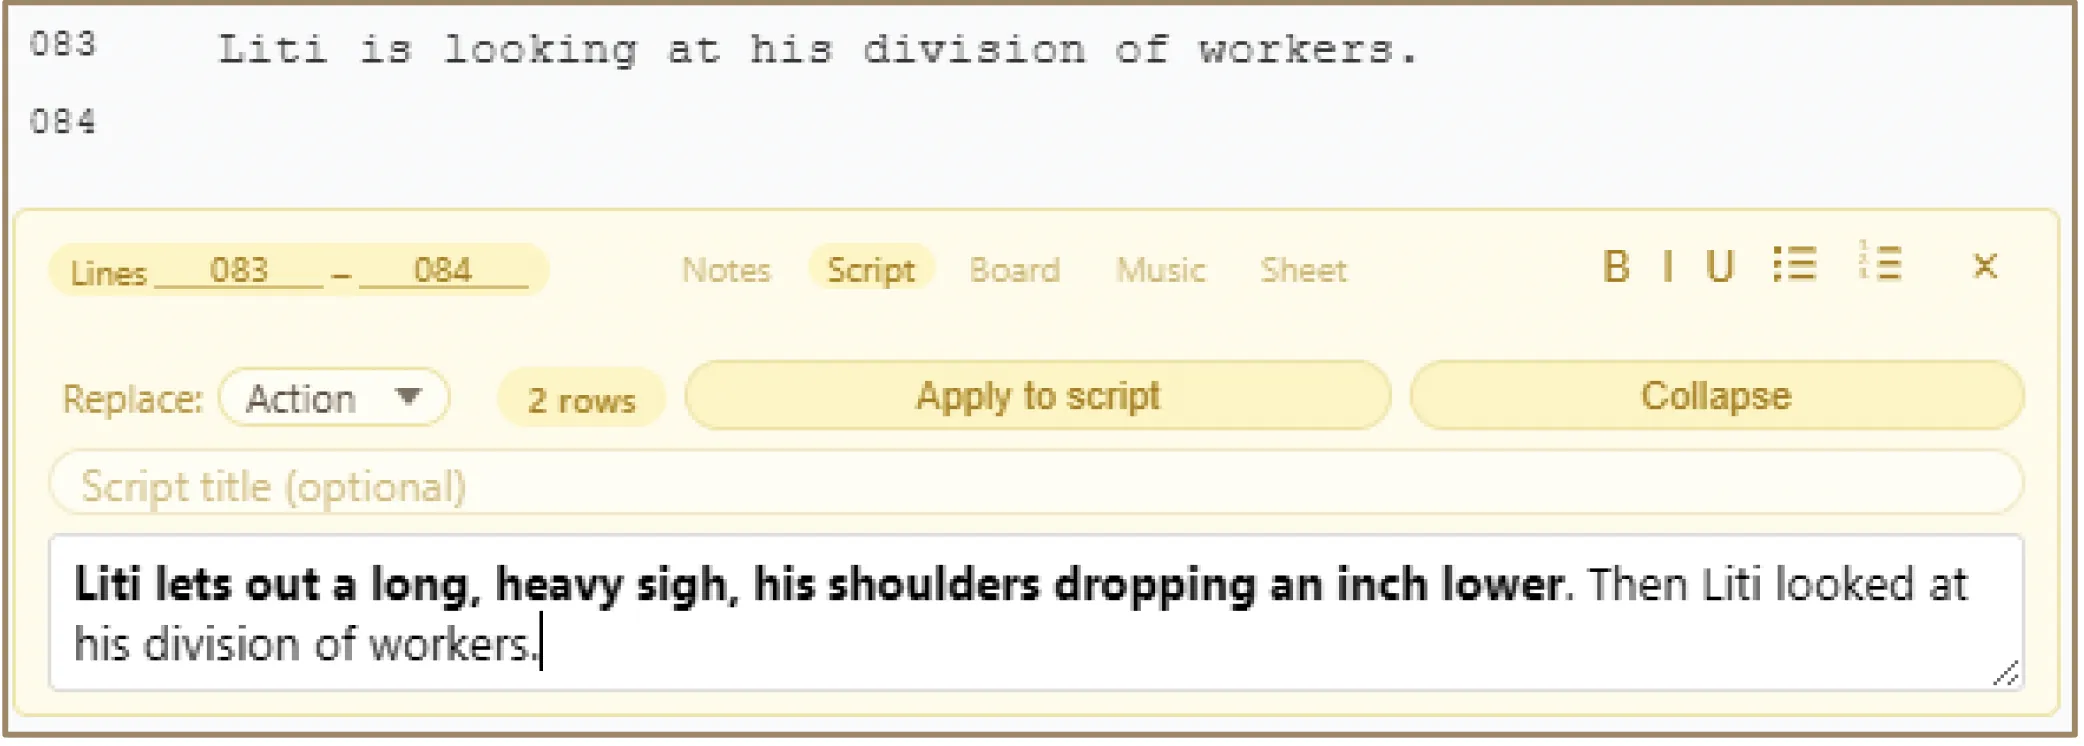
Type the new version of the script into the Text Field. The software will automatically count how many lines will be needed when the text is applied to the script. The result is displayed in the Line Counter.
9.2 Action vs. Dialogue
You can explicitly define the type of text you are writing using the Text Type dropdown menu. This ensures that when you apply your changes, the software automatically applies the correct industry-standard formatting and spacing to the new lines.
You can also emphasize parts of your new script with Bold, Italic, and Underline formatting, or organize it using Bulleted or Numbered Lists. Note that this formatting applies only within the Script injection box, not to the applied script lines themselves.
9.3 Apply to Script
Clicking the "Apply to Script" button triggers a replacement process:
- Automated Substitution: The software removes the lines defined in your Lines Range and inserts your new text in their place, maintaining chronological order, renumbering subsequent lines, and recalculating the necessary margins automatically.
- Tracking: Replaced lines are tagged with a reference to the source injection, which can be viewed in the Project Overview, helping you track where specific changes originated.
- Archive Integration: For safety, the original lines that were replaced are automatically moved to the Archive, allowing you to recover your previous draft if you change your mind.
10. Board Injection
The Board injection serves as a professional interface for integrating visual references, assets, and storyboards in the form of images or videos directly into the script's chronological flow. You can add visuals through two primary methods: importing visual assets or drawing directly in the injection.
10.1 Importing Visual Assets
This function allows you to upload external media files. The software supports common image formats (JPEG, PNG, SVG) and video files (MP4, MOV).
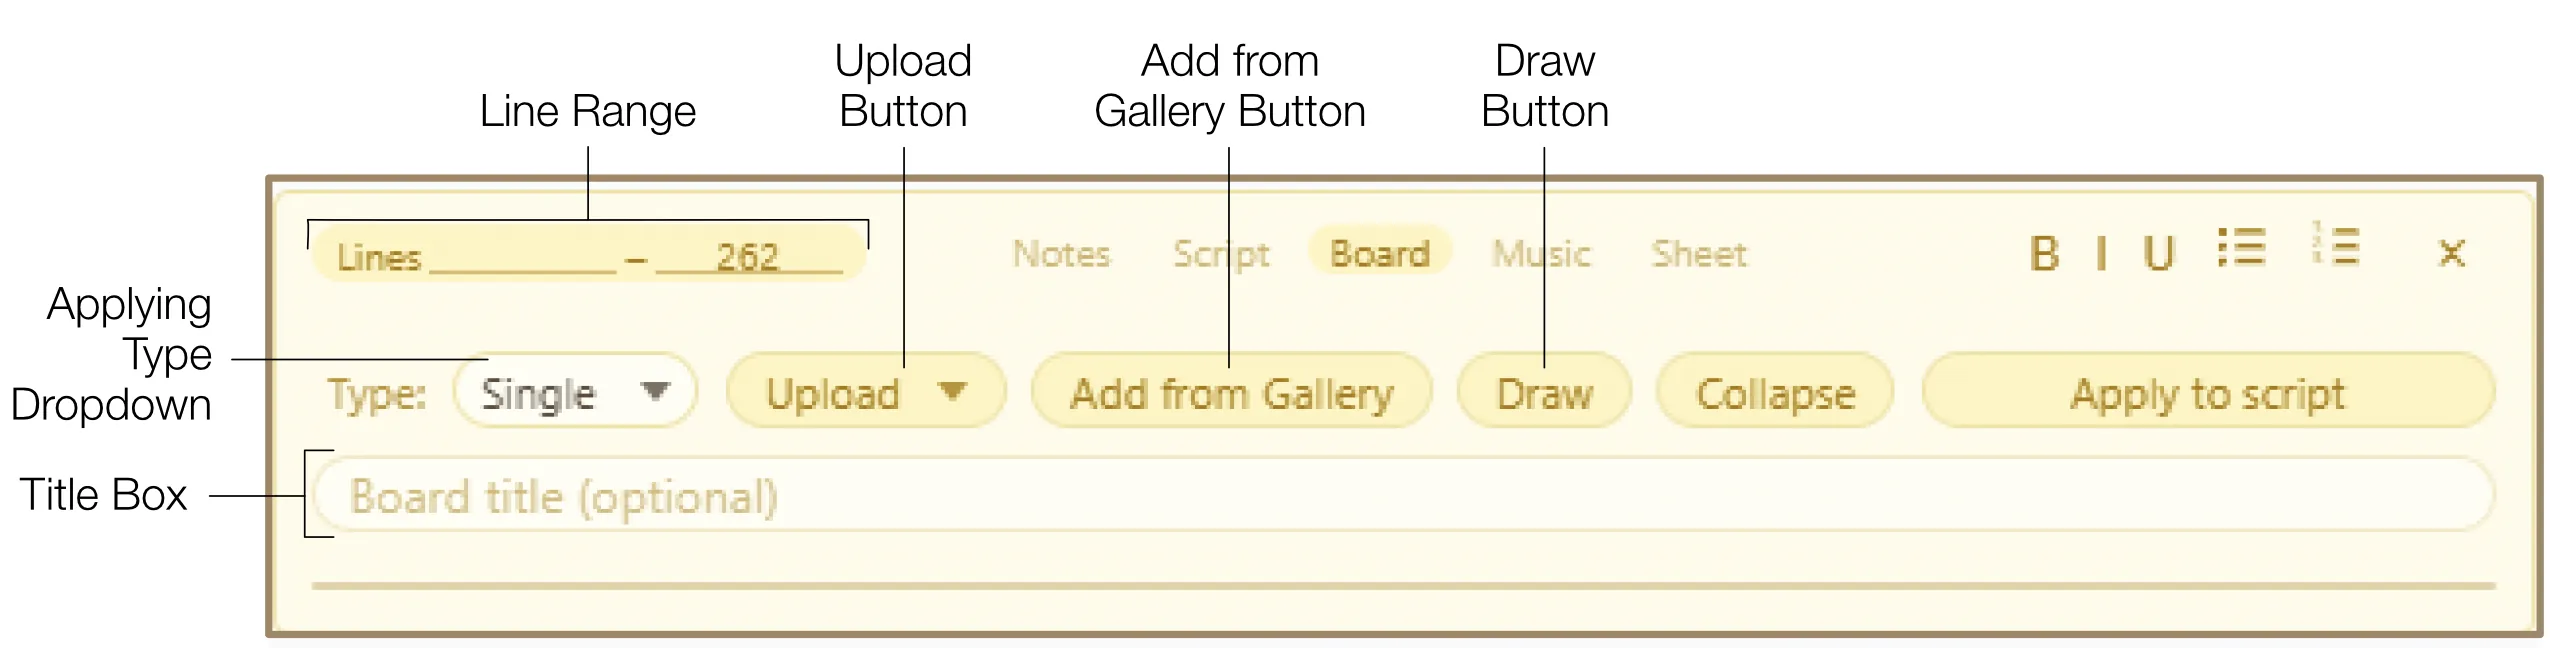
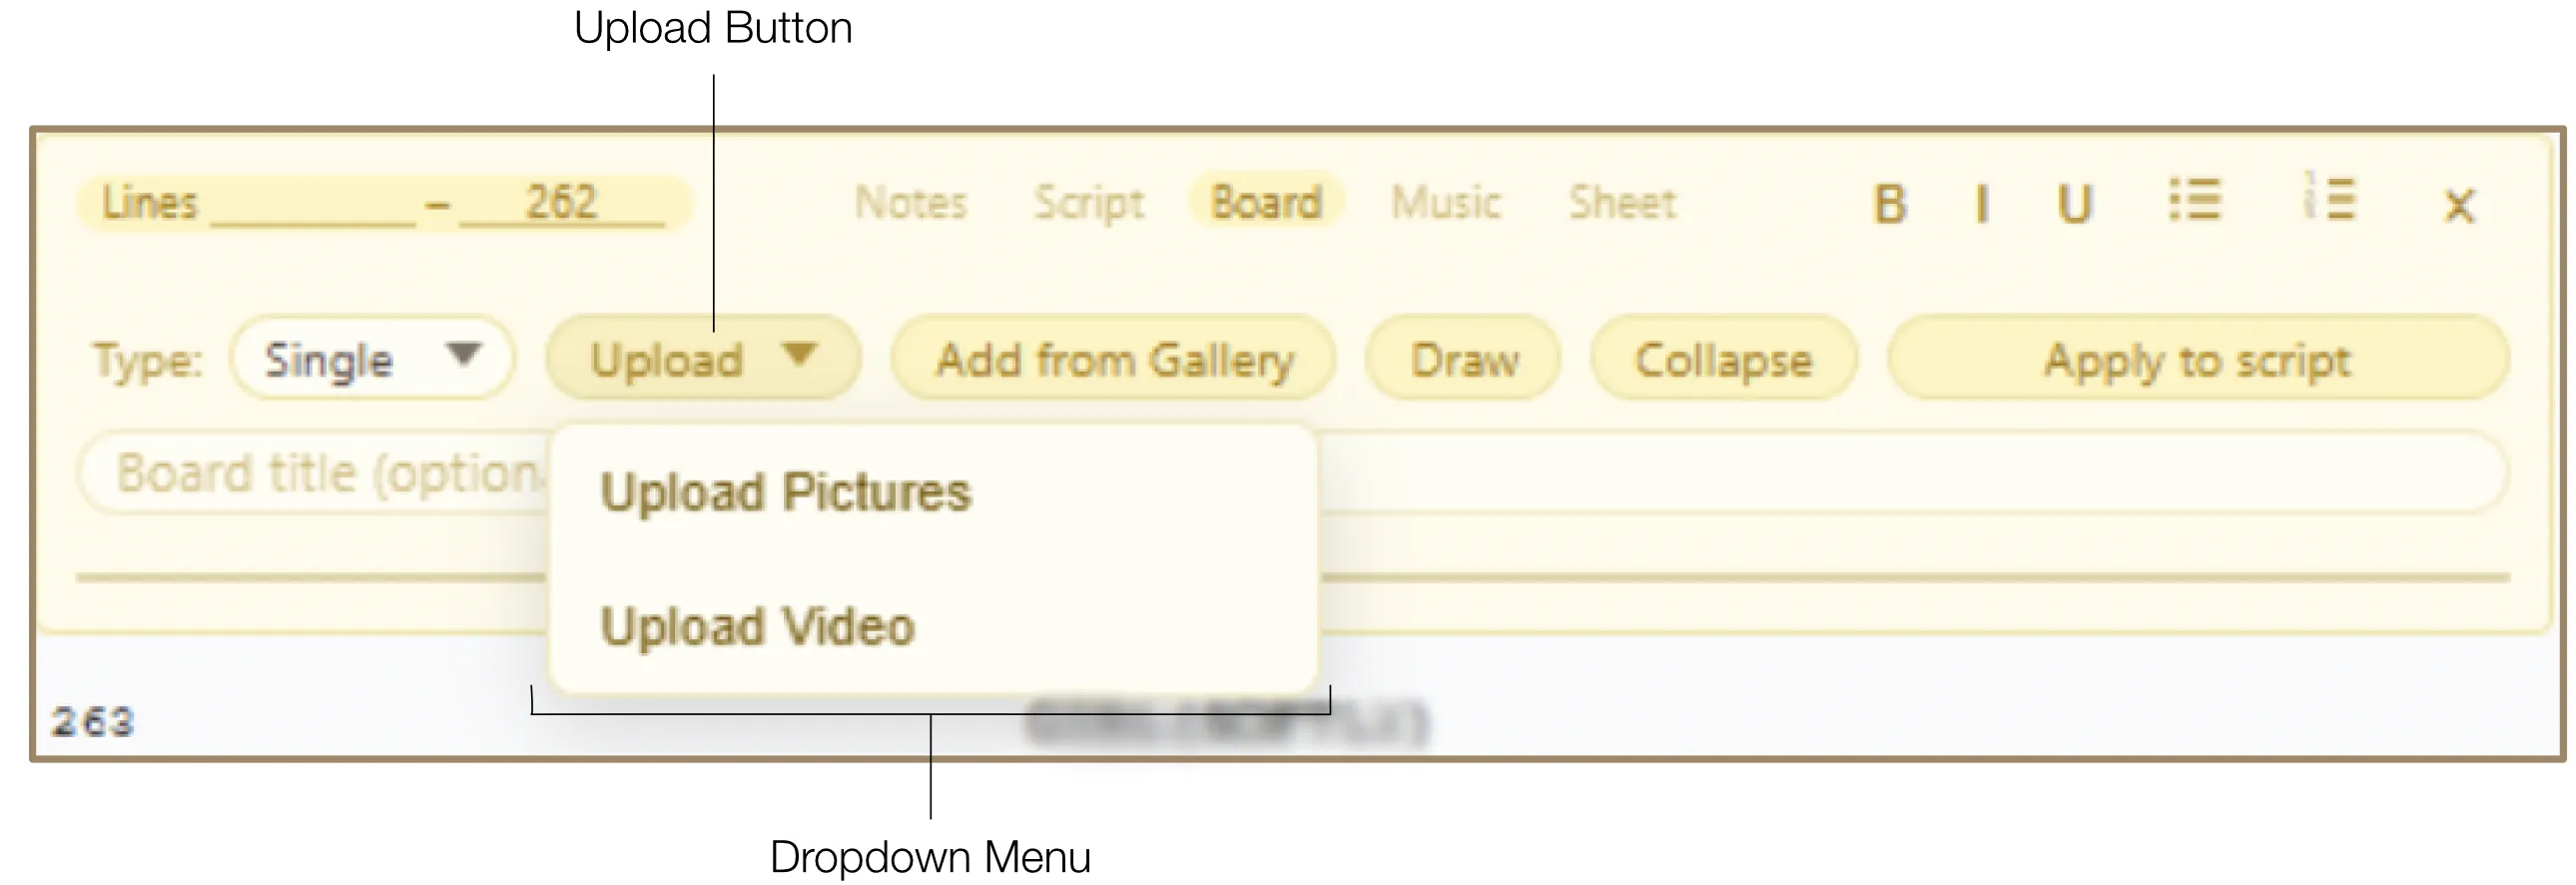
- Direct Upload: Click the "Upload" button and select the visual type (images or video) from the dropdown menu. To upload multiple visuals, select the "Reel" or "Grid" upload type from the Applying Type dropdown.
- Add from Gallery: Access and re-insert previously uploaded assets through the integrated Gallery interface. You can access the Gallery by clicking the "Add from Gallery" button in the Board injection or the Gallery icon in the Script Editor sidebar.
10.2 Draw Function
The Board injection includes a drawing environment for manual storyboard creation and technical sketching — from rough freehand scribbles to precise vector illustrations with anchor-point control.
10.2.1 Adding & Managing Draw Fields
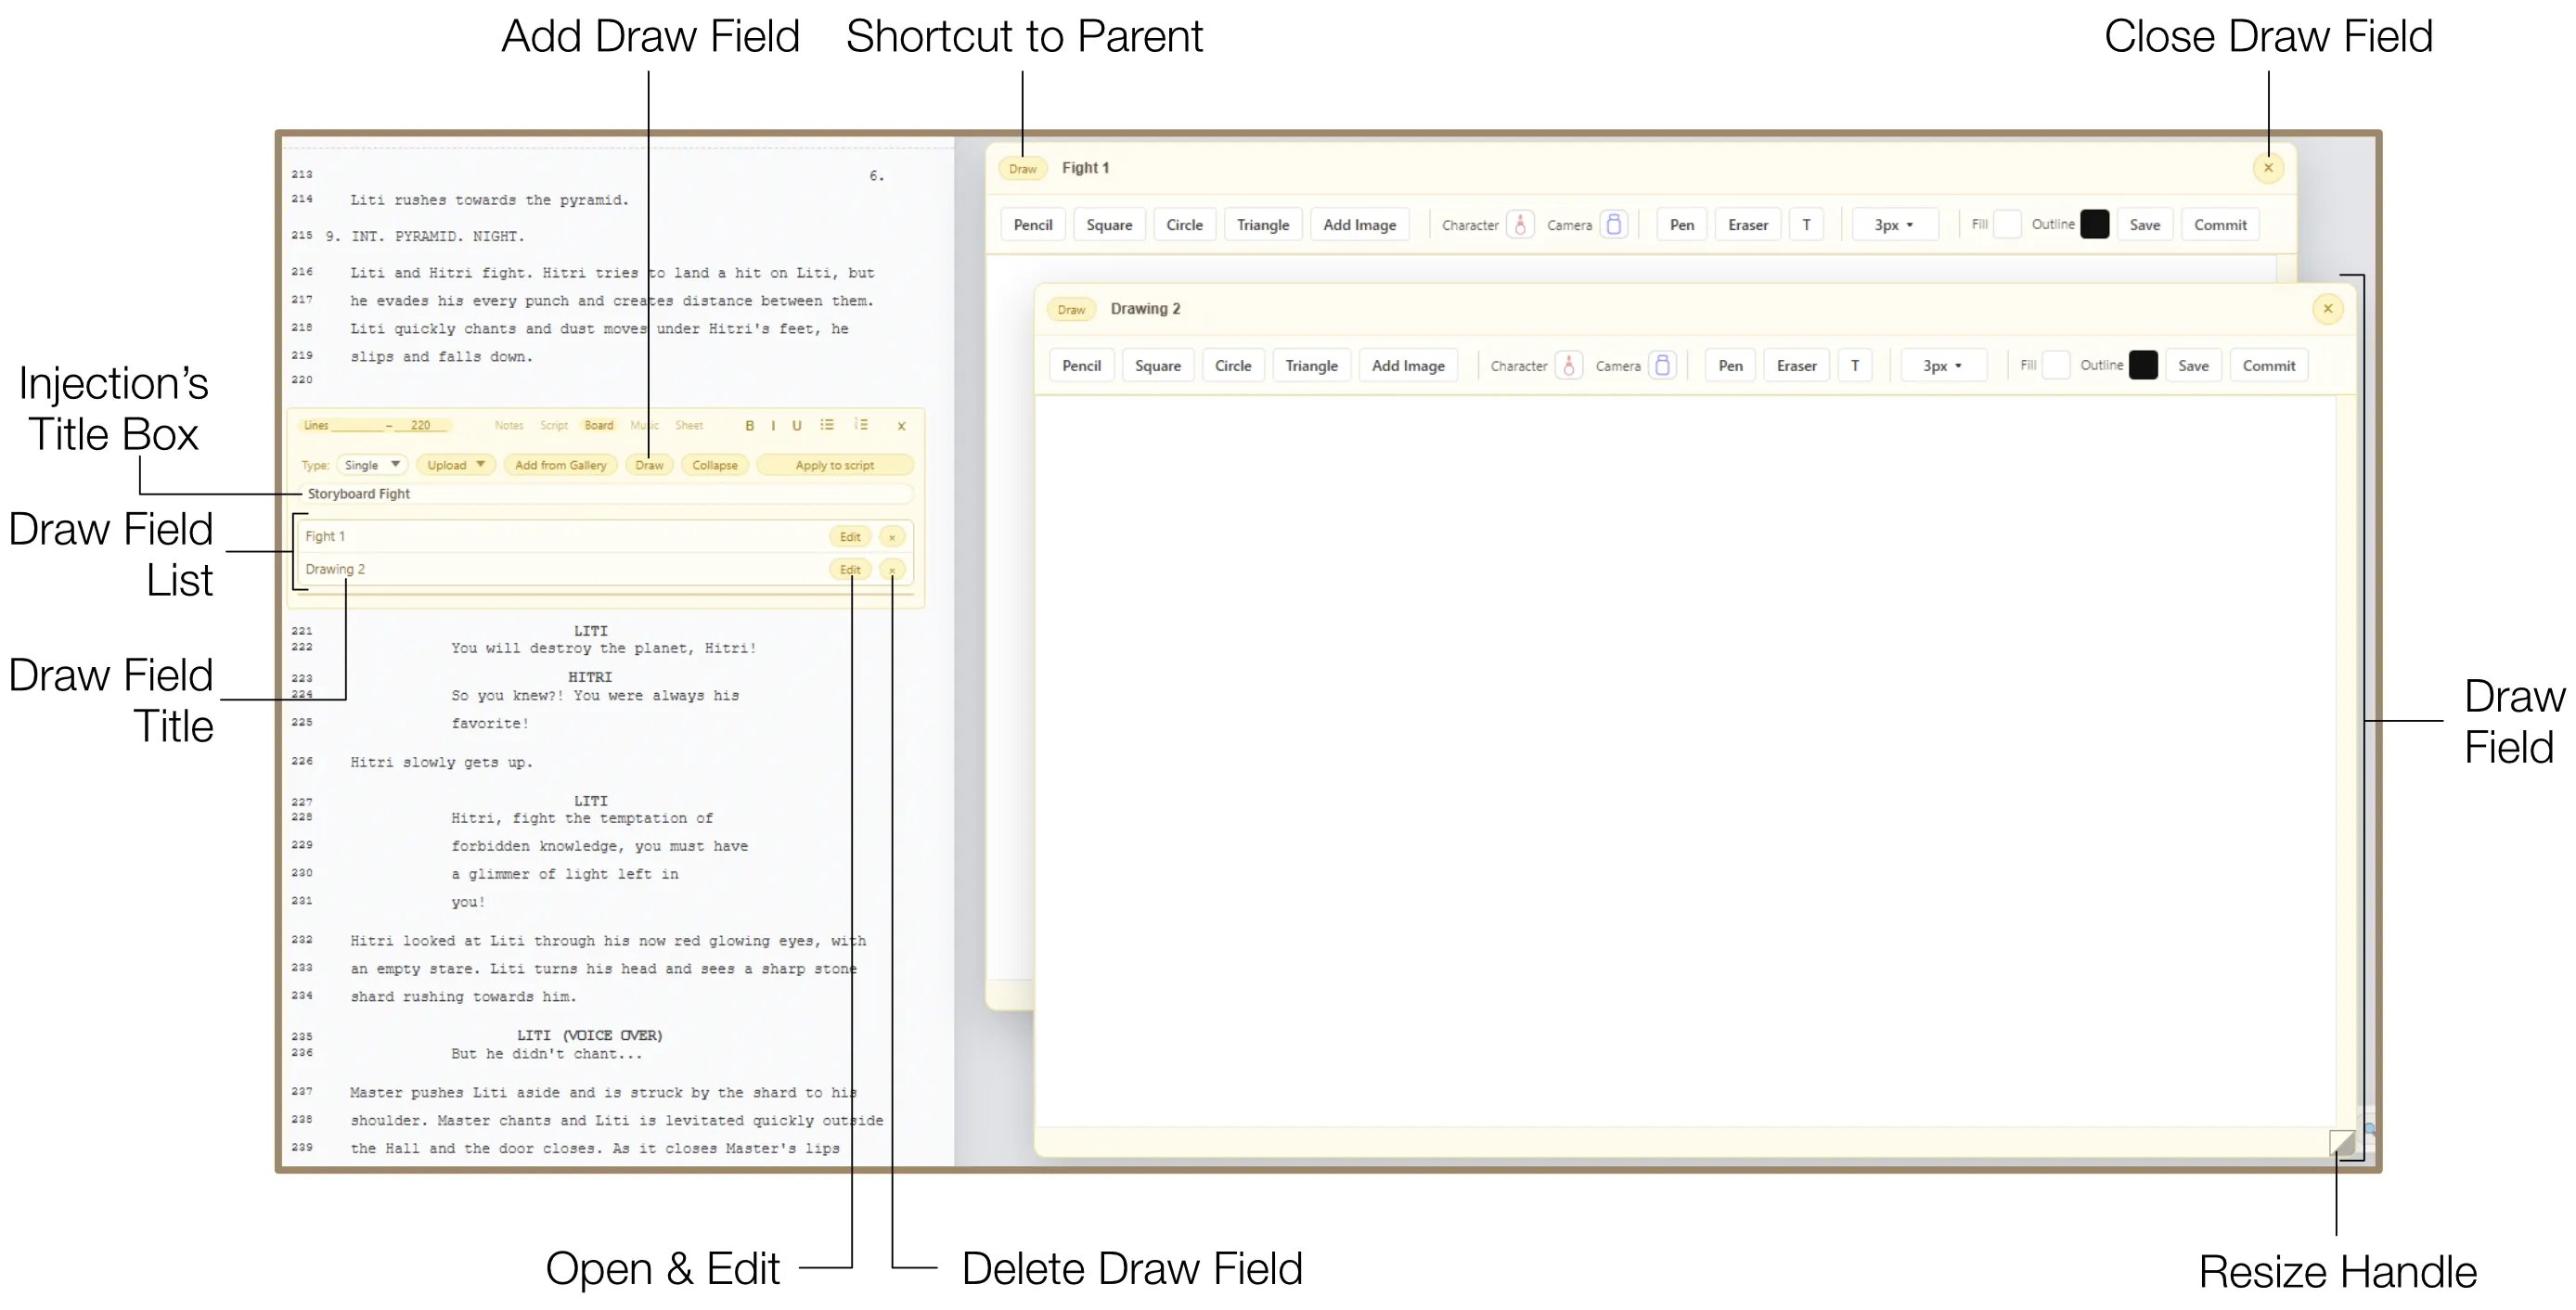
To add a new Draw Field, click the "Draw" button in the Board injection interface. You can create multiple separate Draw Fields and manage them via the Draw Field List at the bottom of the injection box.
- Reorder: Drag elements within the Draw Field List to rearrange their order.
- Title: Give each Draw Field a unique title directly within the Draw Field List for better organization.
- Close: To close a Draw Field, click the Close icon ("×") in the top right corner of the Draw Field.
- Reopen: To open a closed Draw Field again, click the "Edit" button on the item in the Draw Field List.
- Delete: To remove a Draw Field permanently, click the Delete icon ("×") on the item in the Draw Field List.
10.2.2 Resize & Navigation
Adjust the size of the Draw Field using the Resize handle in the bottom-right corner. You can move the Draw Field around the workspace by dragging it.
When the Draw Field is open, specialized Zoom & Shift functions appear. These controls allow you to magnify the workspace or shift the script to provide an unobstructed view of your drawing.
The "Draw" button in the Draw Field header serves as a shortcut — clicking it automatically navigates to the parent injection for that drawing.
10.2.3 Drawing Toolset
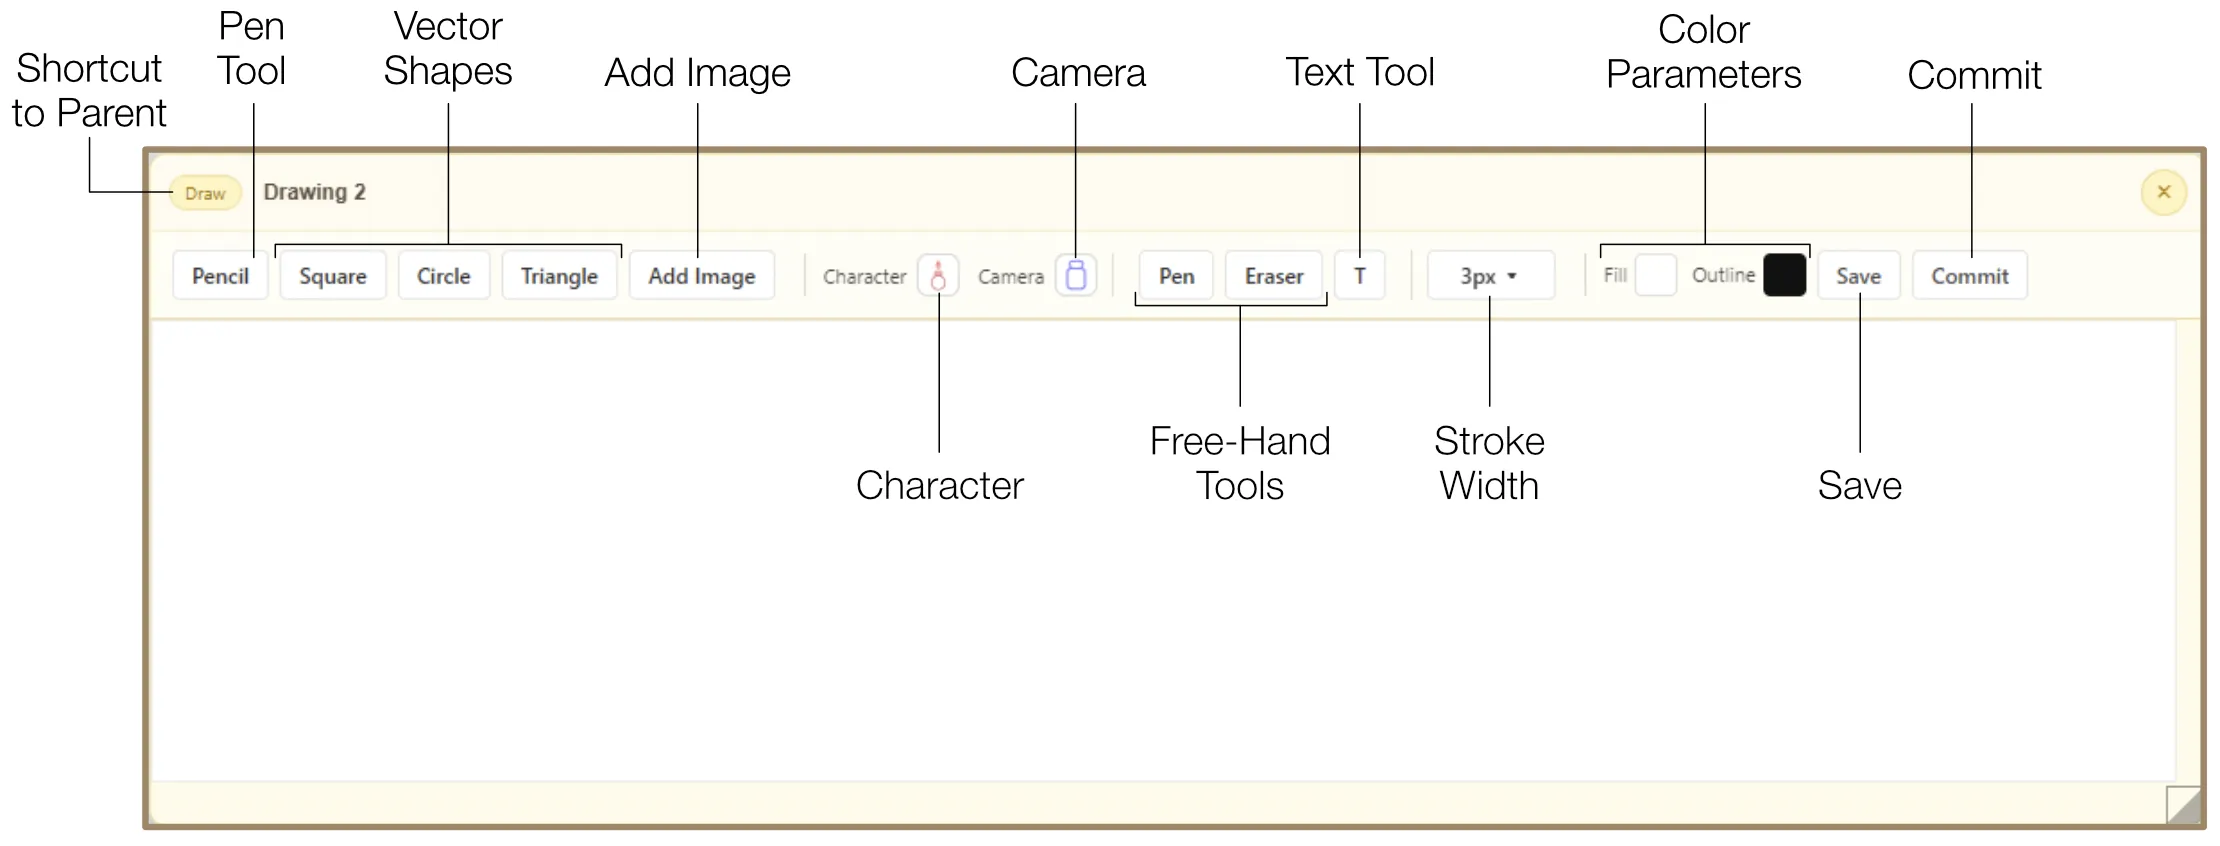
Drawing tools are located at the top toolbar of the Draw Field and include the following:
Pen Tool
Create and edit vector paths with precise anchor point manipulation:
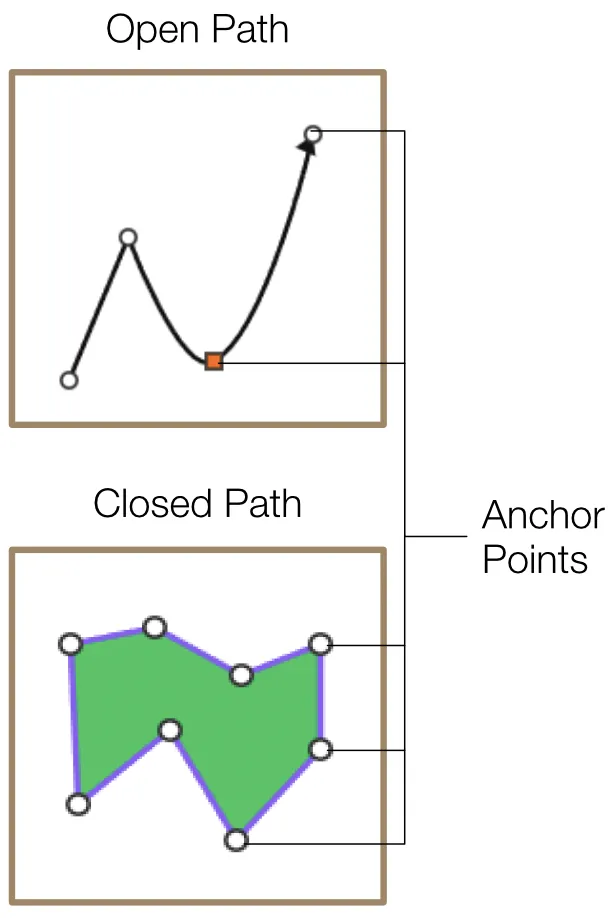
- To create a path, click the "Pen" button. Anchor points appear as you click on the canvas. When the path is complete, press the Esc key to quit the Pen tool.
- You can edit a path's shape by dragging its anchor points at any time. Active (selected) anchor points turn red.
- To curve the path, select the desired anchor points and press the Space Bar key. To adjust the curvature, scroll the mouse wheel while holding the Ctrl / Cmd key. The anchor point then turns into a square.
- To add a new anchor point on an existing path, double-click the desired location on the path.
- To create a branch from an anchor point, double-click the desired anchor point.
- The path ends with an arrow by default. To toggle the arrow off and on, double-click a terminal point while holding Cmd / Ctrl. If the path is closed, the arrow disappears as the path converts into a shape.
Vector Shapes
Insert and manipulate geometric primitives (Square, Circle, Triangle) as selectable objects that can be resized, rotated, and recolored.
Image Integration
To add an image to your drawing canvas, click the "Add Image" button and select the image using the system file browser.
Character & Camera Figurines
Quickly place Character and Camera figurines by clicking the corresponding icons and choosing a color. These icons can cycle through various colors for easy categorization when sketching a storyboard, planning blocking, or placing cameras.

Pencil & Eraser
Raster-based tools for freehand sketching with adjustable brush size and a visual reticle for precision. The Eraser tool can also delete vector shapes.

Text Tool
To add editable text labels directly into your drawings, click the Text icon and drag a text field onto the canvas. You can change the text color using the Outline Color parameter.
10.2.4 Drawing Settings
All elements (shapes, icons, text) remain selectable and adjustable after placement:
- Move: Drag any object to reposition it on the canvas.
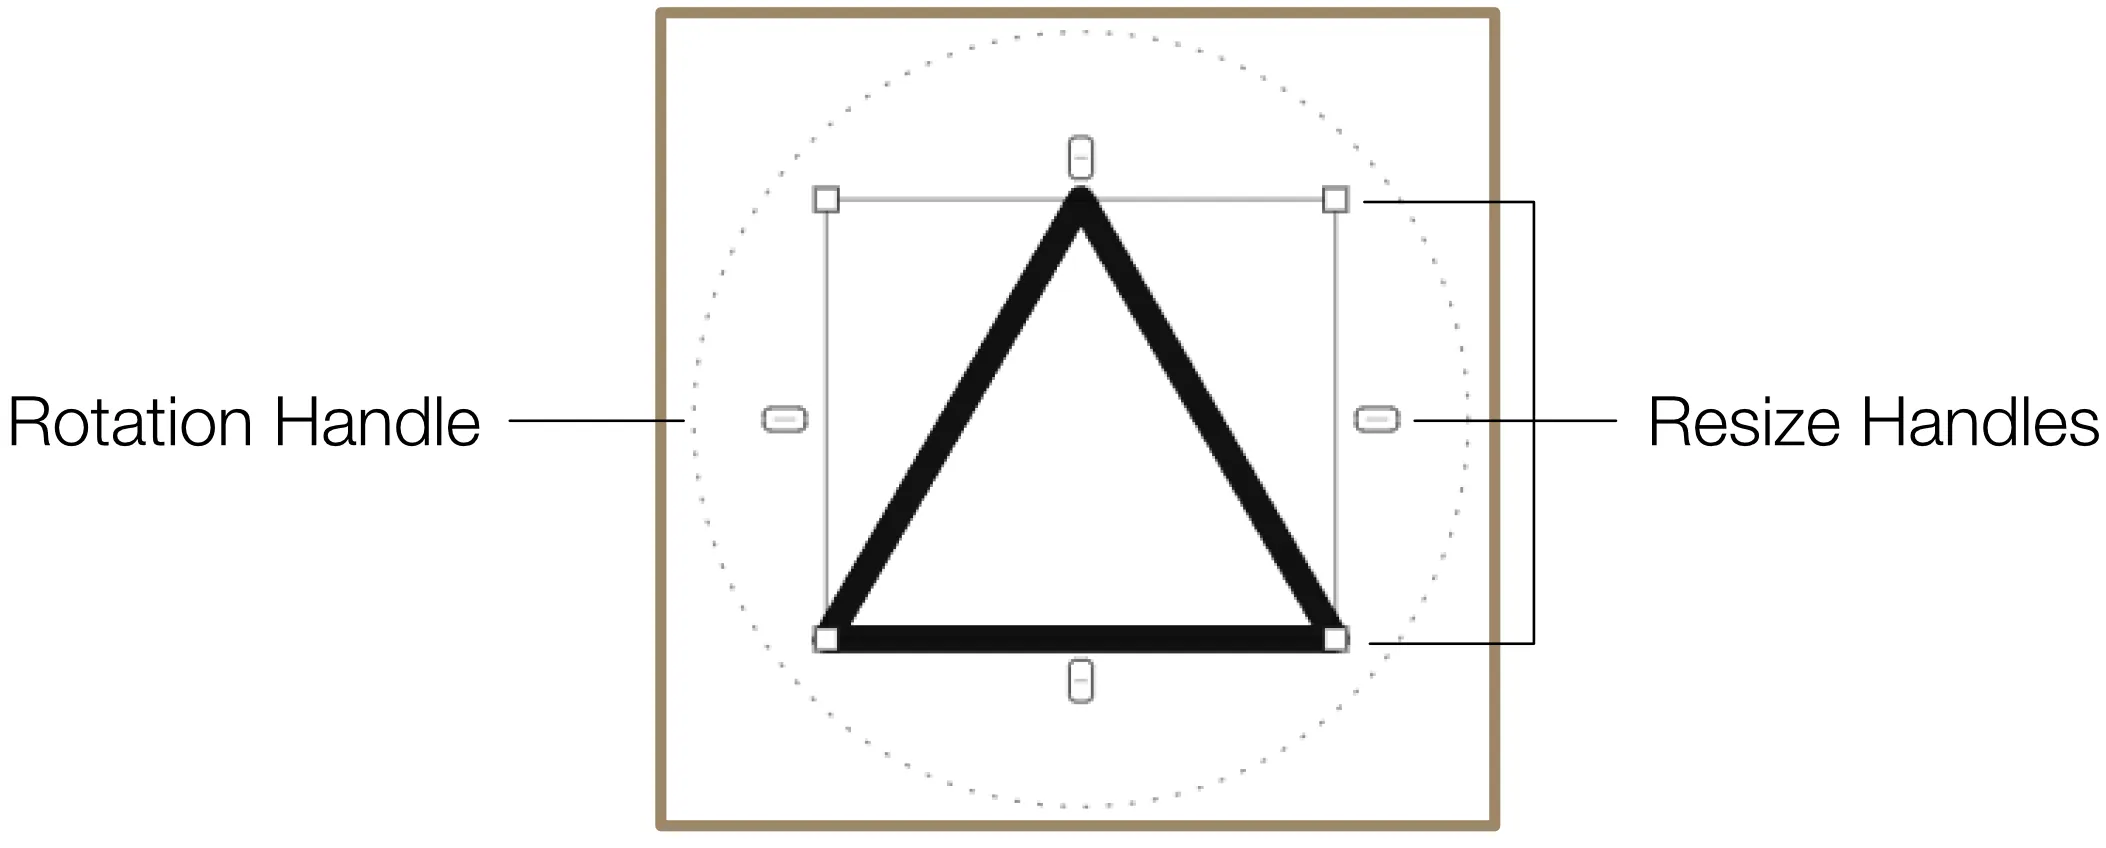
- Resize: Drag the Resize handles located on the sides and corners of a selected object. Hold Shift for proportional resizing. Hold Ctrl / Cmd to resize around the center point.
- Rotate: Use the circular Rotation handle to rotate the object freely.
- Group / Ungroup: Select multiple elements and press Cmd / Ctrl + G to group them into a single unit for easier management. Press Cmd / Ctrl + Alt + G to ungroup.
- Stroke Width: Click the Stroke Width dropdown to reveal a slider. Adjust the slider to change the thickness of lines and outlines.
- Fill & Outline Colors: Click the Fill or Outline color swatches to open the Color Picker and change the respective colors of the selected element.
10.2.5 Save & Commit
The "Save" button adds your drawing as a PNG image to the Project Gallery, so you can reuse it in other parts of the script.
To add your drawing to the Board injection, click the "Commit" button. Your drawing is flattened into a PNG image and functions exactly like uploaded images.
The "Commit" button does not delete your Draw Field. All Draw Fields remain accessible in the Draw Field List in the parent Board injection for further editing.
10.3 Managing & Applying Board Injection
Each Board injection can hold multiple separate images and videos, managed in a list at the bottom of the injection box. Visual assets can be reordered by dragging and each features an automatically numbered title field.
Applying Type
Before applying visuals to the script, choose from three layout options:
Single: Isolates a single high-priority asset and displays it in a large format.
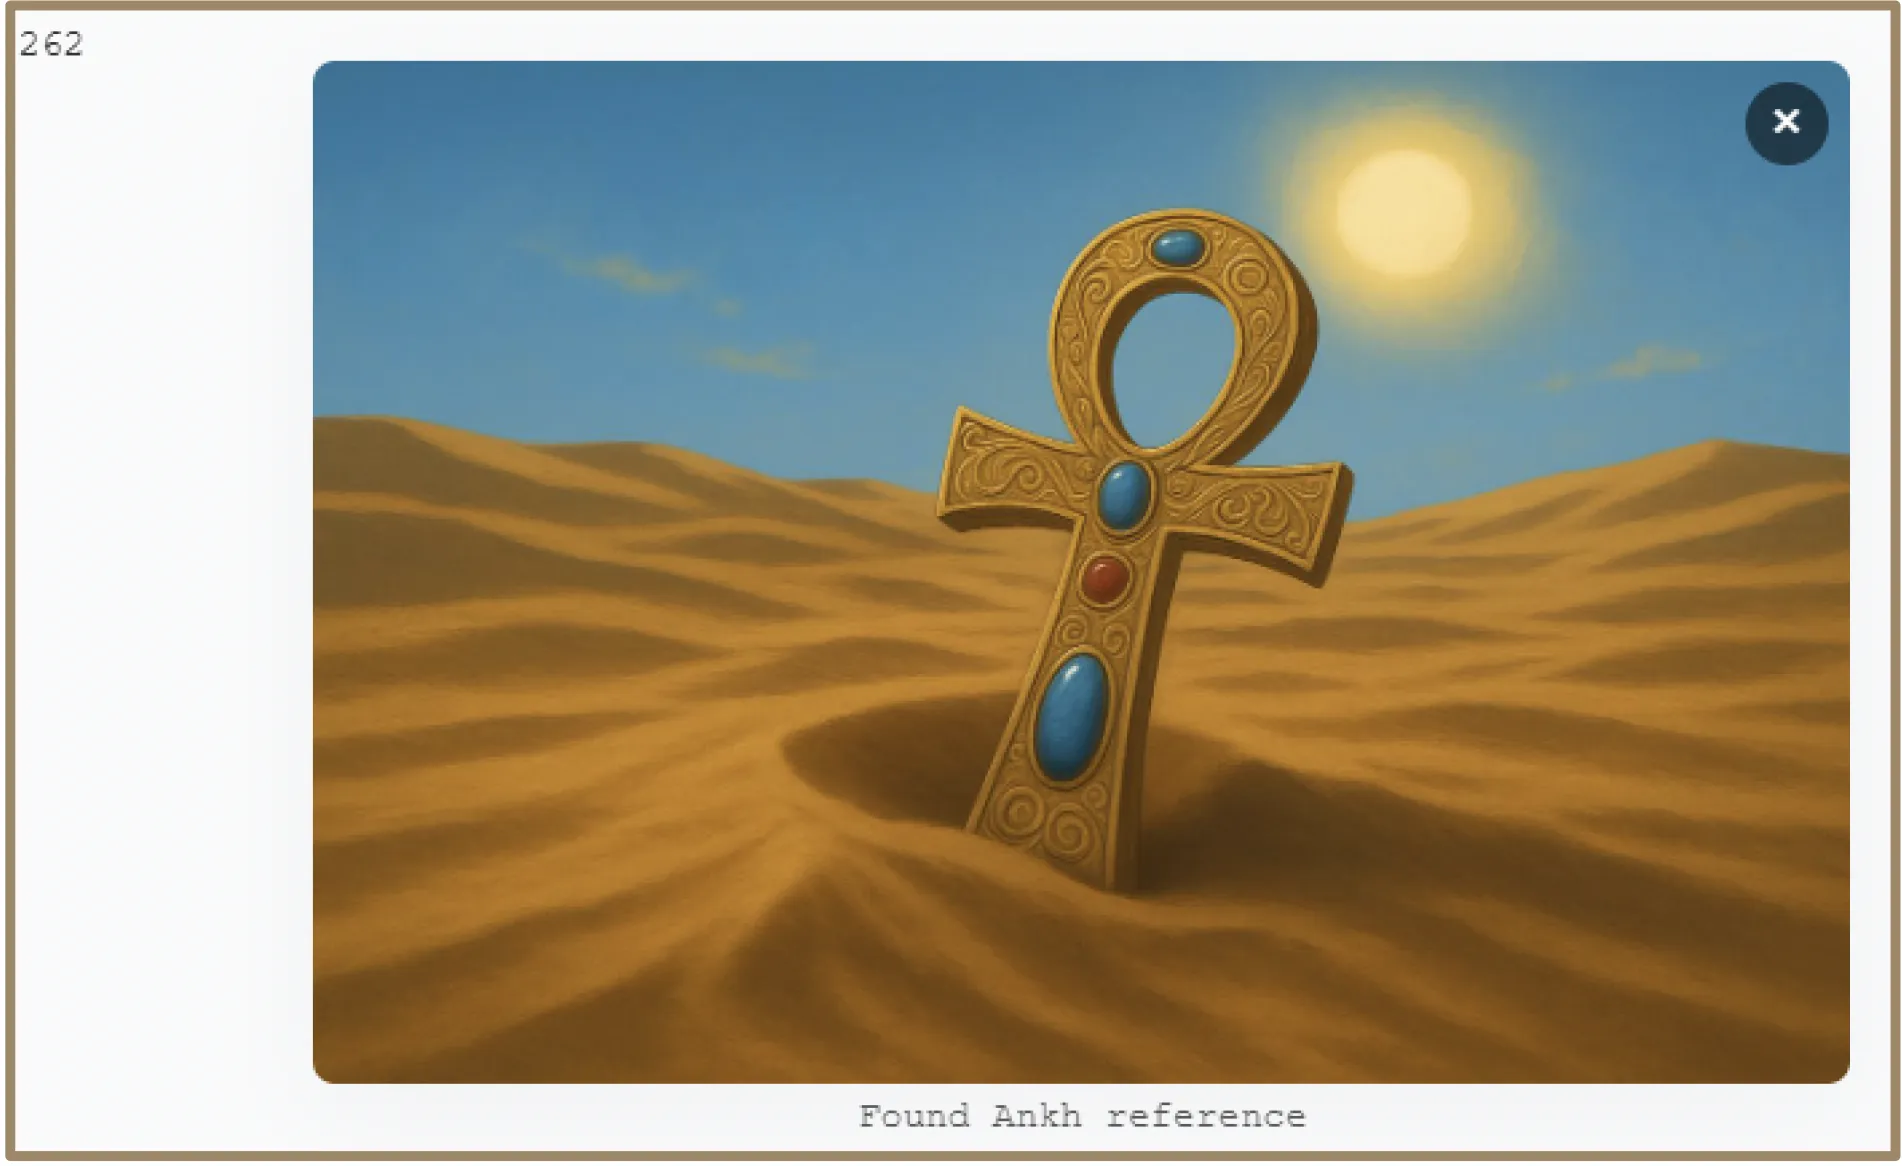
Reel: Arranges assets in a horizontal, cinematic sequence.
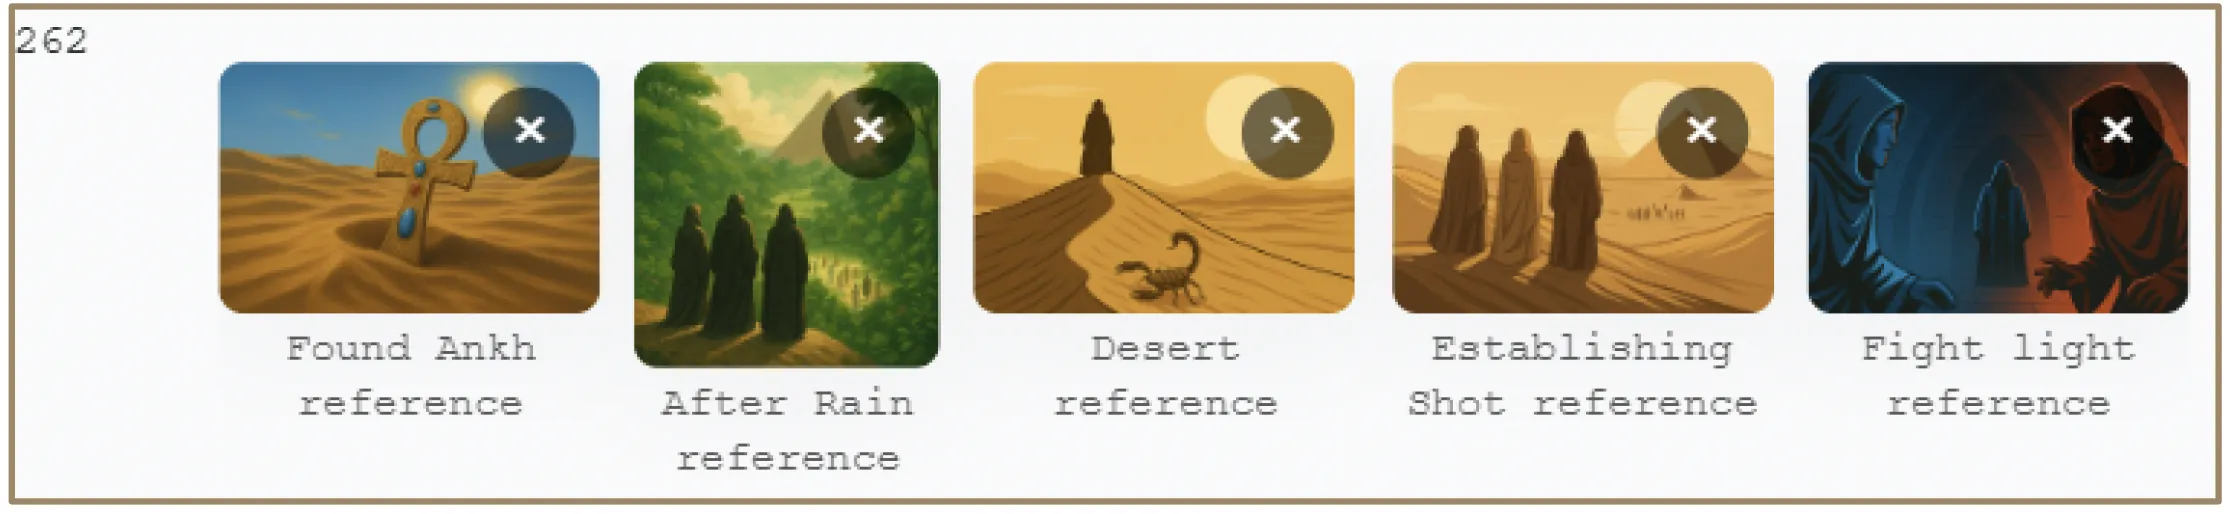
Grid: Organizes multiple assets into a structured mosaic for a comprehensive overview.
Clicking "Apply to Script" generates a specialized Board Line in the screenplay that preserves the selected layout and provides interactive playback for video assets. Applying a Board does not remove the injection box, allowing for continued revisions.
11. Music Injection
The Music injection is a powerful musical composition and playback tool integrated directly into your script editing workspace. It lets you write musical notation, record live MIDI performances, and embed the results as either engraved sheet music or fully playable audio tracks.
11.1 Overview & General Settings
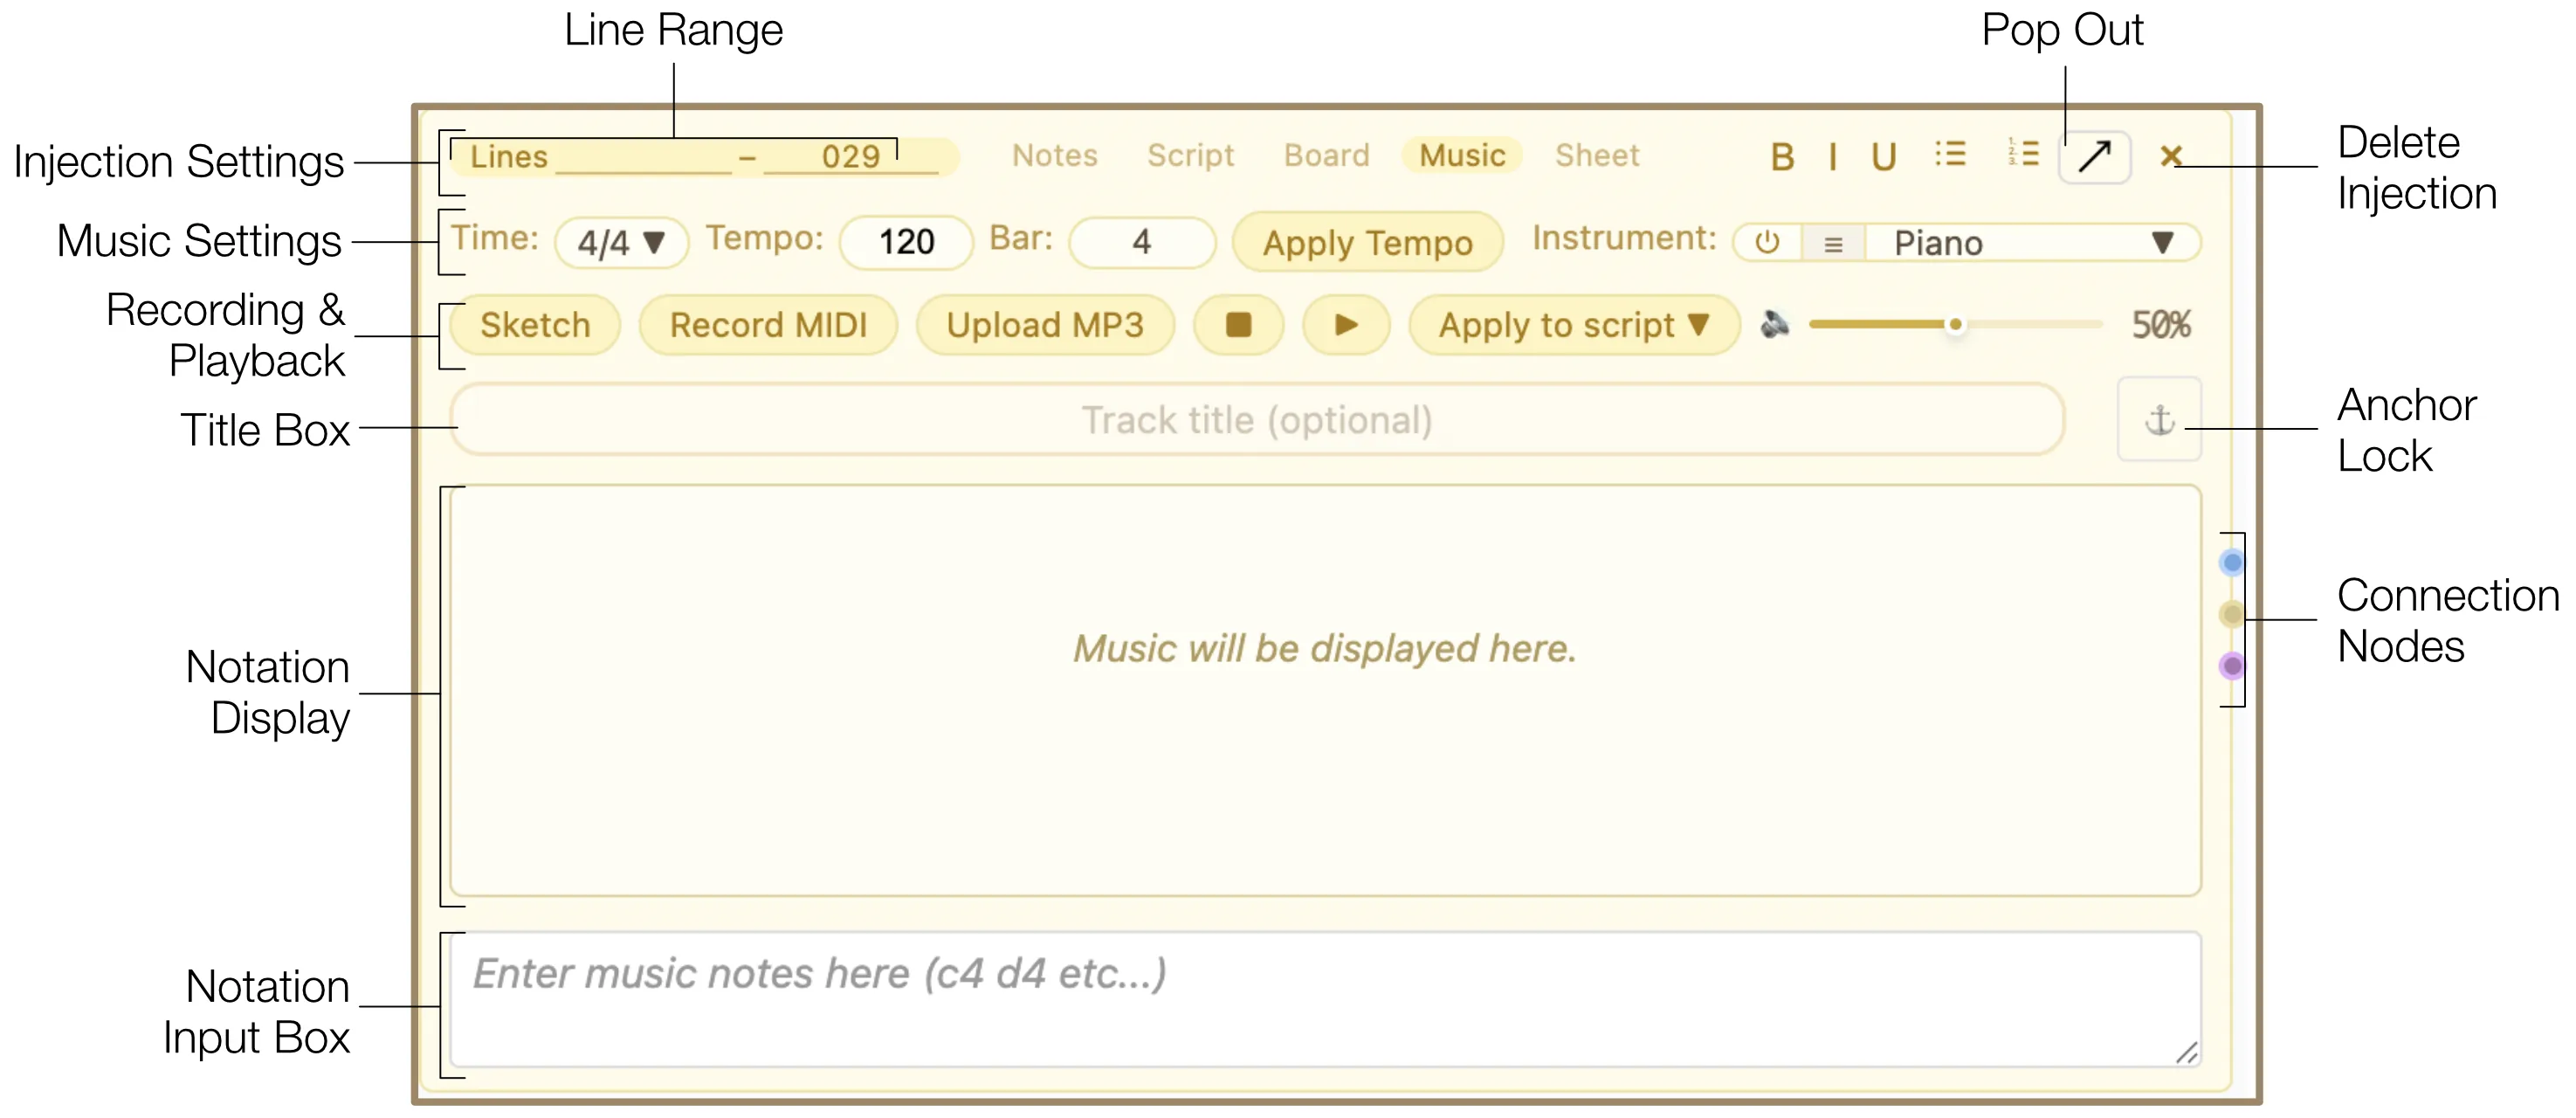
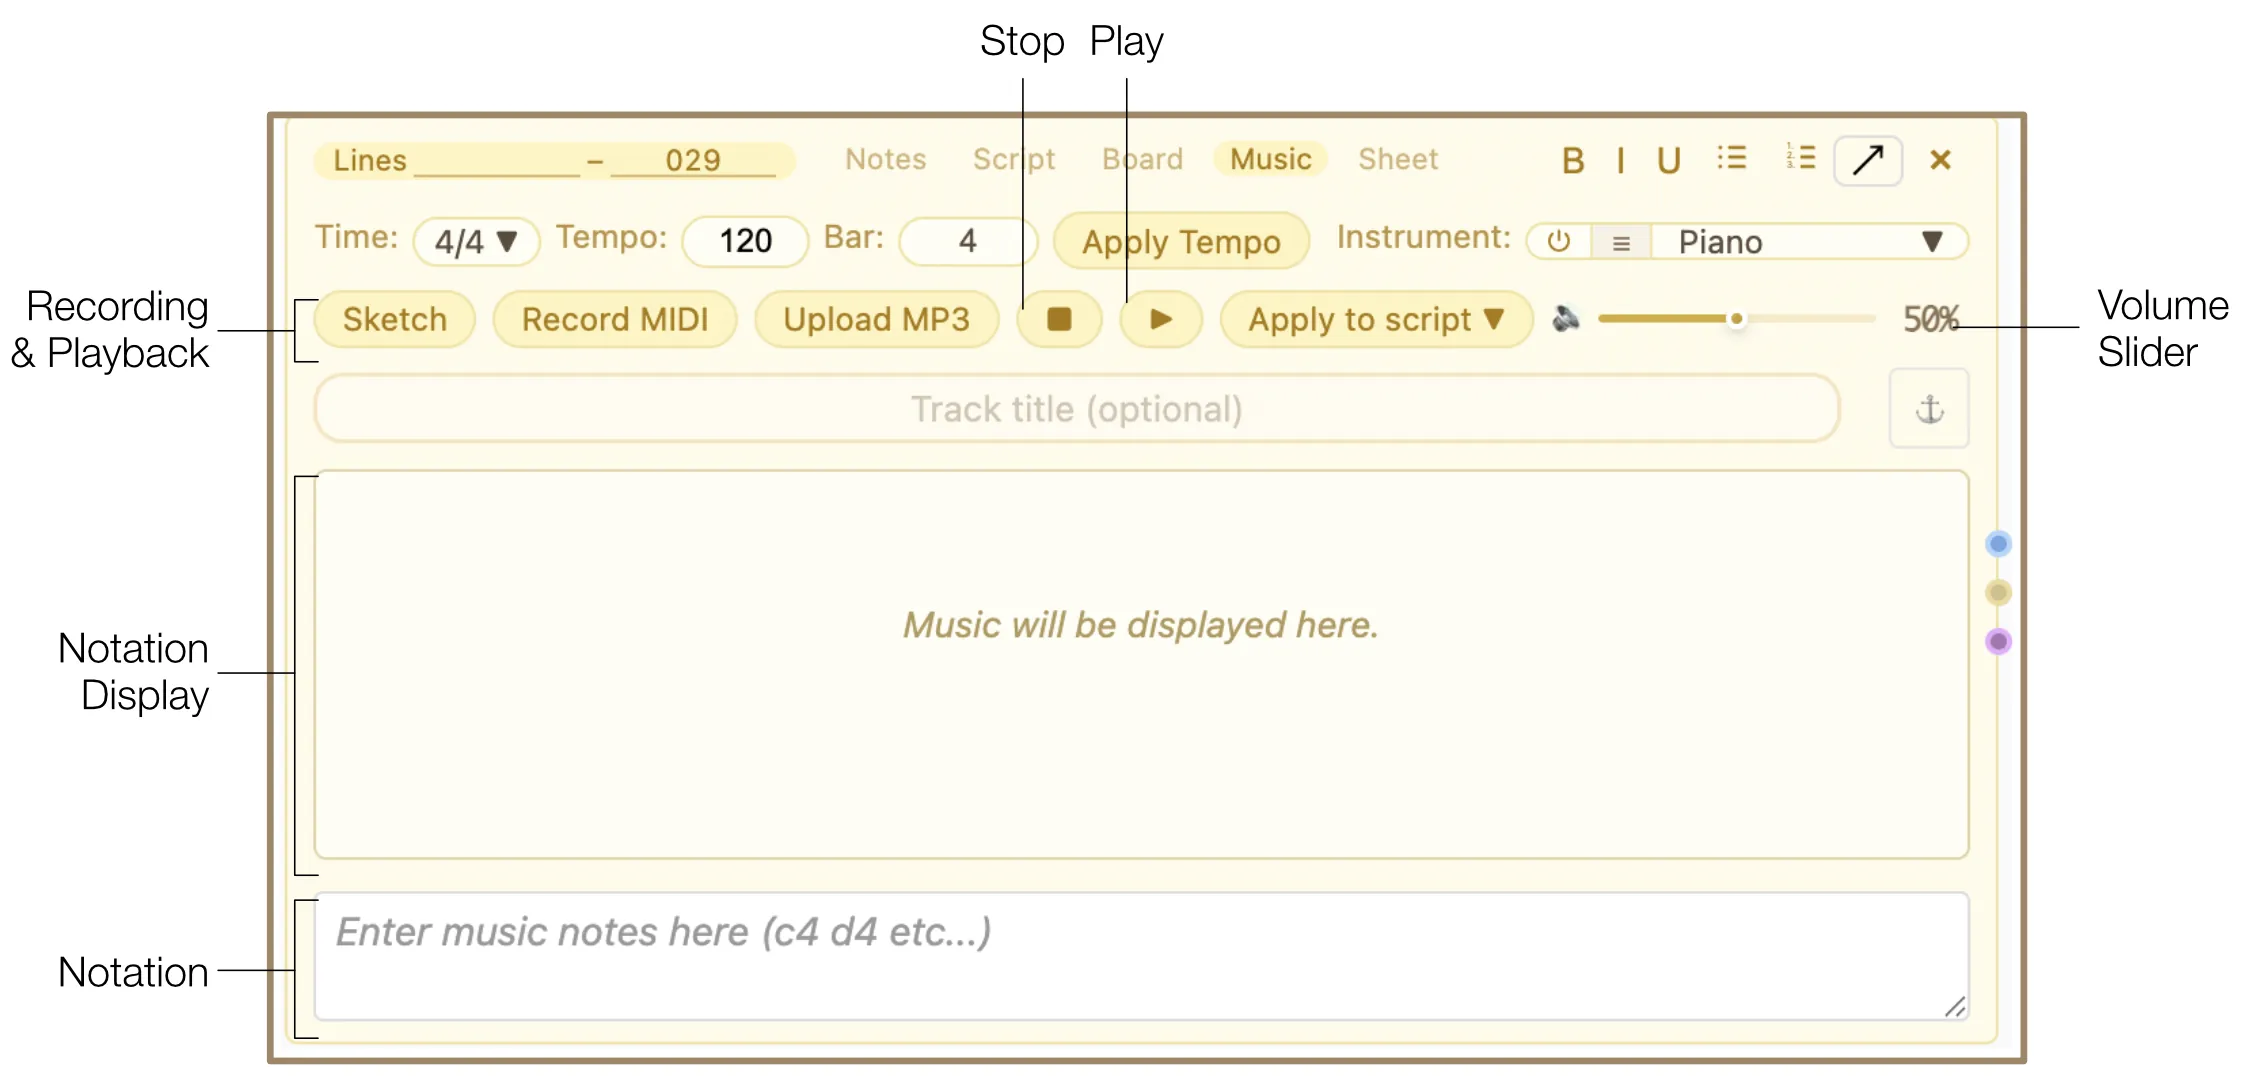
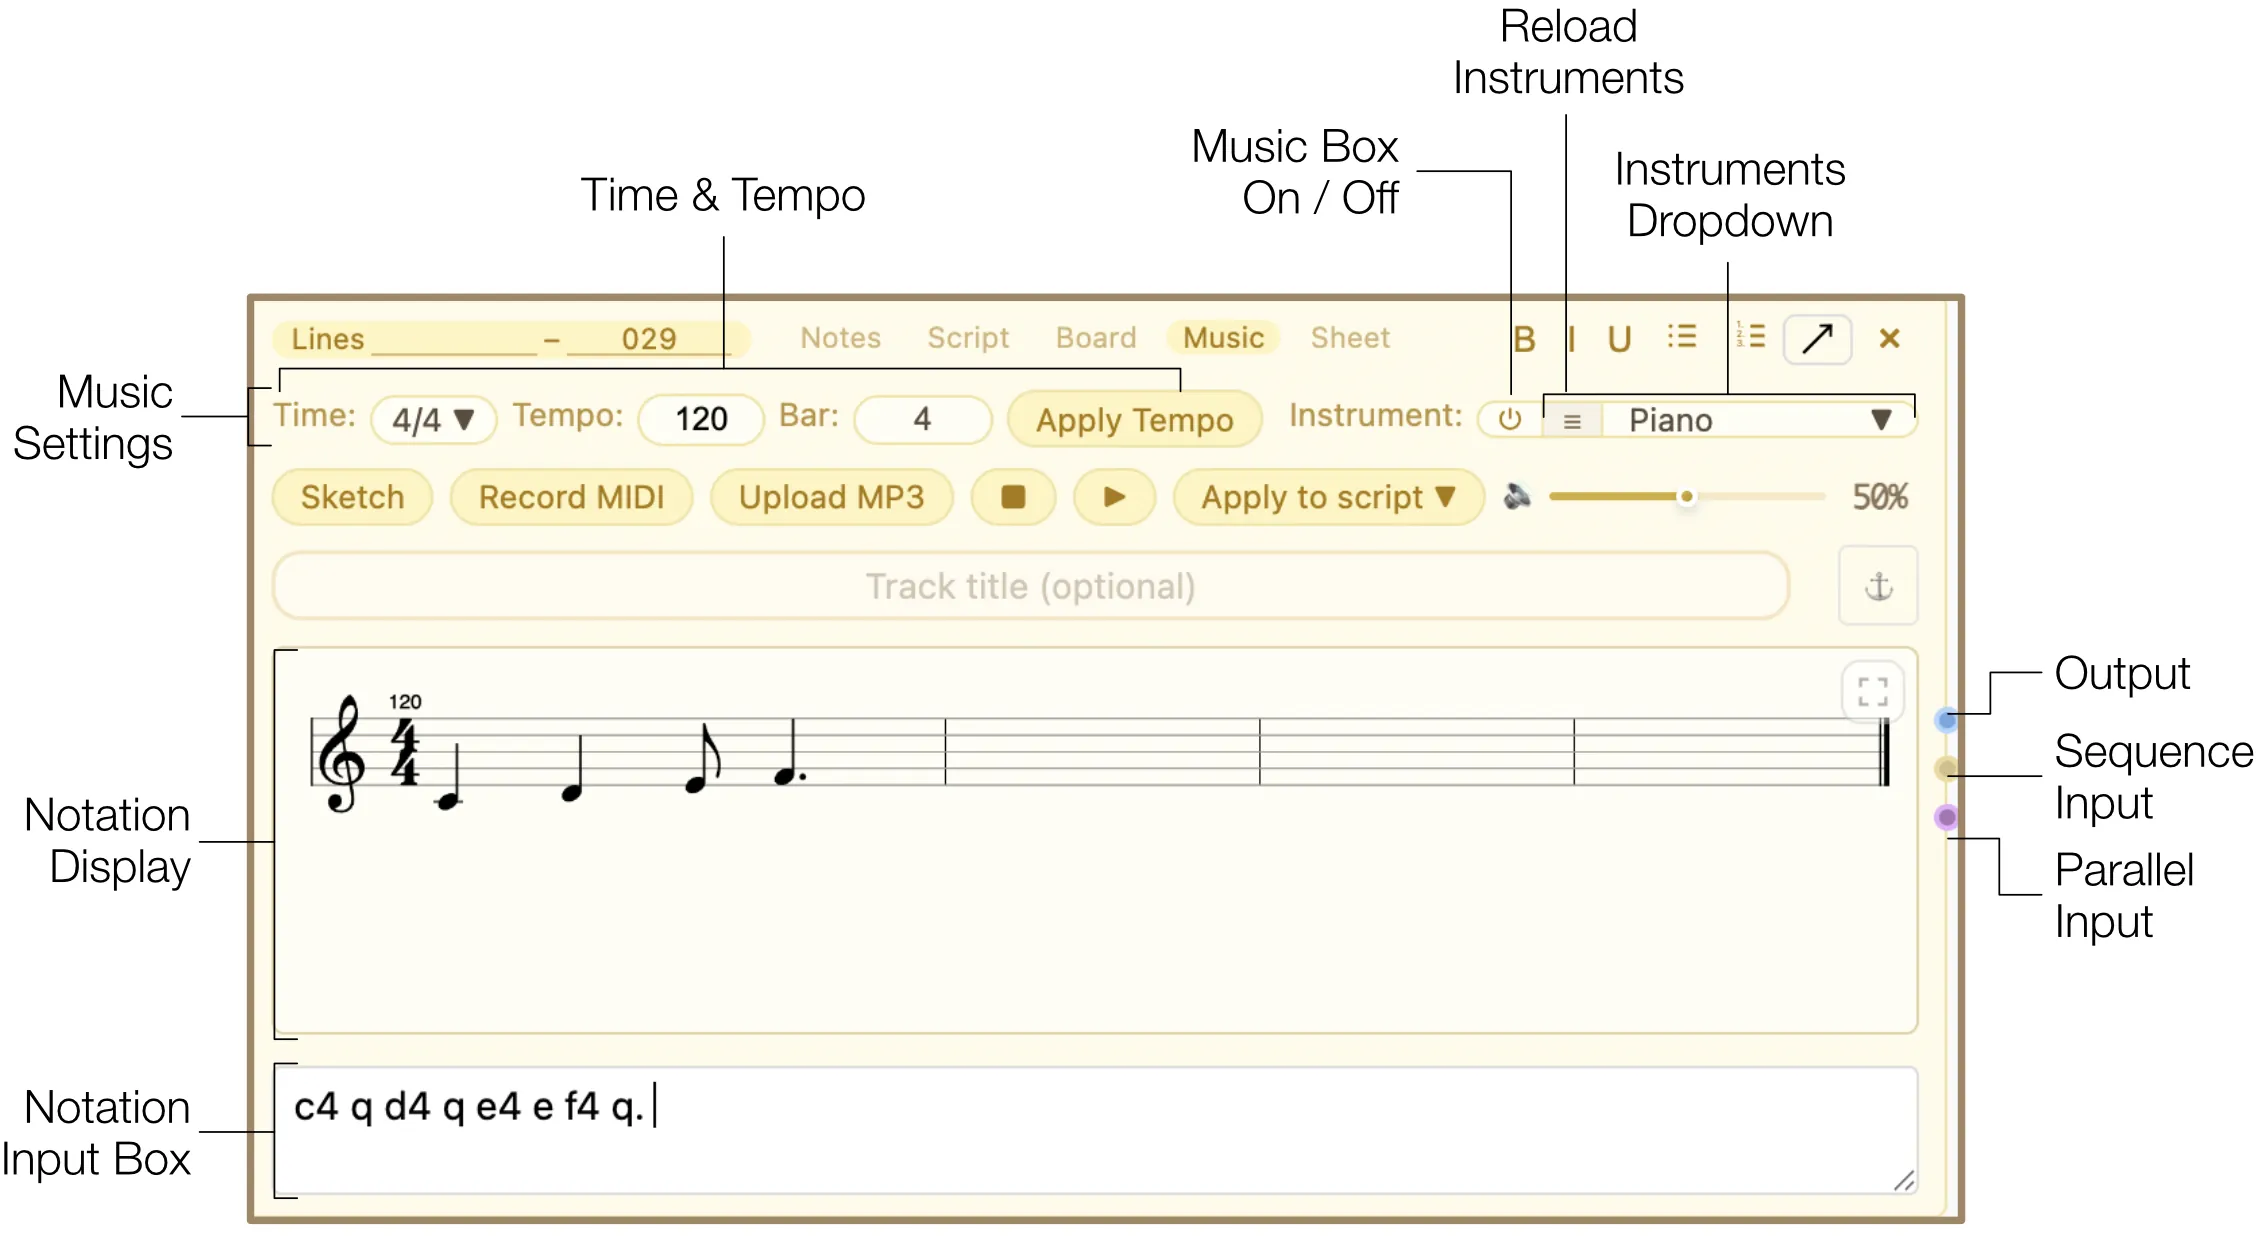
The Music injection interface is separated into several functional groups: Injection Settings, Music Settings, Recording & Playback, Notation Display, Notation Input Box, and Connection Manager.
- Title Box: Name your piece of music. The title appears on the generated waveform player when applied to the script. When you upload an audio file, the filename becomes the default track name.
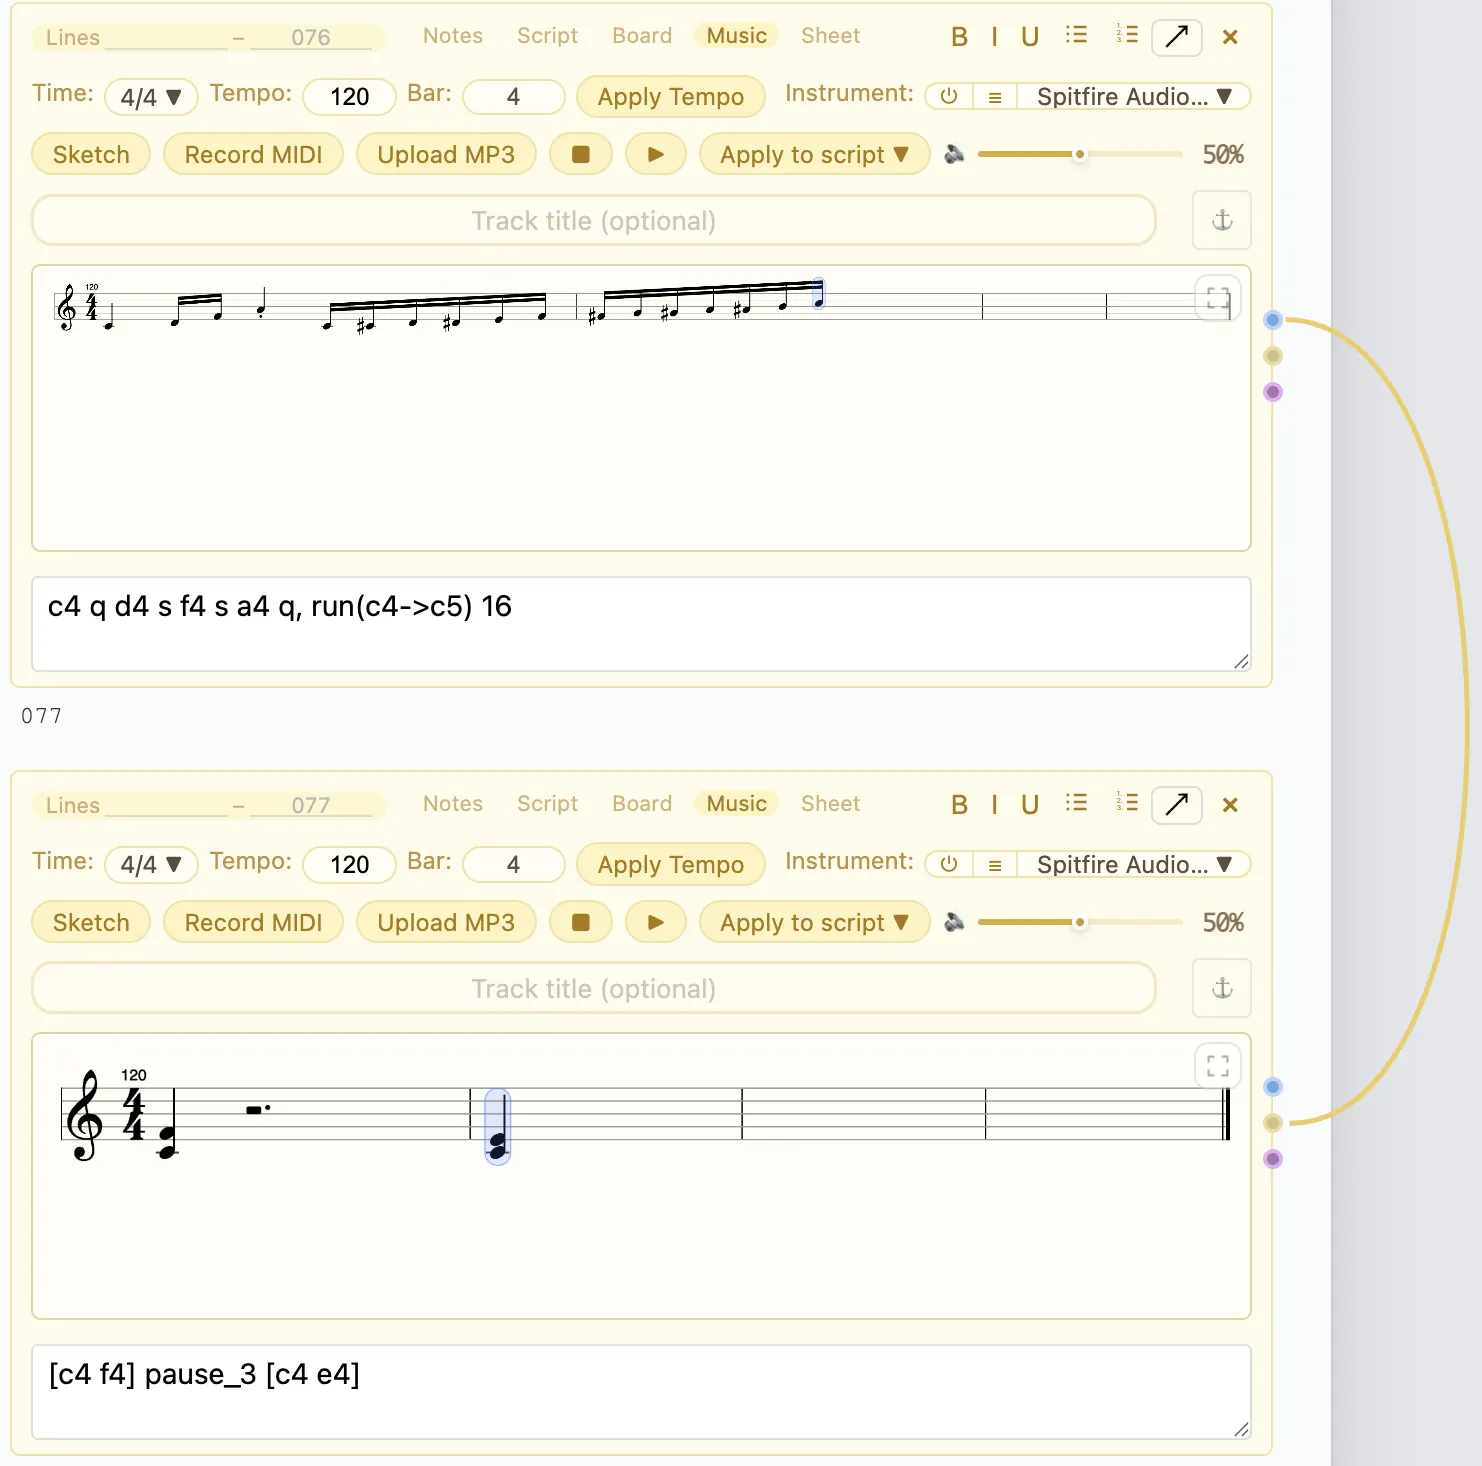
- Pop Out: Move the Music injection out of the script area by clicking the Pop Out icon. It maintains a visual connection (yellow dotted line) to its initial position. You can expand or collapse it, drag it to reposition it, and toggle the Move Lock icon to lock its position so it stays in place while scrolling.
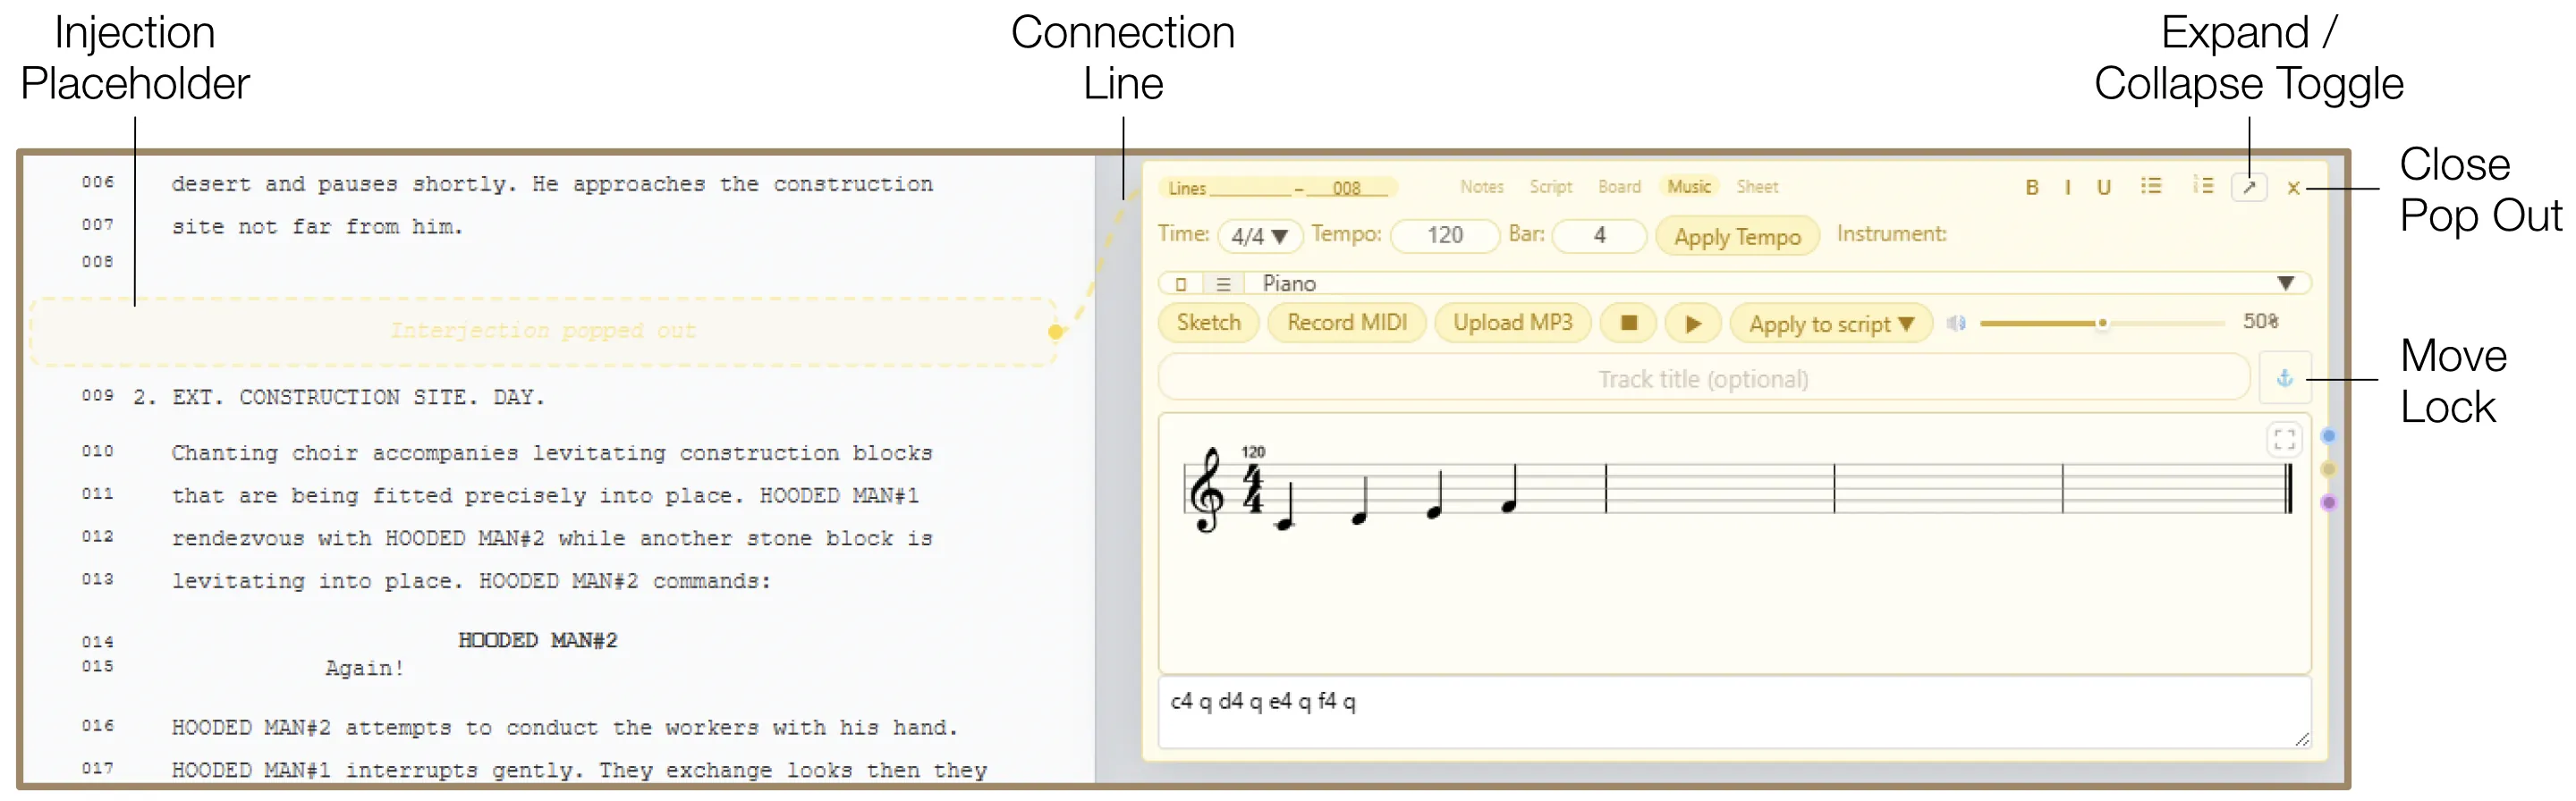
- Delete Injection: To remove the injection, click the Delete icon (×) in the top right corner. If the Delete Safeguard is active, you must hold the button for 2.5 seconds to confirm deletion. The content already applied to the script is not removed. Deleted injections remain in the Archive until manually cleared.
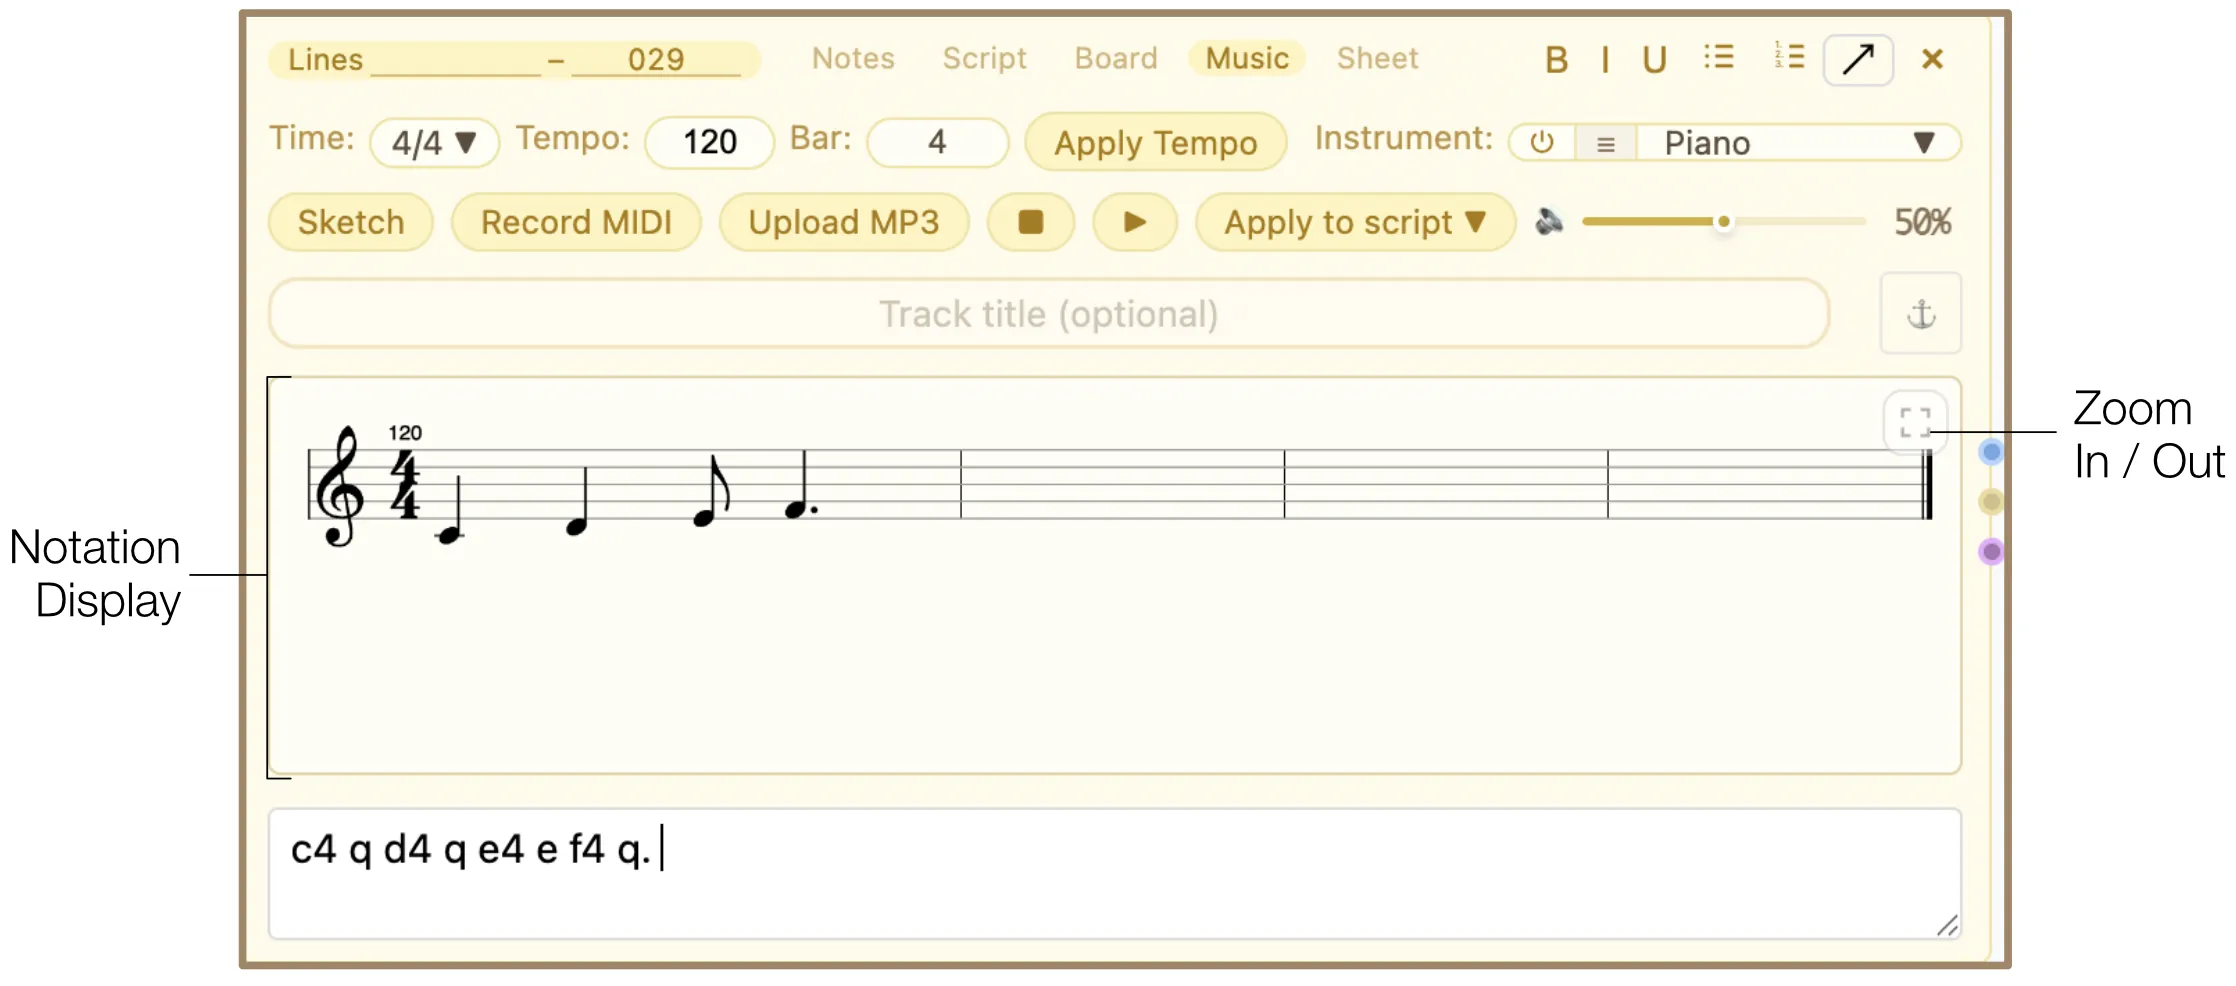
- Zoom In / Out: When notation is displayed, zoom in and out of the Notation Display area using the Zoom widget in its top right corner. In zoom mode, scroll the sheet area or middle-mouse drag to pan around the notation.
11.2 Adding Music
You can add music in three main workflows:
11.2.1 Upload Music
The software supports MP3 (.mp3) and WAV (.wav) formats. Click the "Upload MP3" button and select the file from the system file browser. The music file is automatically applied to the script and appears as a waveform player displaying the track name. You can play and pause the track by toggling the Play icon, and scrub through the audio by clicking anywhere on the waveform.
11.2.2 Record MIDI
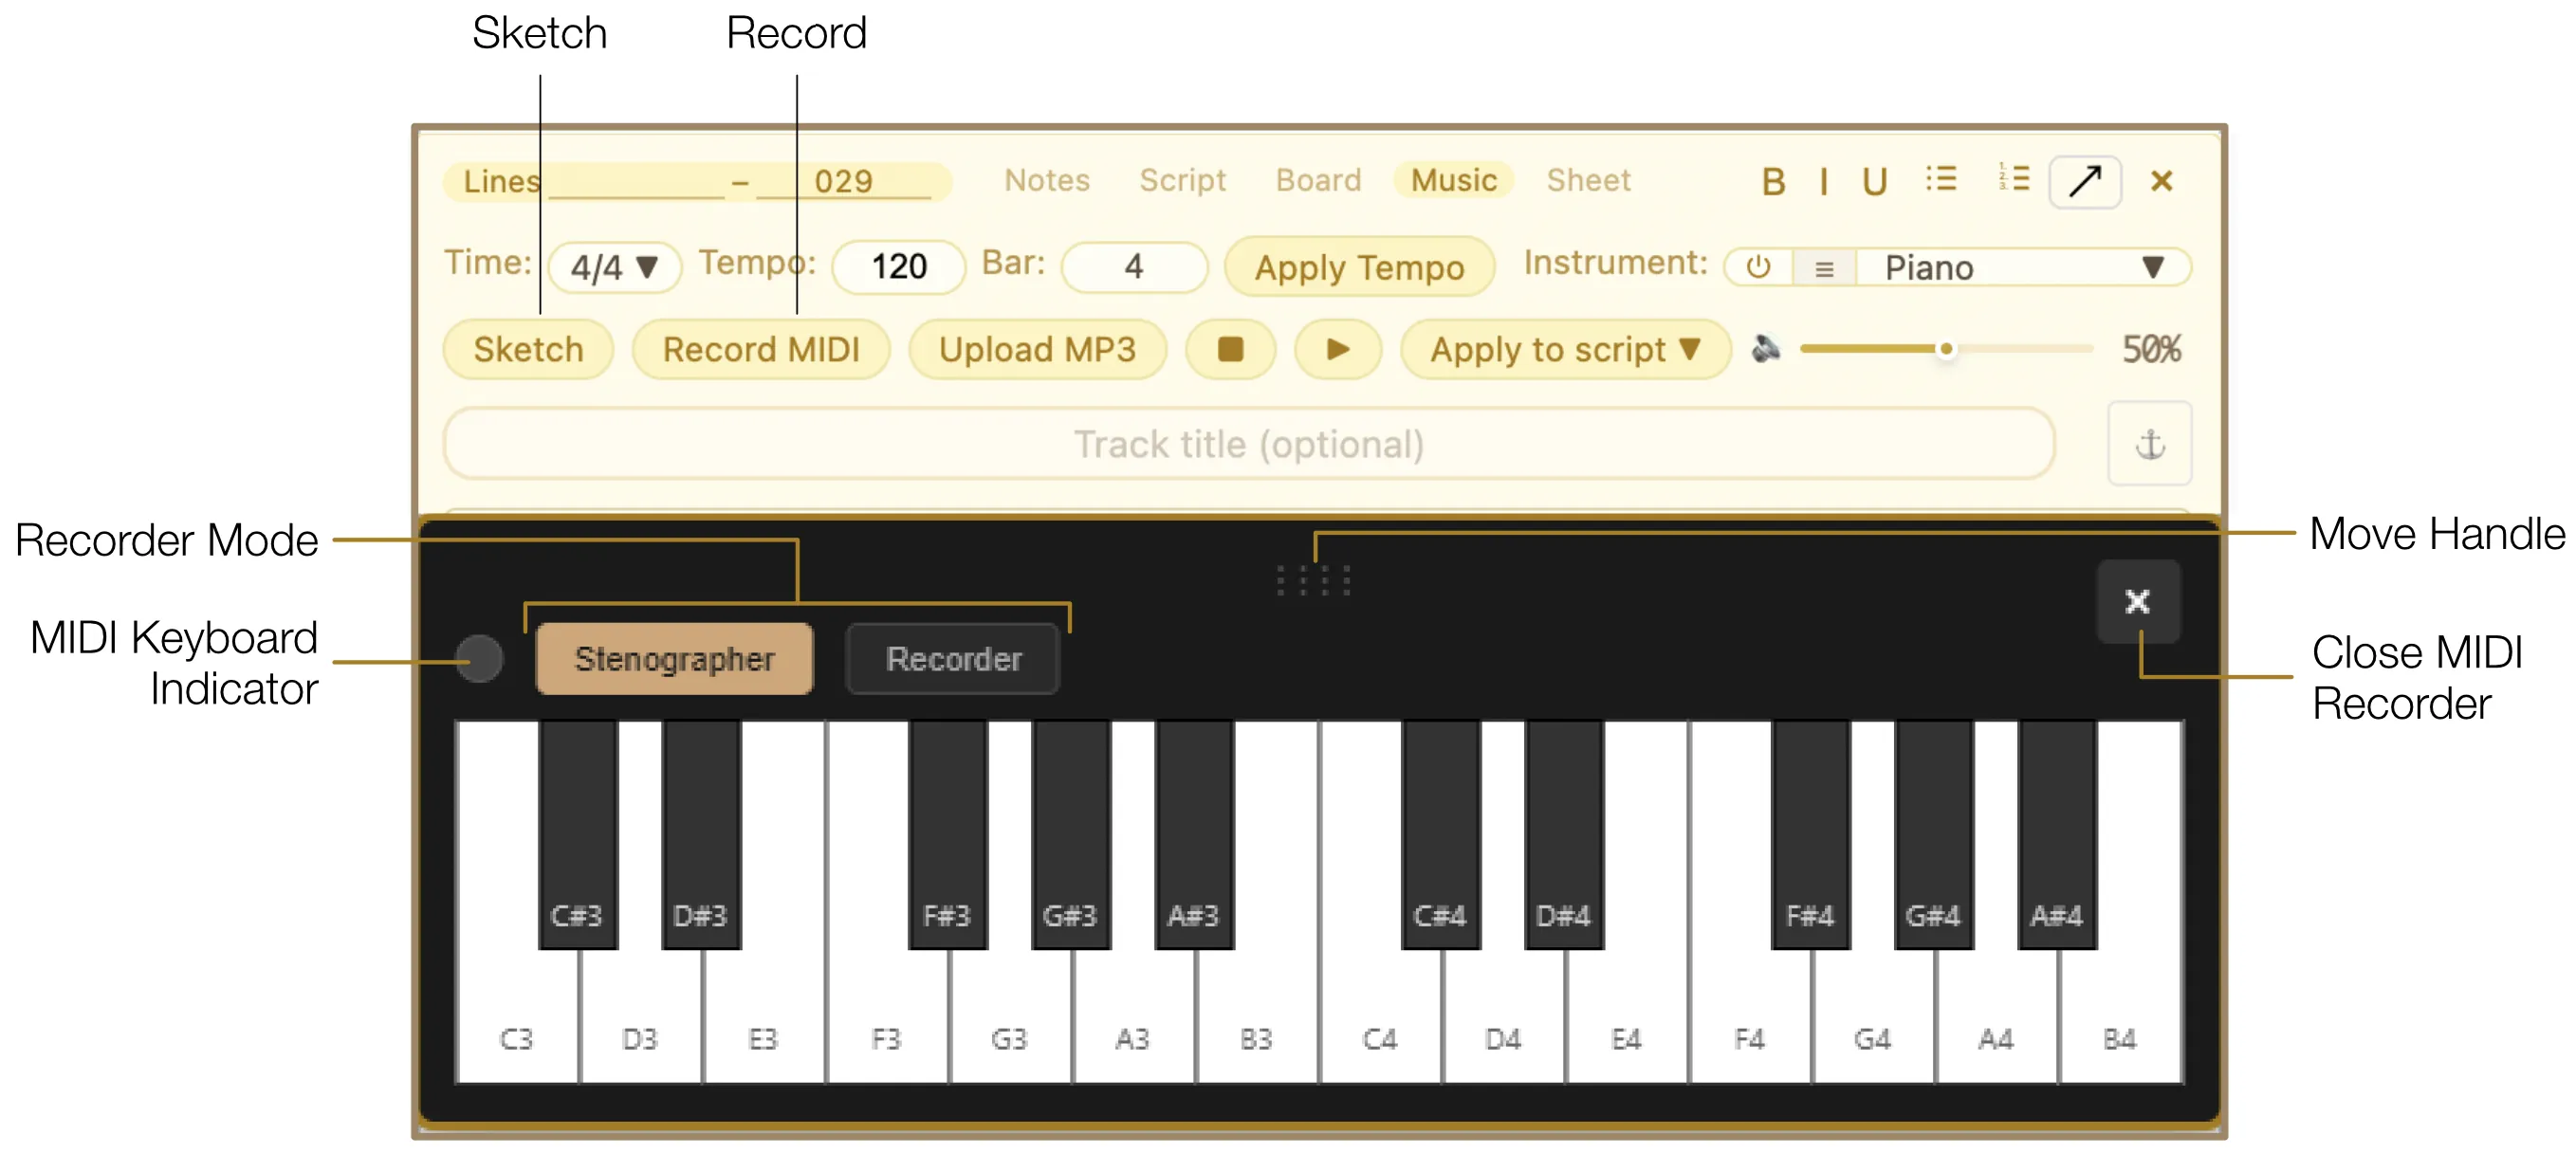
Click "Sketch" to open the MIDI Recorder. Use the integrated virtual keyboard by clicking on its keys, or connect your own physical MIDI keyboard. When the software detects a connected MIDI device, the MIDI Keyboard Indicator in the top left corner of the recorder window turns green. You can reposition the recorder by dragging its Move handle, and close it by clicking the Close icon (×).
Before recording, select a Recording Mode:
- Stenographer Mode: Converts your MIDI performance into readable musical notation.
- Recorder Mode: Preserves the raw performance feel and renders it as an audio waveform.
Click "Record MIDI" to start — the button label changes to "Recording". Click it again to stop.
11.2.3 Notation Typing
Use the Notation Input Box to type music instructions using abbreviations and shortcuts. The software reads this text and renders it as sheet music automatically in the Notation Display area. If you select a note in the Notation Display, the corresponding abbreviation in the Notation Input Box highlights.
The Notation Display area can show:
- Treble clef notation
- Notes and rests
- Chords
- Accidentals (sharps, flats, naturals)
- Staccato marks
- Slurs and ties across measures
- Crescendo and diminuendo hairpins
- Triplets
- Grace notes
- Beamed notes
- Multiple rows of measures
- Tempo and time signature changes
You can open the full shortcut list by pressing the / key in the Notation Input Box.
11.2.4 Playback Controls
Listen to the added music using the Play/Pause toggle. During playback, the current note is highlighted and the preview follows the playhead in zoom mode. Clicking Play/Pause during playback pauses exactly at the current position; clicking it again resumes from that spot. To stop playback and reset the playhead to the beginning, use the Stop icon. Adjust the playback volume using the Volume slider.
11.3 Music Settings
- Time & Tempo: Change the time and tempo signature at a certain bar. Choose the time signature from the Time dropdown, enter Tempo and Bar values, and click "Apply Tempo".
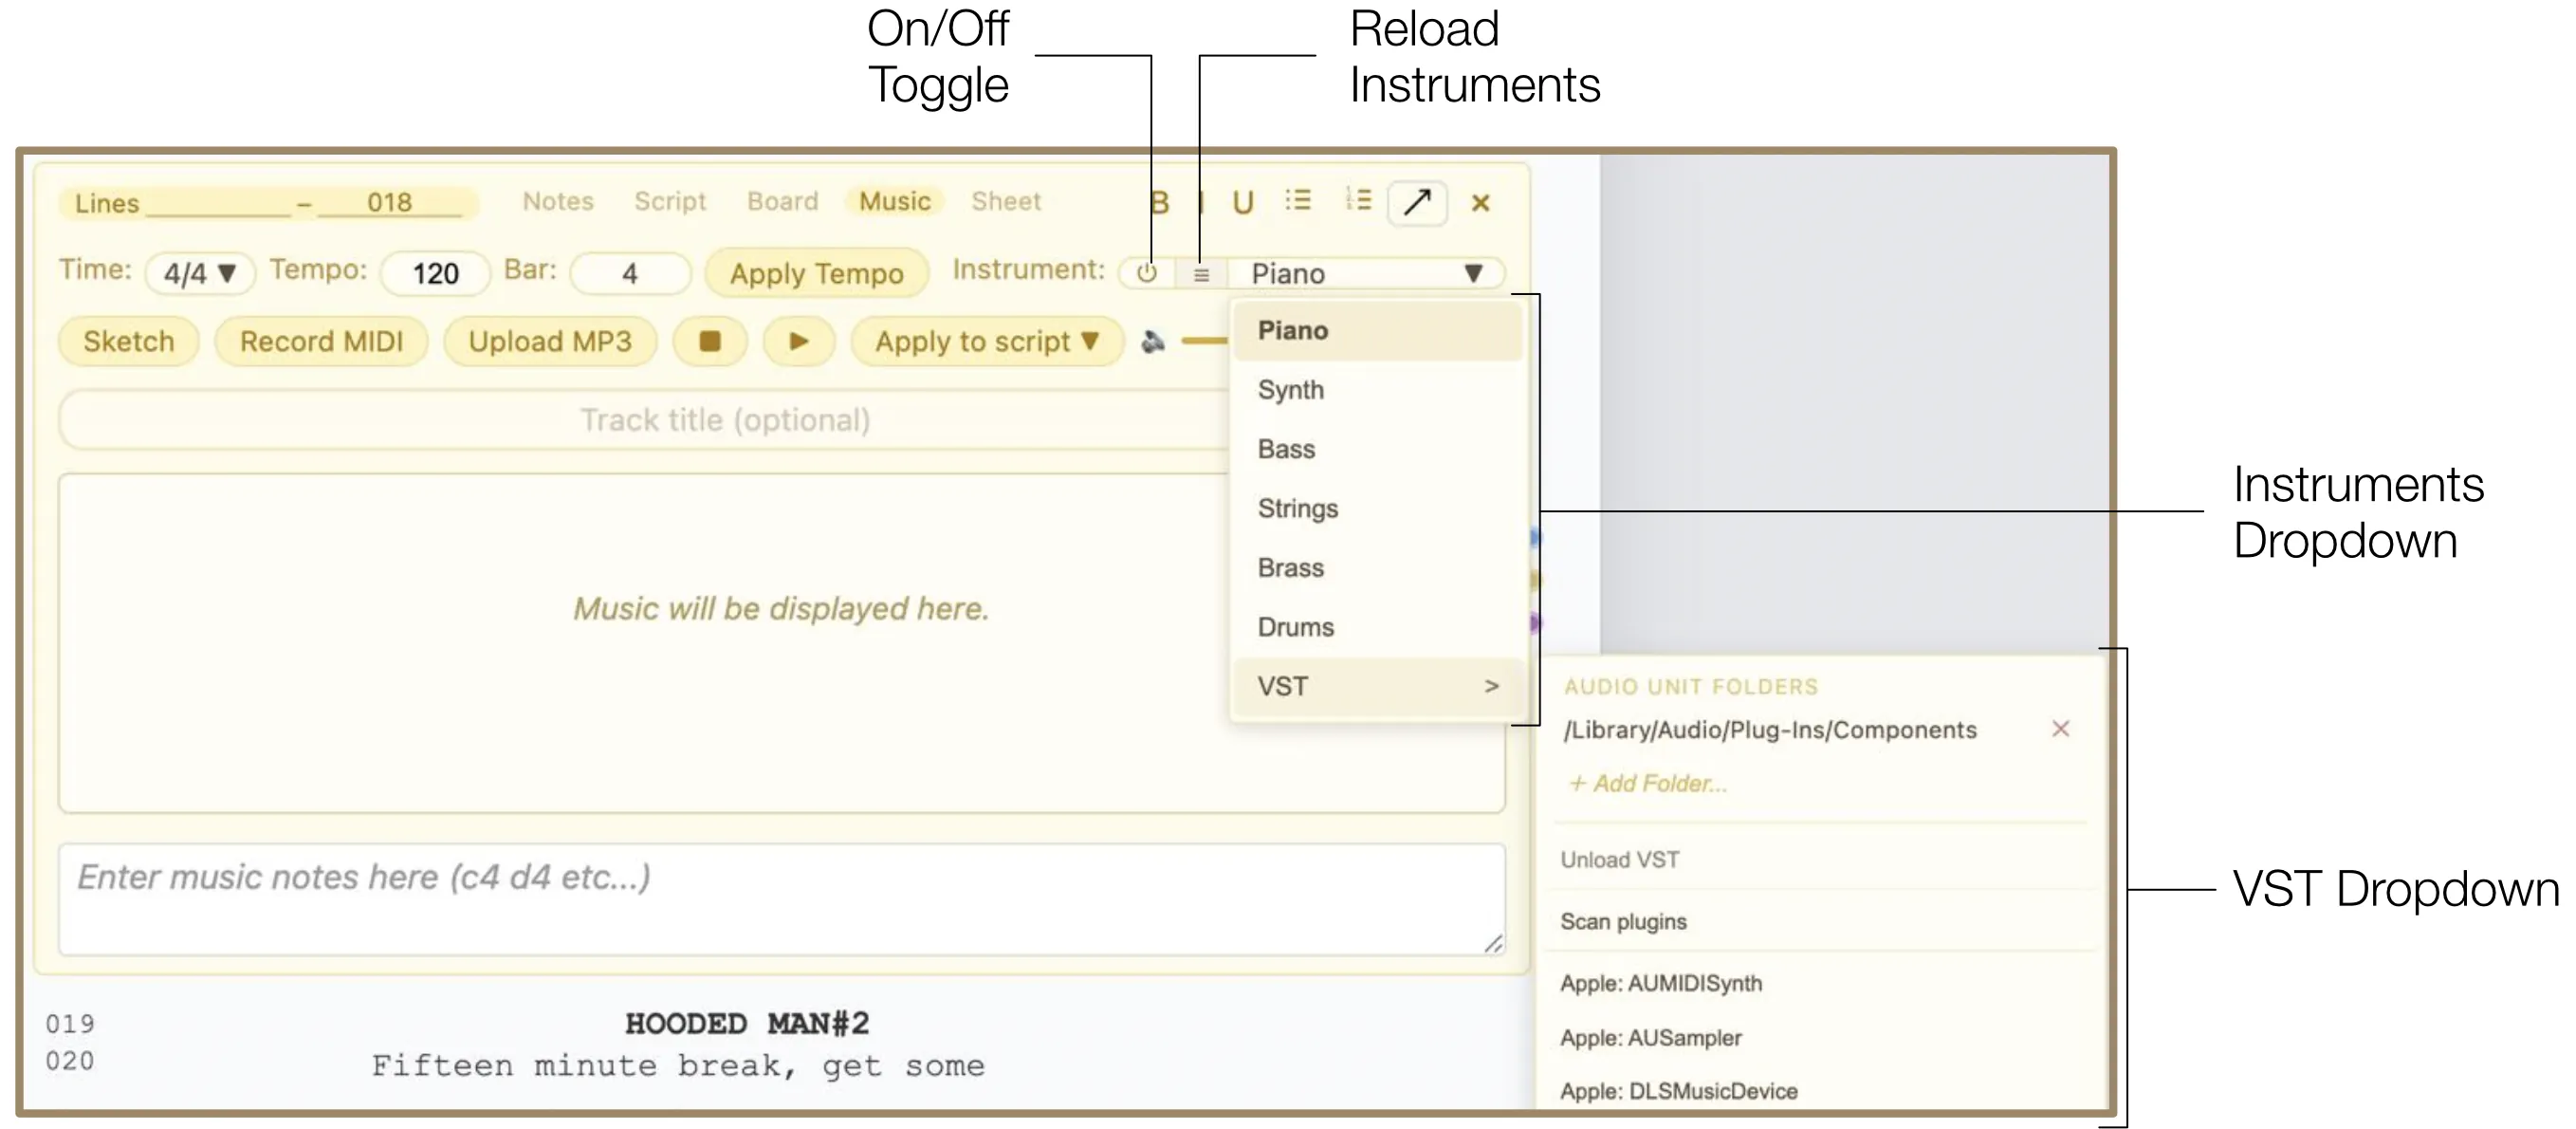
- Instruments & VST: The default instrument is piano. Choose another from the Instruments dropdown or connect VST3/Audio Units plugins. Click "+ Add Folder" in the VST dropdown and select the folder containing your instruments. The instruments connect automatically and appear in the dropdown. If they do not appear, select "Scan plugins". If a directory path has changed (e.g., instruments were relocated or the project was opened on a different device), delete the invalid path by clicking the Delete icon (×) next to it. To avoid excessive memory load, select an instrument and click "Unload VST" to disconnect it. Use the On/Off toggle to temporarily disable the entire injection and prevent unwanted accidental actions. Click the Reload icon if a connected plugin fails to produce sound — this may happen when a project has not been opened for a while.
11.4 Connection Nodes
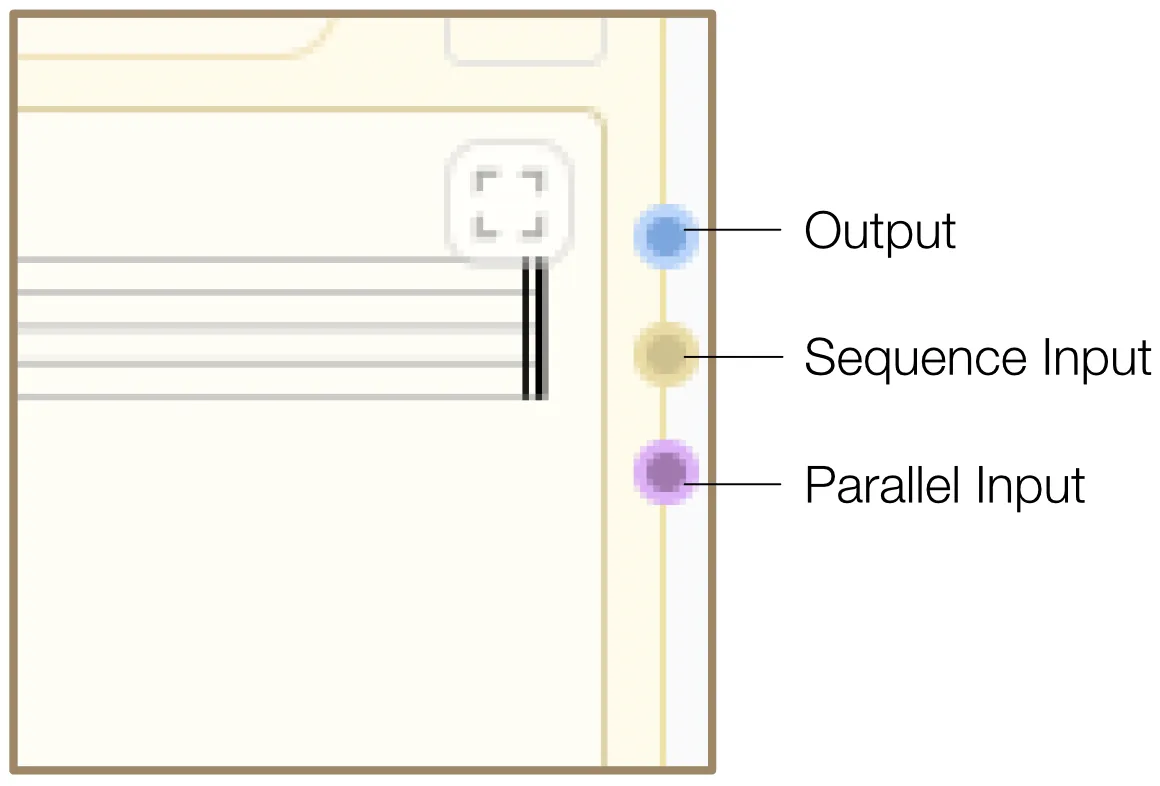
Connect multiple Music injections so several music sections can play or render in sequence or in parallel. To play Audio 2 after Audio 1, drag a wire from the blue Output port of Audio 1 into the yellow Sequence Input port of Audio 2. To play Audio 1 and Audio 2 simultaneously, drag a wire from the blue Output port of Audio 1 into the purple Parallel Input port of Audio 2. Each Music injection displays three ports: Output (blue, for sending audio out), Sequence Input (yellow, for chaining in series), and Parallel Input (purple, for simultaneous playback).
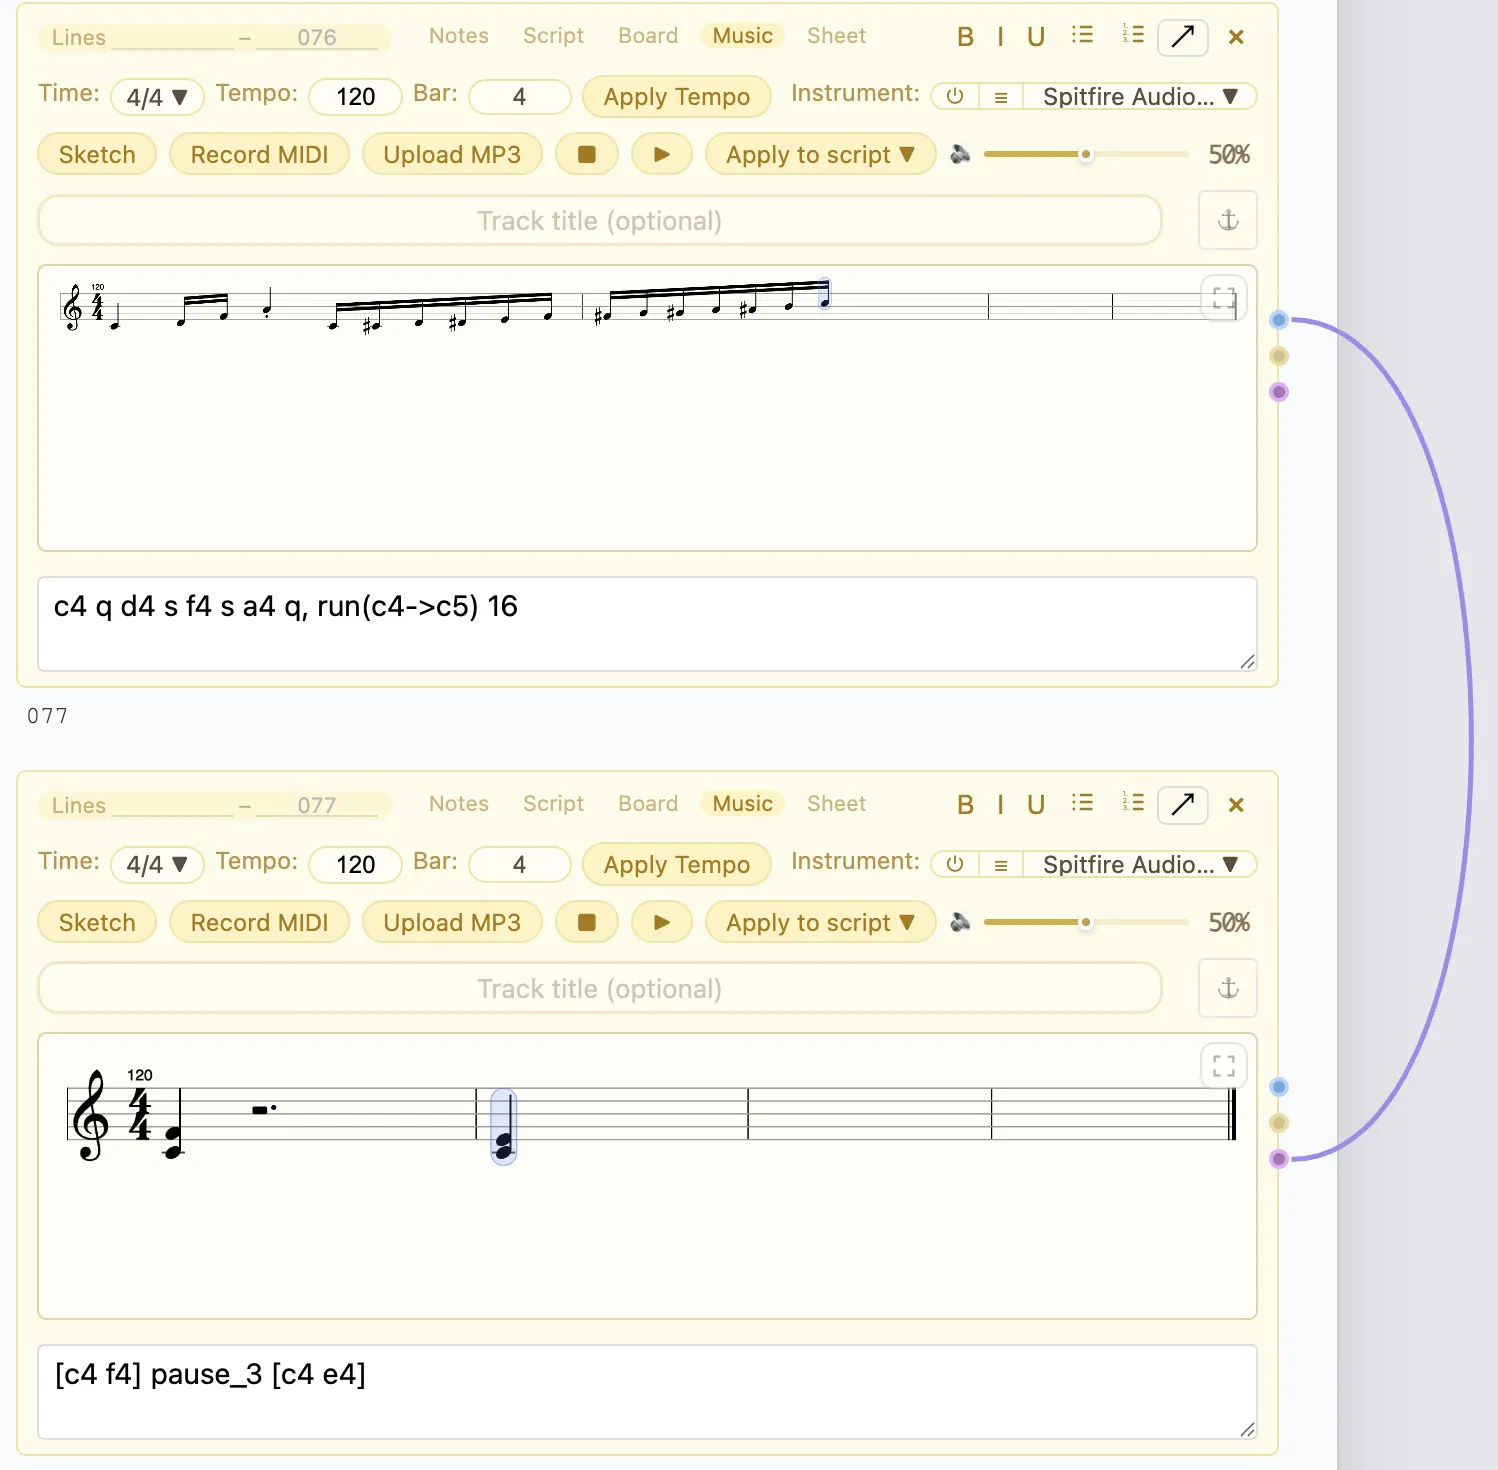
11.5 Apply to Script
Music can be applied to the script in two ways, accessible in the Apply To Script dropdown:
- As Notation: Inserts the rendered music as inline notation. Live playhead markers and temporary highlight effects are removed from the applied notation.
- As Audio (MP3, WAV): Inserts a waveform player into the document. If only notation exists, the notation is rendered into an audio track first. While rendering, a placeholder is displayed. If rendering fails, an error message appears.
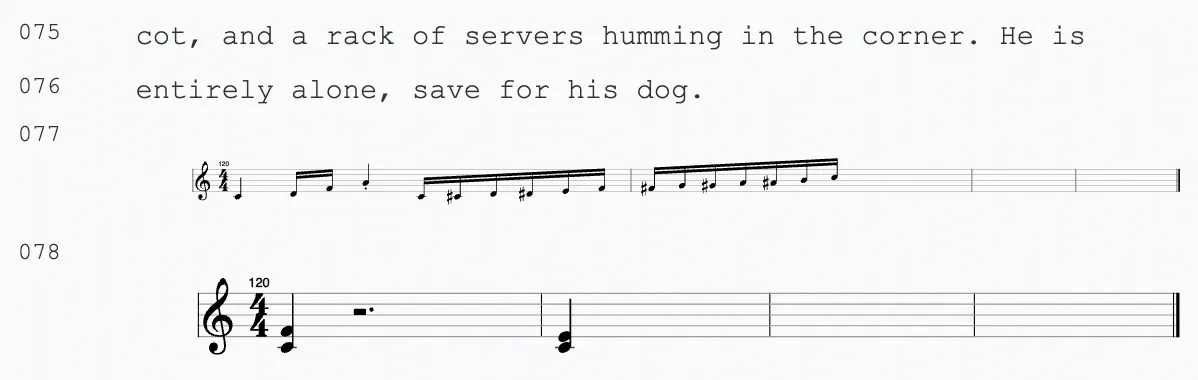
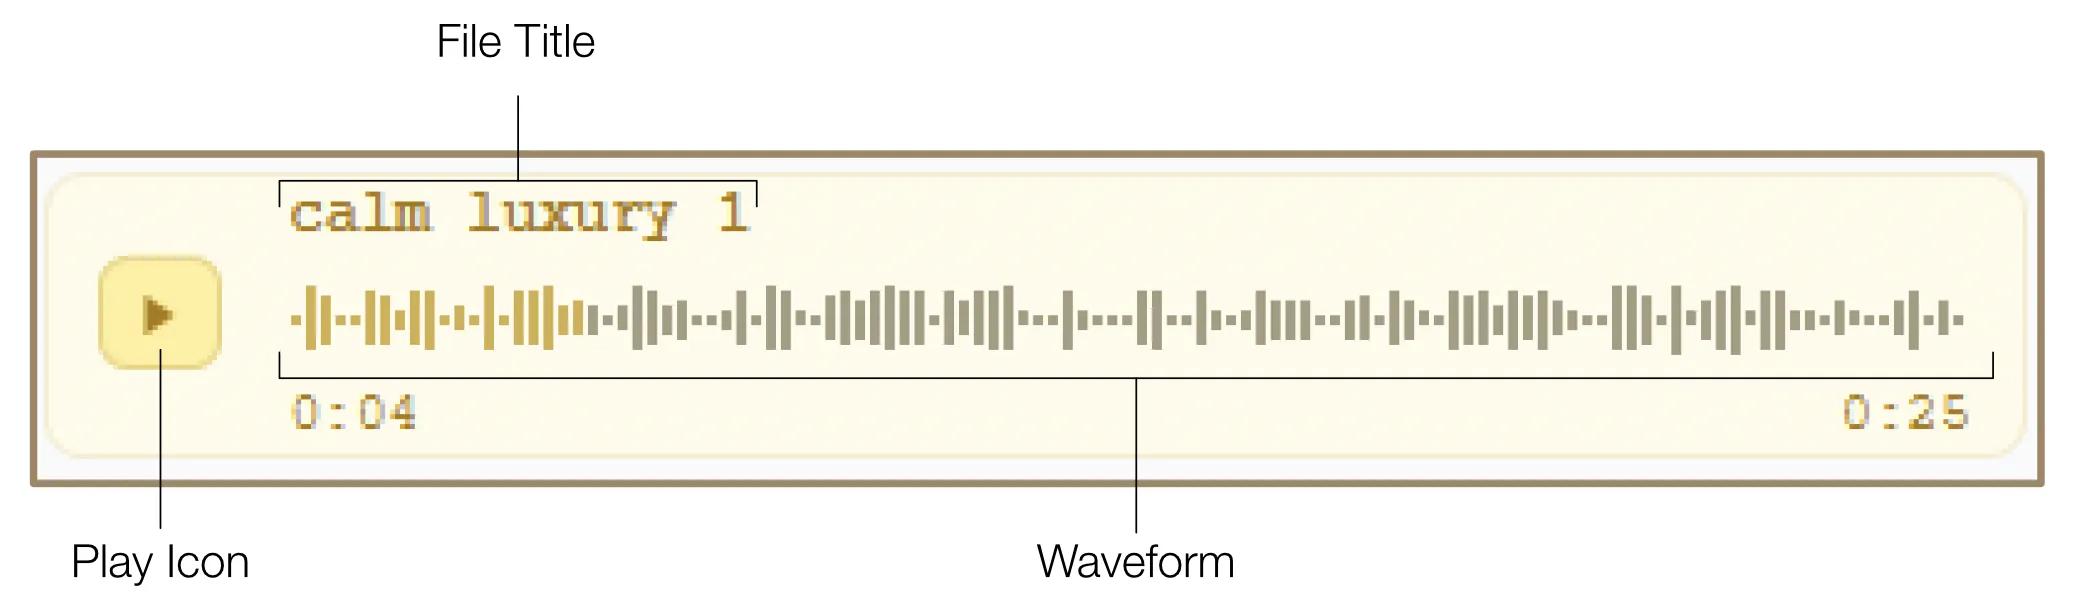
11.6 Shortcuts
The following table lists the abbreviations and shortcuts for typing music instructions in the Notation Input Box. You can also open the shortcut list by pressing the / key in the Notation Input Box.
| Shortcut | Meaning | Notes |
|---|---|---|
a b c d e f g | Notes | Not case-sensitive: c4 and C4 are treated the same. |
0 1 2 3 4 … | Octaves | Added after the note name, e.g.: c4, f#5, bb3. |
# | Sharp | The renderer manages accidentals per bar and adds natural signs where needed to cancel earlier accidentals. |
## | Double sharp | |
b | Flat | |
bb | Double flat | |
n | Natural | |
| Velocity (Dynamics) | ||
pp | Pianissimo (20%) | Place the marker before a note written in CAPITAL letters, e.g. mfC4 q = mezzo forte C4 quarter note. Capital letters are required because fb4 could be misinterpreted as "f flat 4" instead of "forte b 4". The default (unmarked) velocity is 70%. |
p | Piano (35%) | |
mp | Mezzo piano (50%) | |
mf | Mezzo forte (65%) | |
f | Forte (80%) | |
ff | Fortissimo (100%) | |
C4 q (capital C) | Capital note naming | Required when velocity markers precede a note to avoid ambiguity with accidentals. |
| Durations | ||
w or 1 | Whole | Example: c4 w d4 1 |
h or 2 or 1/2 | Half | Example: c4 h d4 1/2 |
q or 4 or 1/4 | Quarter | Example: c4 q d4 4 |
e or 8 or 1/8 | Eighth | Example: c4 e d4 1/8 |
s or 16 or 1/16 | Sixteenth | Example: c4 s d4 16 |
t or 32 or 1/32 | Thirty-second | Example: c4 t d4 1/32 |
64 or 1/64 | Sixty-fourth | Example: c4 64 d4 1/64 |
. or d | Dotted | Example: c4 q. d4 hd |
| Rests & Pauses | ||
pause 4 | Whole rest | Approximate beat values are converted to readable rests. |
pause 3 | Dotted half rest | |
pause 2 | Half rest | |
pause 1.5 | Dotted quarter rest | |
pause 1 | Quarter rest | |
pause 0.75 | Dotted eighth rest | |
pause 0.5 | Eighth rest | |
pause 0.25 | Sixteenth rest | |
| Triplets | ||
c4 8t | Triplet duration suffix | Added after the duration. |
tri(c4 d4 e4) | Group of triplet notes | Enclose notes in tri(). |
| Chords | ||
[c4 e4 g4] q | Basic chord | Write chords inside square brackets. Duration after the closing bracket overrides inner duration. |
[c4 e4 g4] q, | Staccato chord | Add a comma after the duration. |
| Staccato | ||
c4 q, | Staccato note | The comma belongs after the duration, not after the note. |
| Legato / Slurs | ||
(c4 q d4 q e4 q f4 q) | Slurred group | The renderer draws slurs across the notes in the group. Staccato notes break the slur behavior. |
| Crescendo & Diminuendo | ||
cres(c4 q d4 q) | Crescendo | Hairpins also affect playback velocity, making notes louder or softer during playback. |
cresp(c4 q d4 q) | Stronger crescendo | |
decres(c4 q d4 q) or dim(c4 q d4 q) | Diminuendo | |
decresp(c4 q d4 q) or dimp(c4 q d4 q) | Diminuendo toward piano | |
| Arpeggios | ||
arp [c4 e4 g4] q | Default arpeggio | You can specify the delay between chord notes in milliseconds. |
arp40 [c4 e4 g4] q or arp_40 [c4 e4 g4] q | Arpeggio with delay (40ms) | |
| Grace Notes | ||
grace(c4 d4 e4) f4 q | Explicit grace notes | Rendered as slashed grace notes and play quickly before the main note. |
grace(c4->e4) f4 q | Grace-note run | |
| Runs | ||
run(c4->c5) s | Ascending run | The duration after the closing parenthesis is applied to every generated note. Defaults to sixteenth notes. Ascending runs prefer sharps; descending runs prefer flats. |
run(c4->g4->c4) e | Run with direction change | |
| Flutter | ||
c4 q flutter | Flutter / Tremolo | Affects playback. Useful for tremolo-like or repeated note effects. |
12. Sheet Injection
The Sheet injection provides a professional, structured workspace for spreadsheet management. It allows you to embed detailed production documents — call sheets, continuity logs, production plans, and more — directly into your project. Unlike other injection types, Sheet injections cannot be applied to the script because of their size. Instead, data is saved within injection boxes and can be exported in CSV or PDF format.
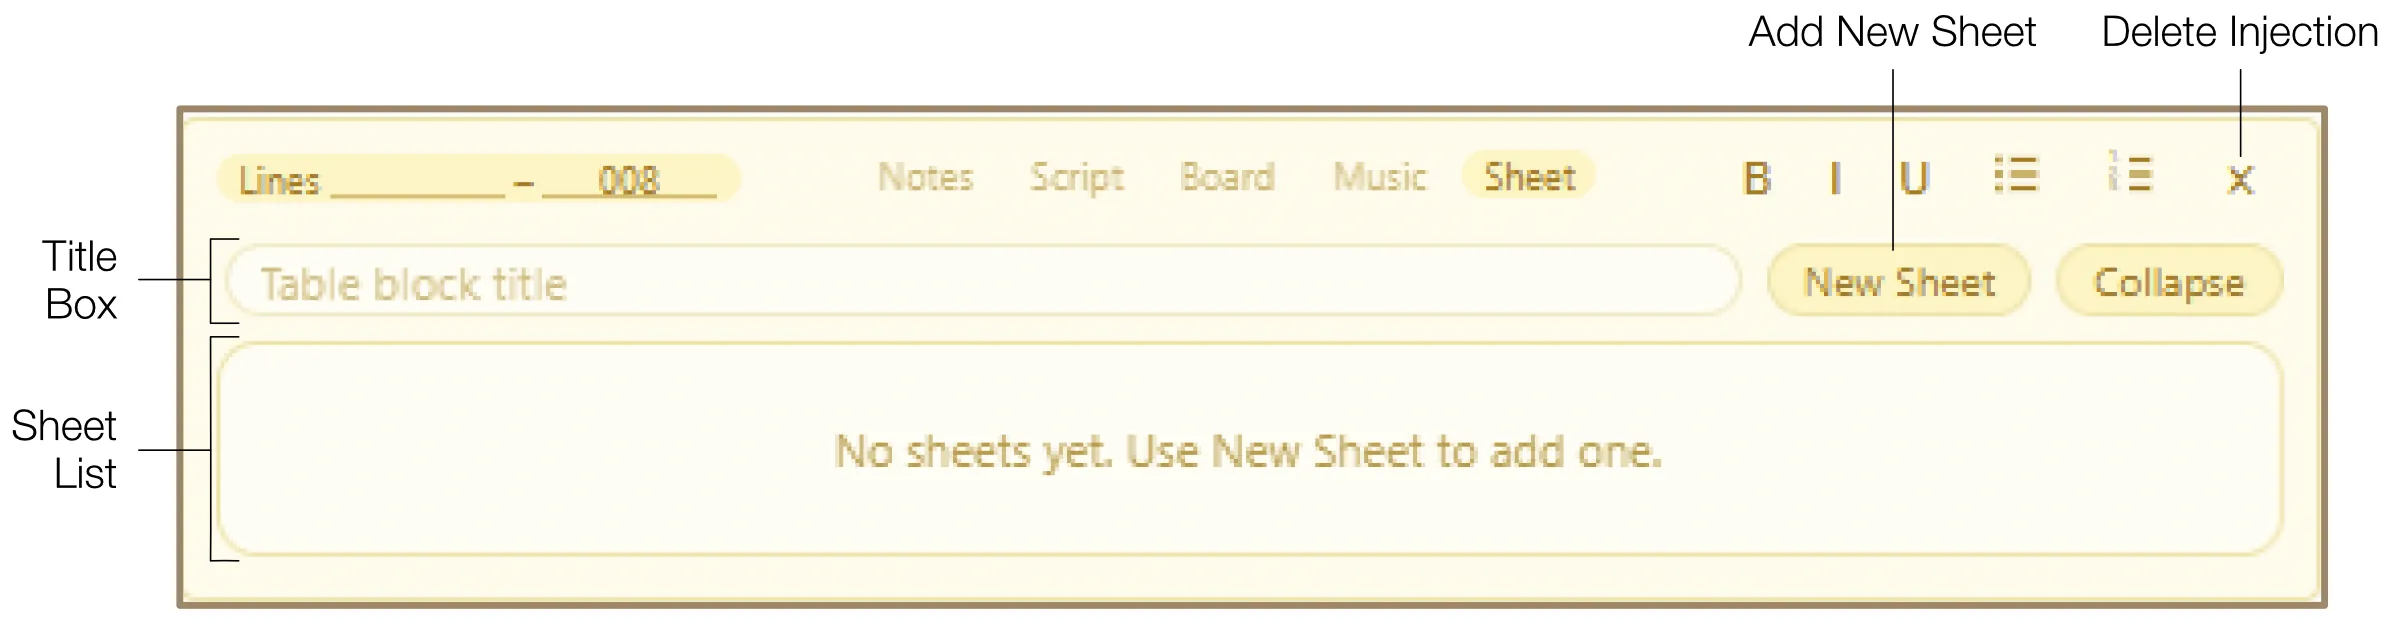
12.1 Sheet Management
Multiple spreadsheets can be added to the same injection, each with its own independent content. To add a spreadsheet, click the "New Sheet" button and choose from six distinct types: Budget, Production Plan, Scheduling (Call Sheet), Continuity Log, Costume, or Freeform. Once added, the spreadsheet appears in the Sheet List with its type badge, title, and configuration settings.
You can rename spreadsheets by clicking their title. The Sheet Editor rescales automatically according to its contents. Specialized Zoom & Shift functions appear when the editor is open to provide an unobstructed view.
12.2 Budget Spreadsheet
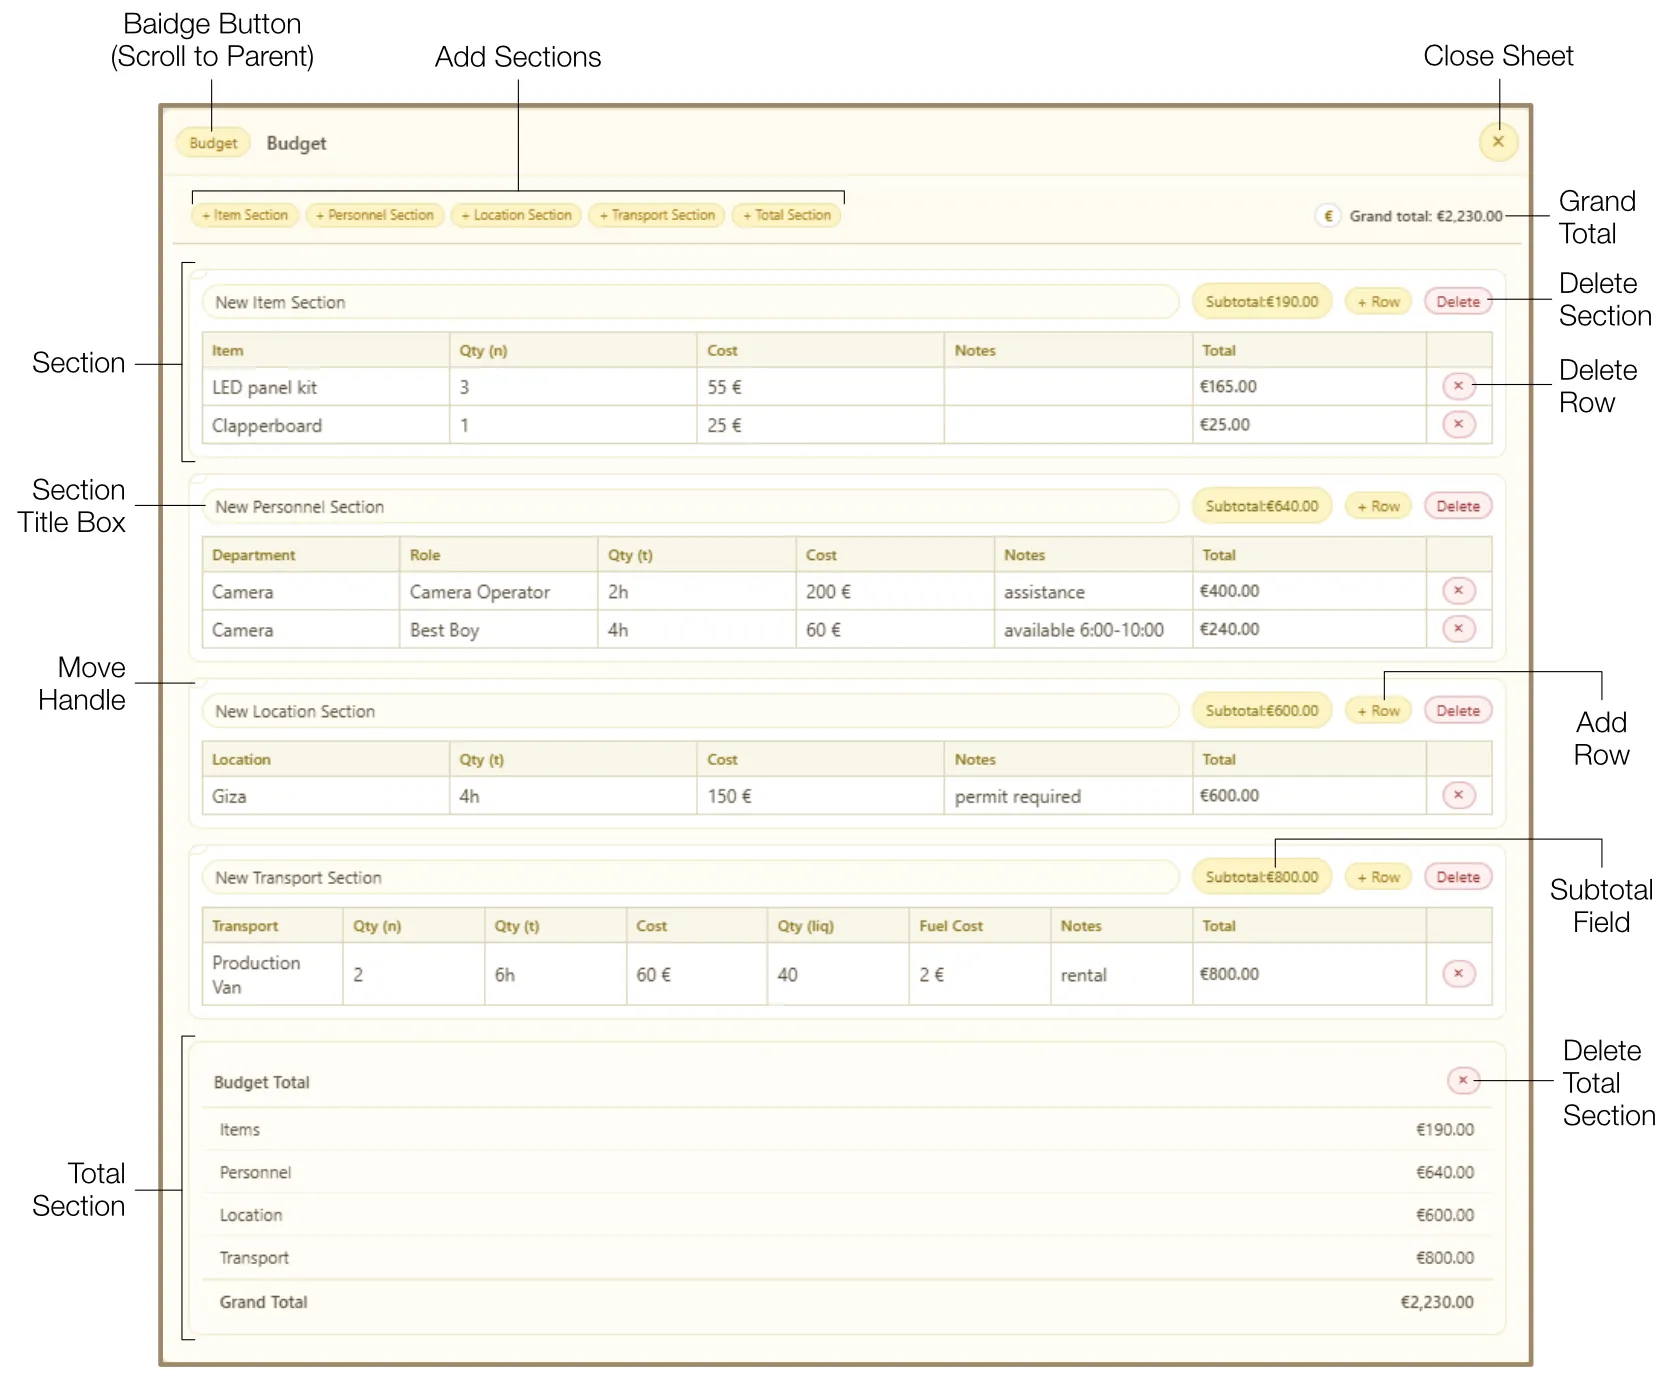
Designed for production accountants and line producers to itemize, cost, and total expenses of individual scenes or an entire project. The editor is organized into sections: Item, Personnel, Location, Transport, and Total. Each section (except Total) features a table with columns for Item, Department, Role, Location, Transport, Quantity, Cost, Notes, and an auto-calculated Total column. The Total Section provides an overview of all costs per cost type with the grand total at the bottom, updating automatically as data changes.
12.3 Production Plan Spreadsheet
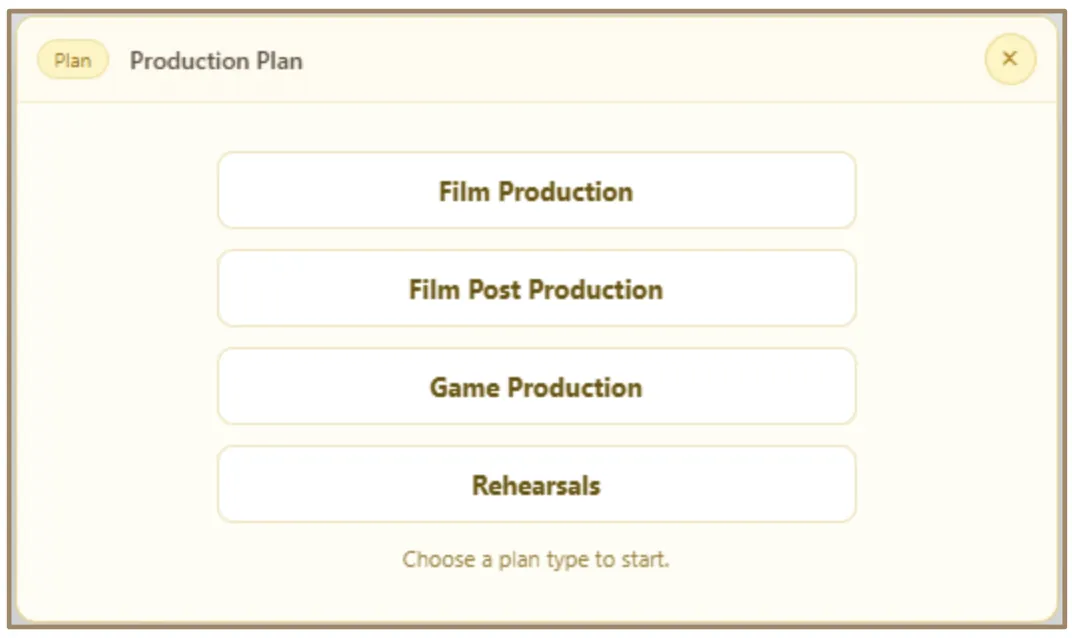
A specialized data management tool for organizing timelines and technical steps. When you add a Production Plan, you choose one of four workflow types:
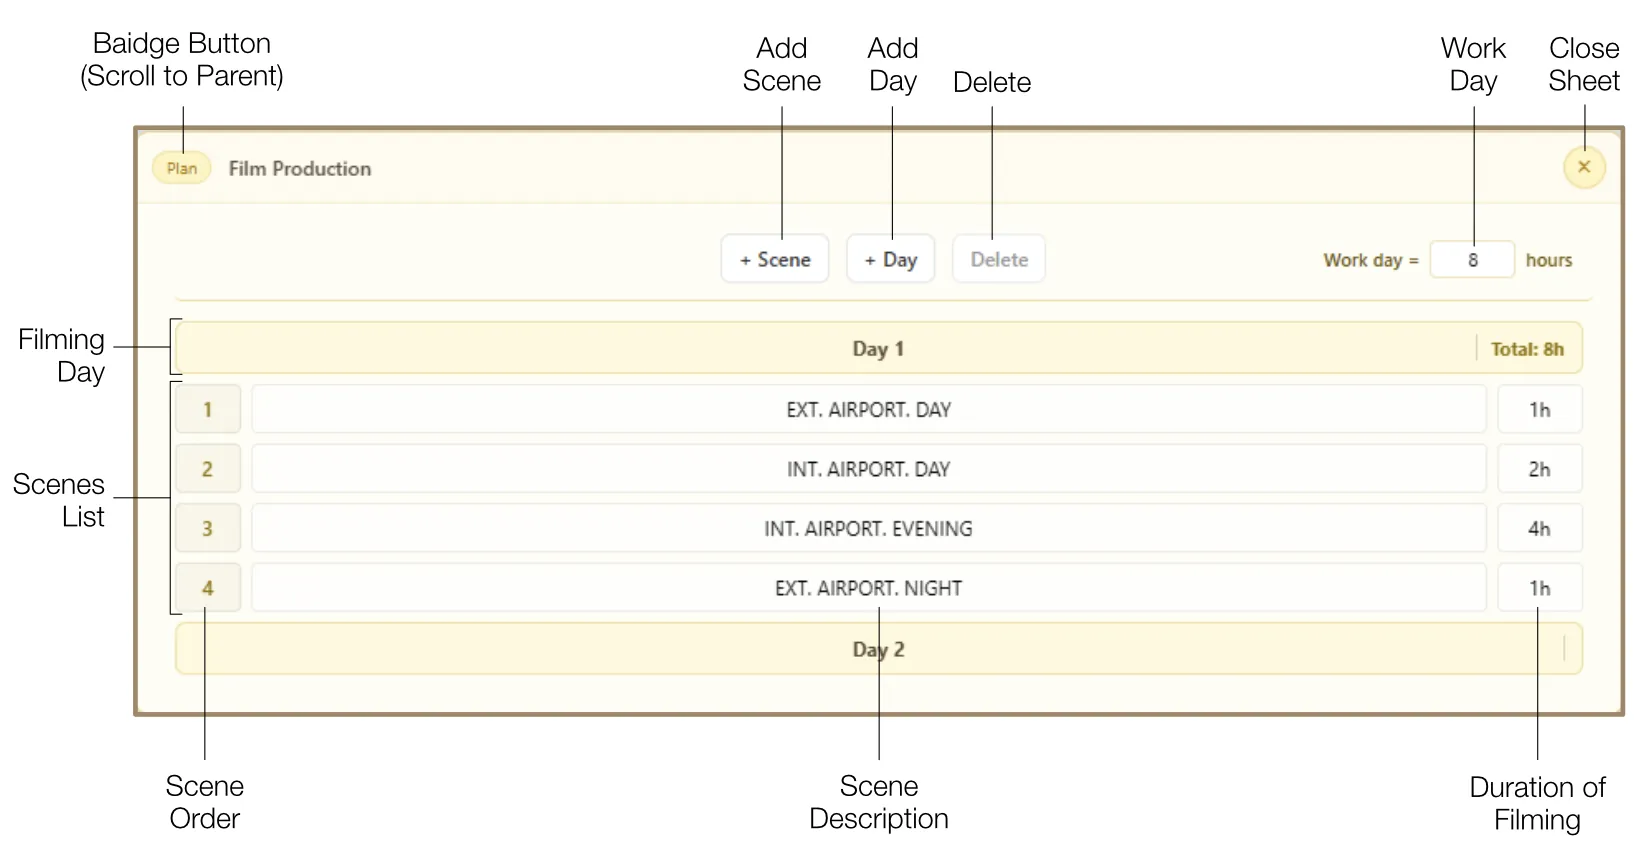
Film Production: Day-by-day scheduling with Filming Days, Scene Rows, and auto-calculated hour totals.
Film Post Production: Tracks multiple iterations of scenes through the editing process.
Game Production: Modular framework based on development phases and technical cycles.
Rehearsals: Performance-based planning focusing on scenes and rehearsal sessions.
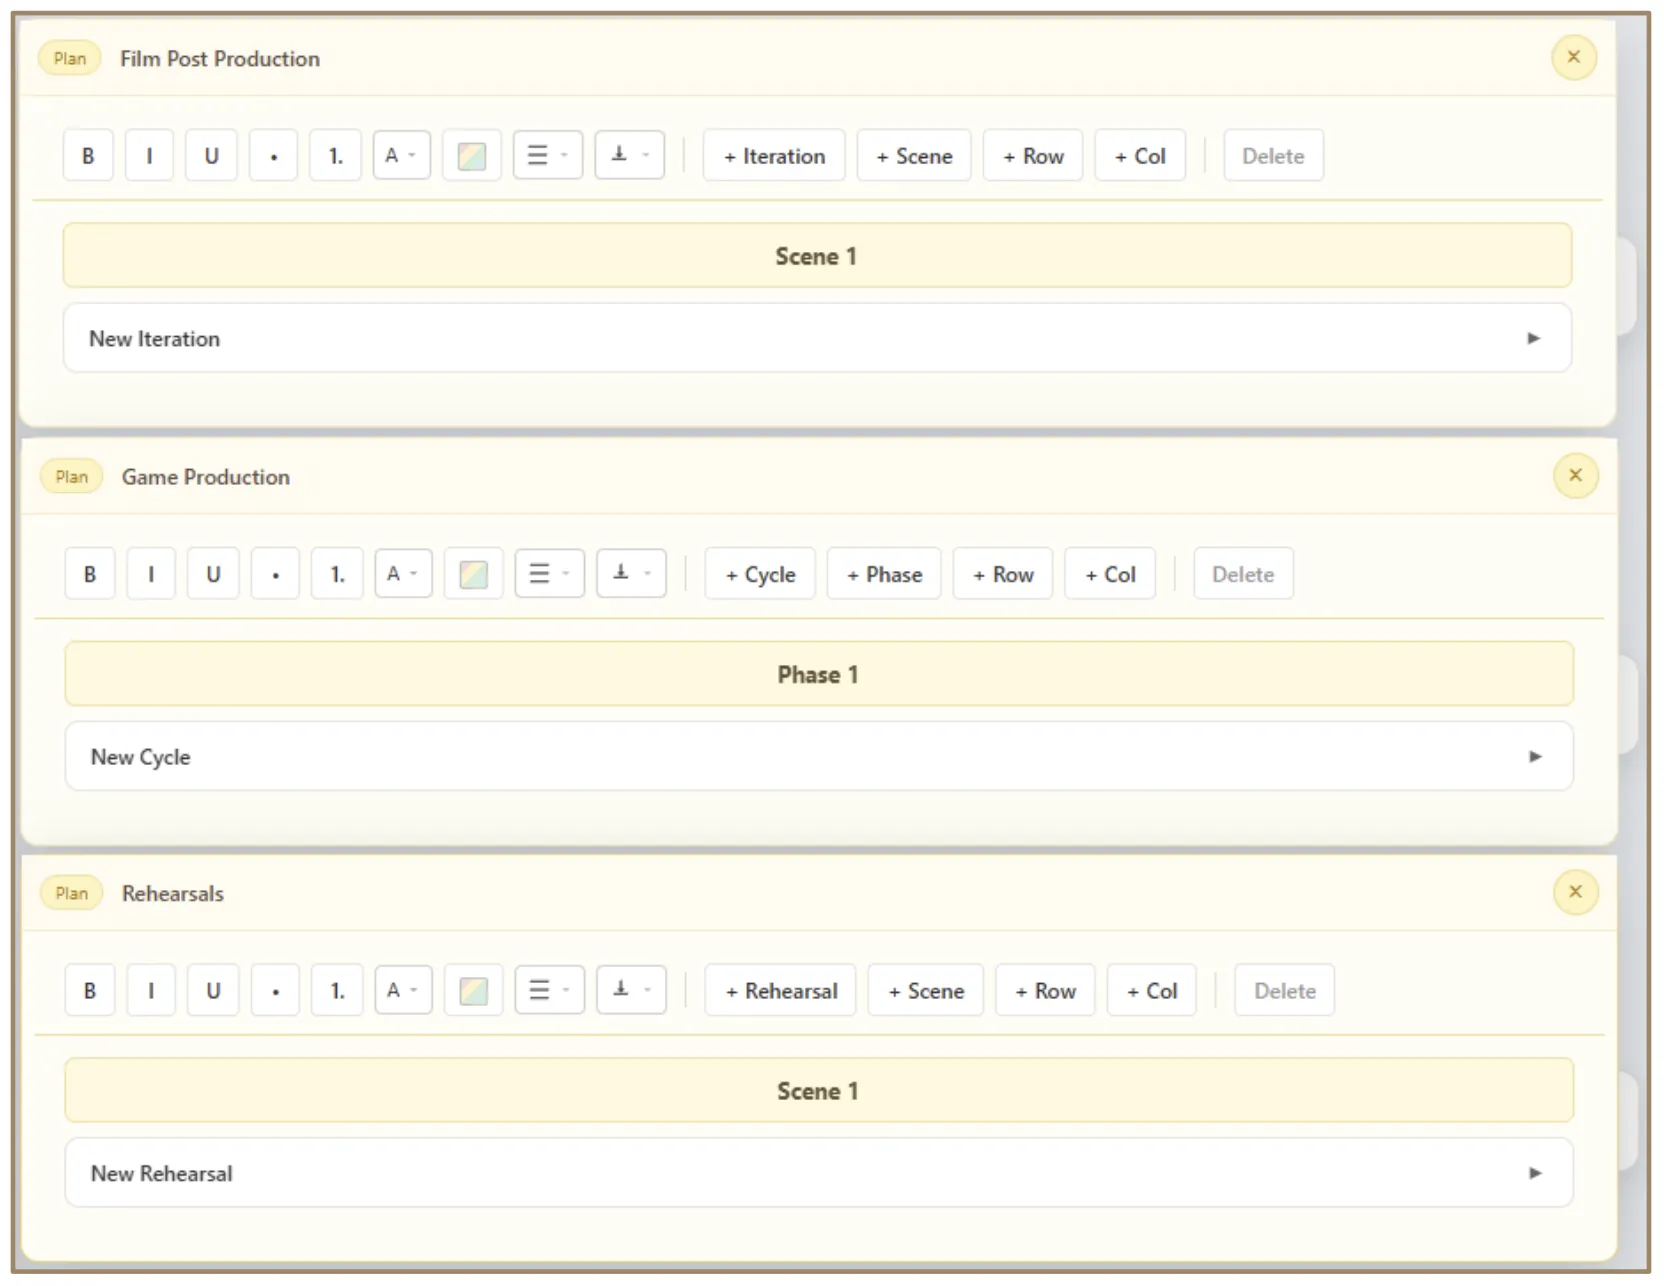
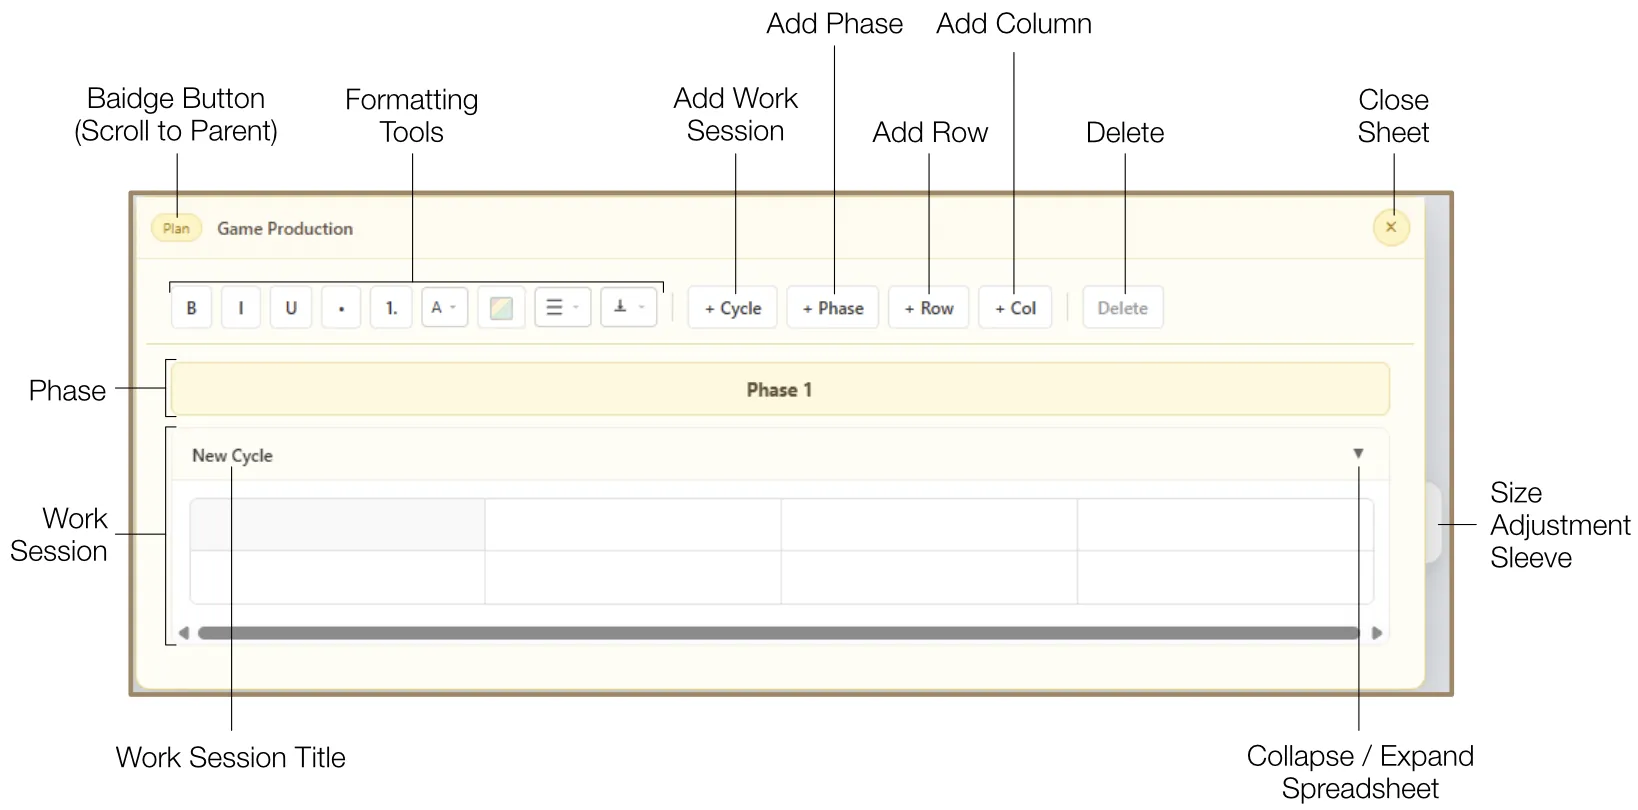
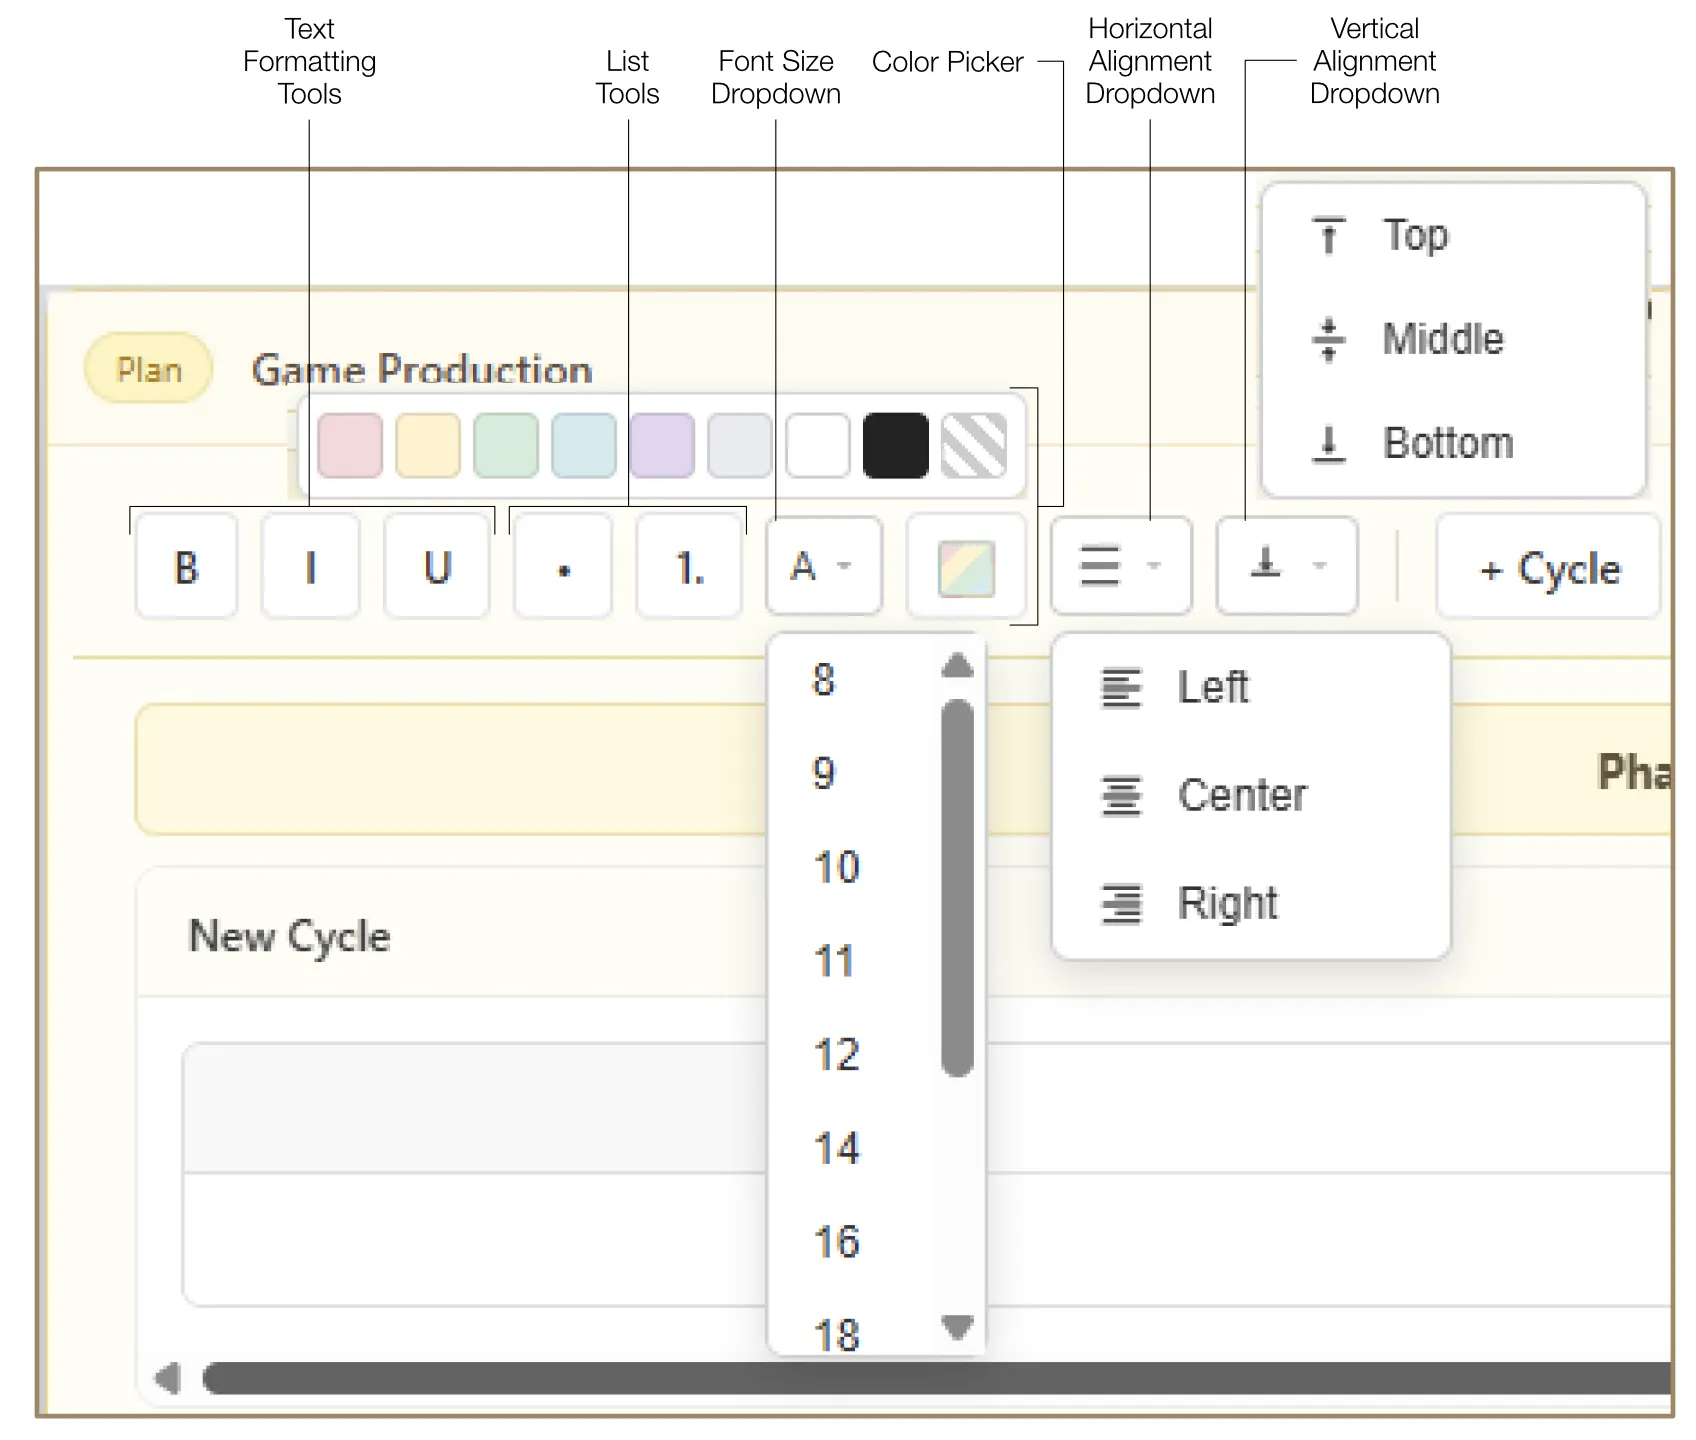
Iterative types (Post, Game, Rehearsals) share a common structure: Phases/Scenes containing Work Sessions, each with a dedicated spreadsheet supporting rows, columns, text formatting (Bold, Italic, Underline, lists, font size, color picker, alignment), and collapse/expand for organization.
12.4 Scheduling Spreadsheet (Call Sheet)
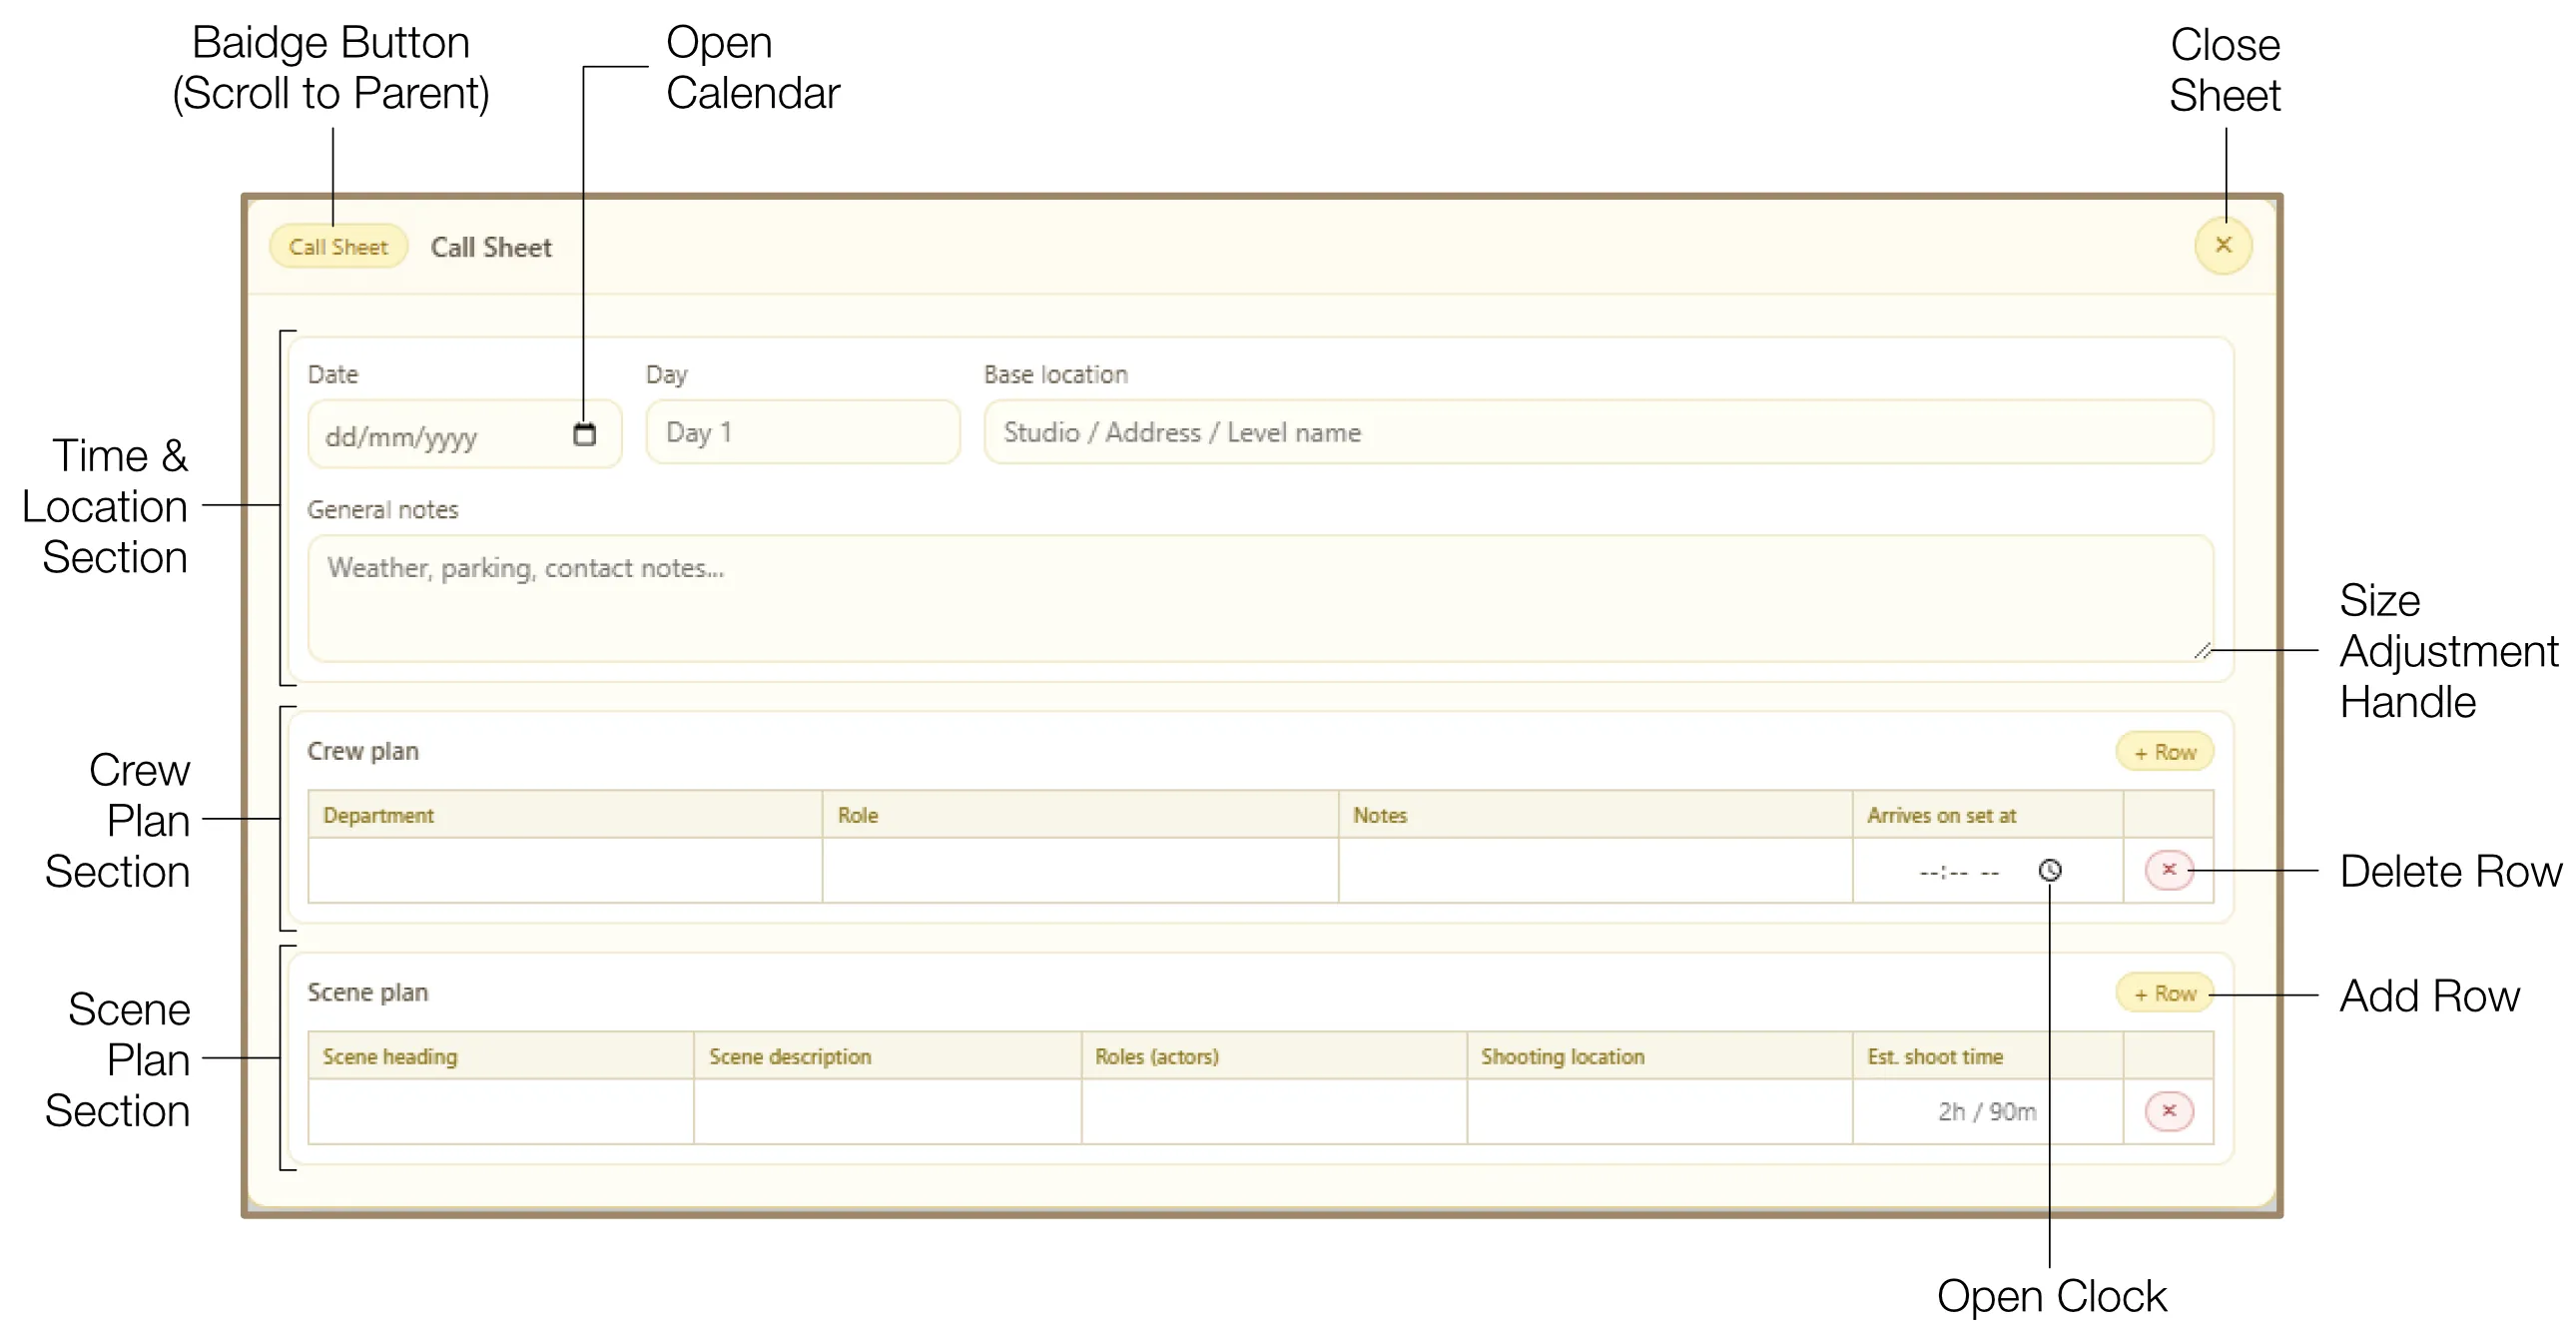
A specialized tool for creating daily schedules, organized into three primary sections:
- Time & Location: Track core logistics — Date (calendar picker), Day, Base Location, and multi-line General Notes.
- Crew Plan: Manage individual arrival times with Department, Role, Notes, and call time (clock picker supporting 12h/24h format).
- Scene Plan: Map the day's shooting sequence with Scene Heading, Description, Roles (Actors), Shooting Location, and Est. Shoot Time.
12.5 Continuity Log
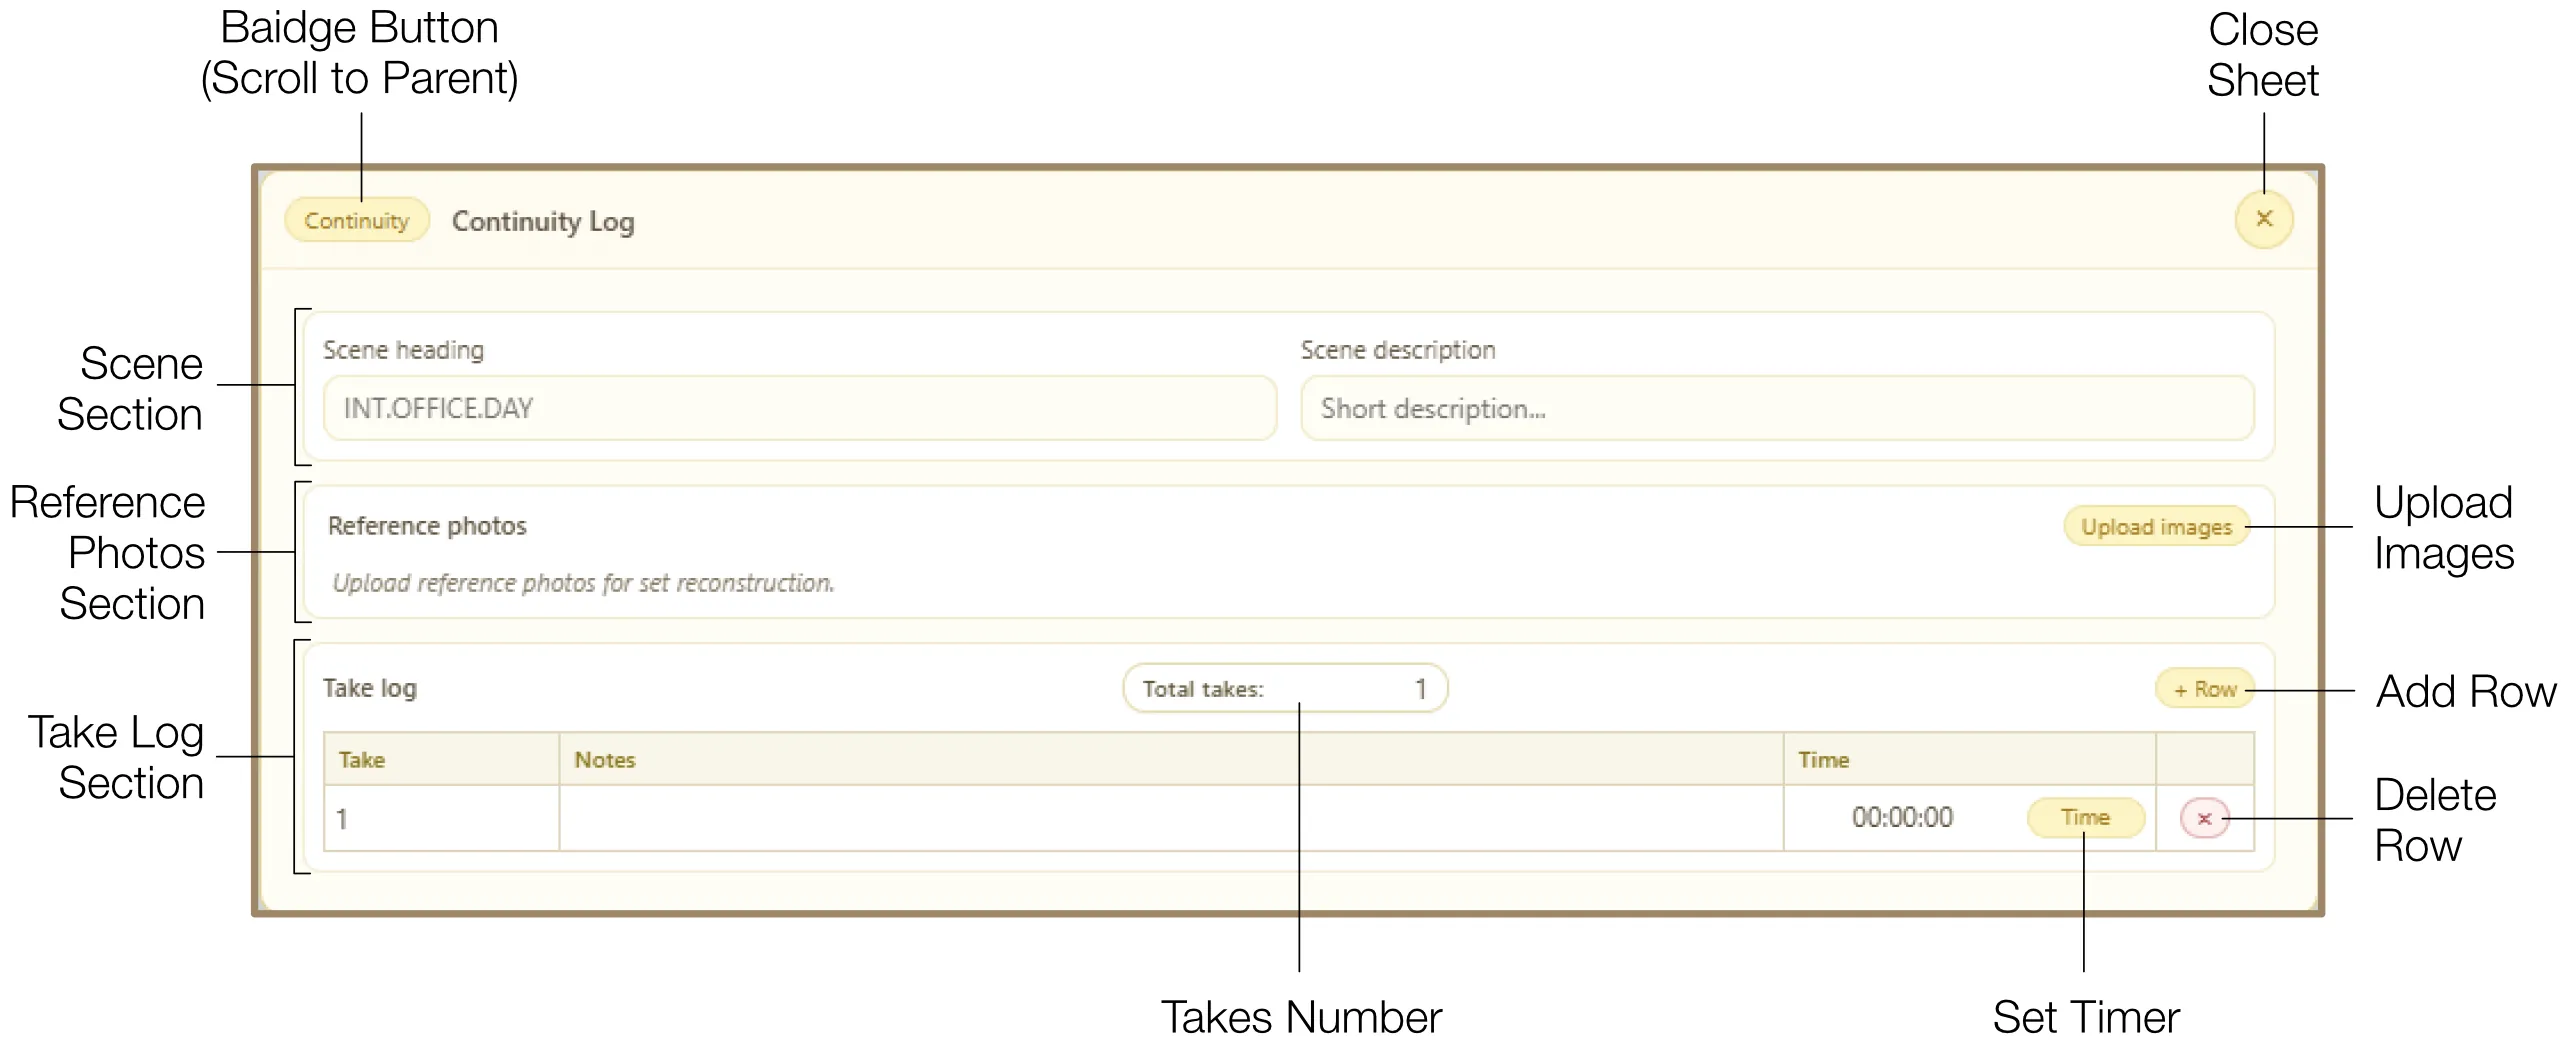
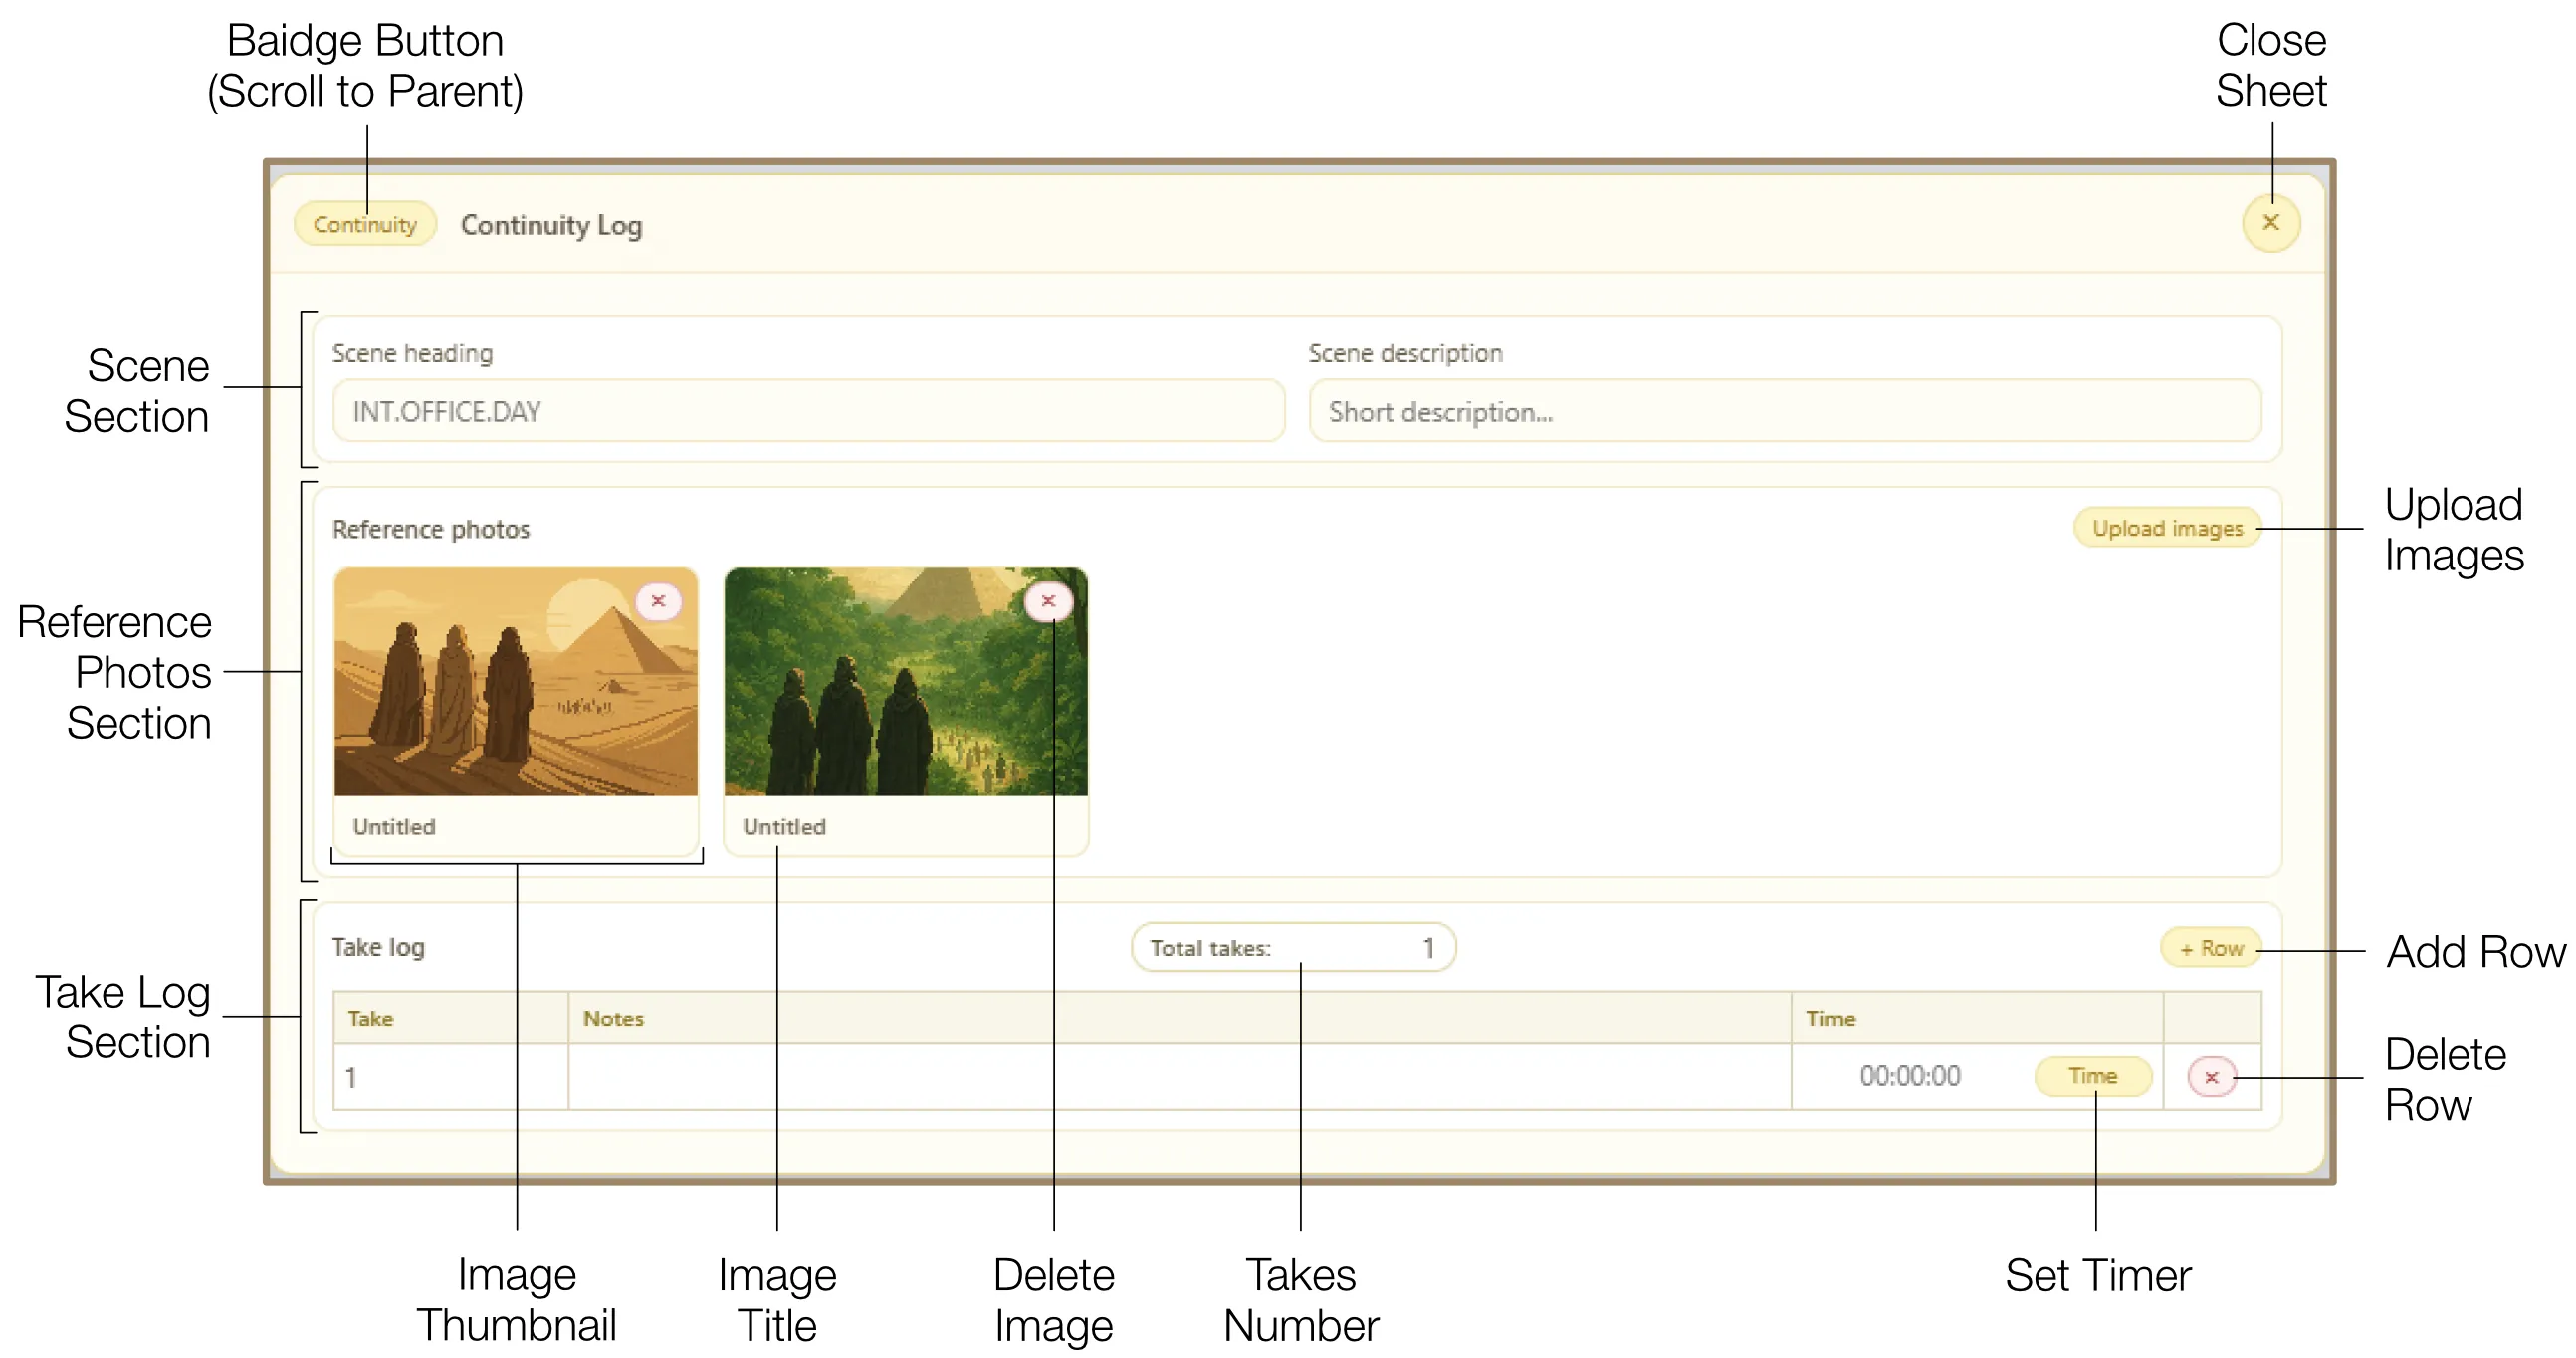
A specialized environment for script supervisors to track takes and visual consistency during a shoot. It is divided into three sections:
- Scene Section: Set context with Scene Heading and Description fields.
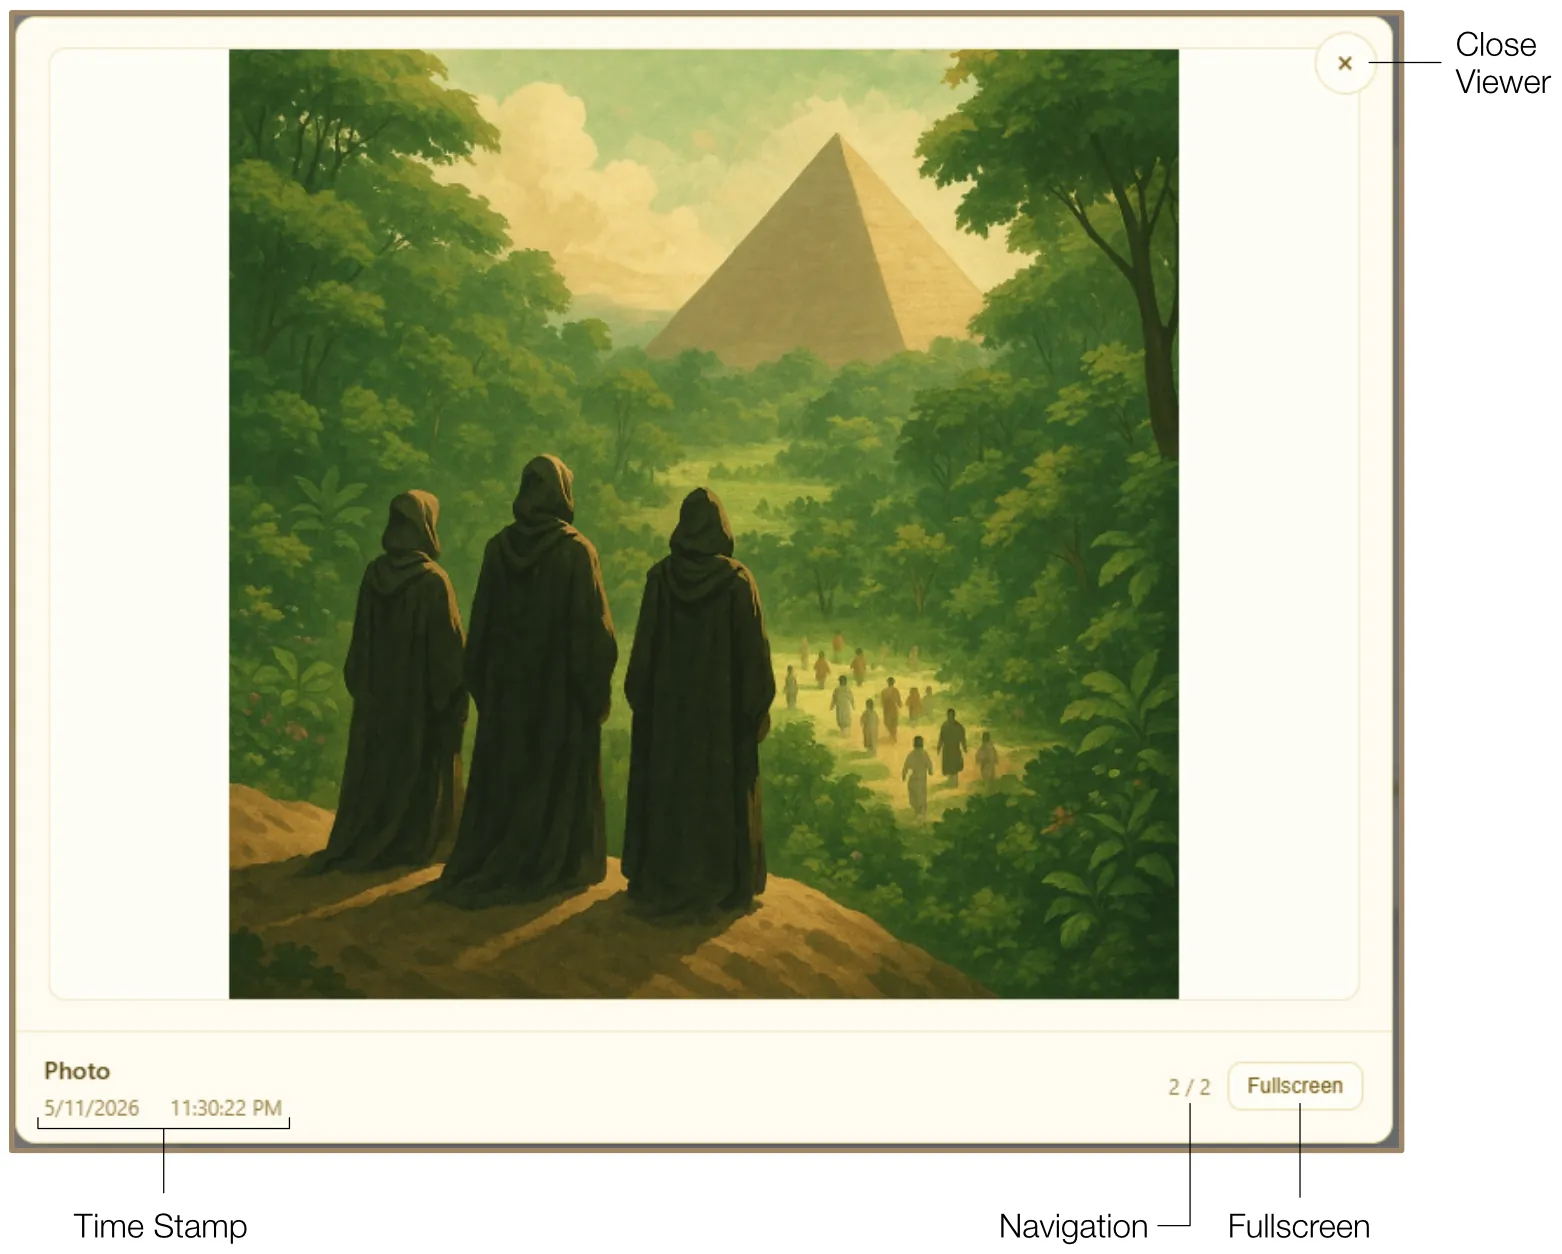
- Reference Photos: Upload set photos with automatic timestamps. Photos appear as thumbnails with titles and can be viewed in a high-resolution lightbox with fullscreen mode and keyboard navigation.
- Take Log: Core section for rapid entry during filming. Features include total takes counter, auto-numbered take fields, performance notes, and an integrated stopwatch per take.
12.6 Costume Spreadsheet
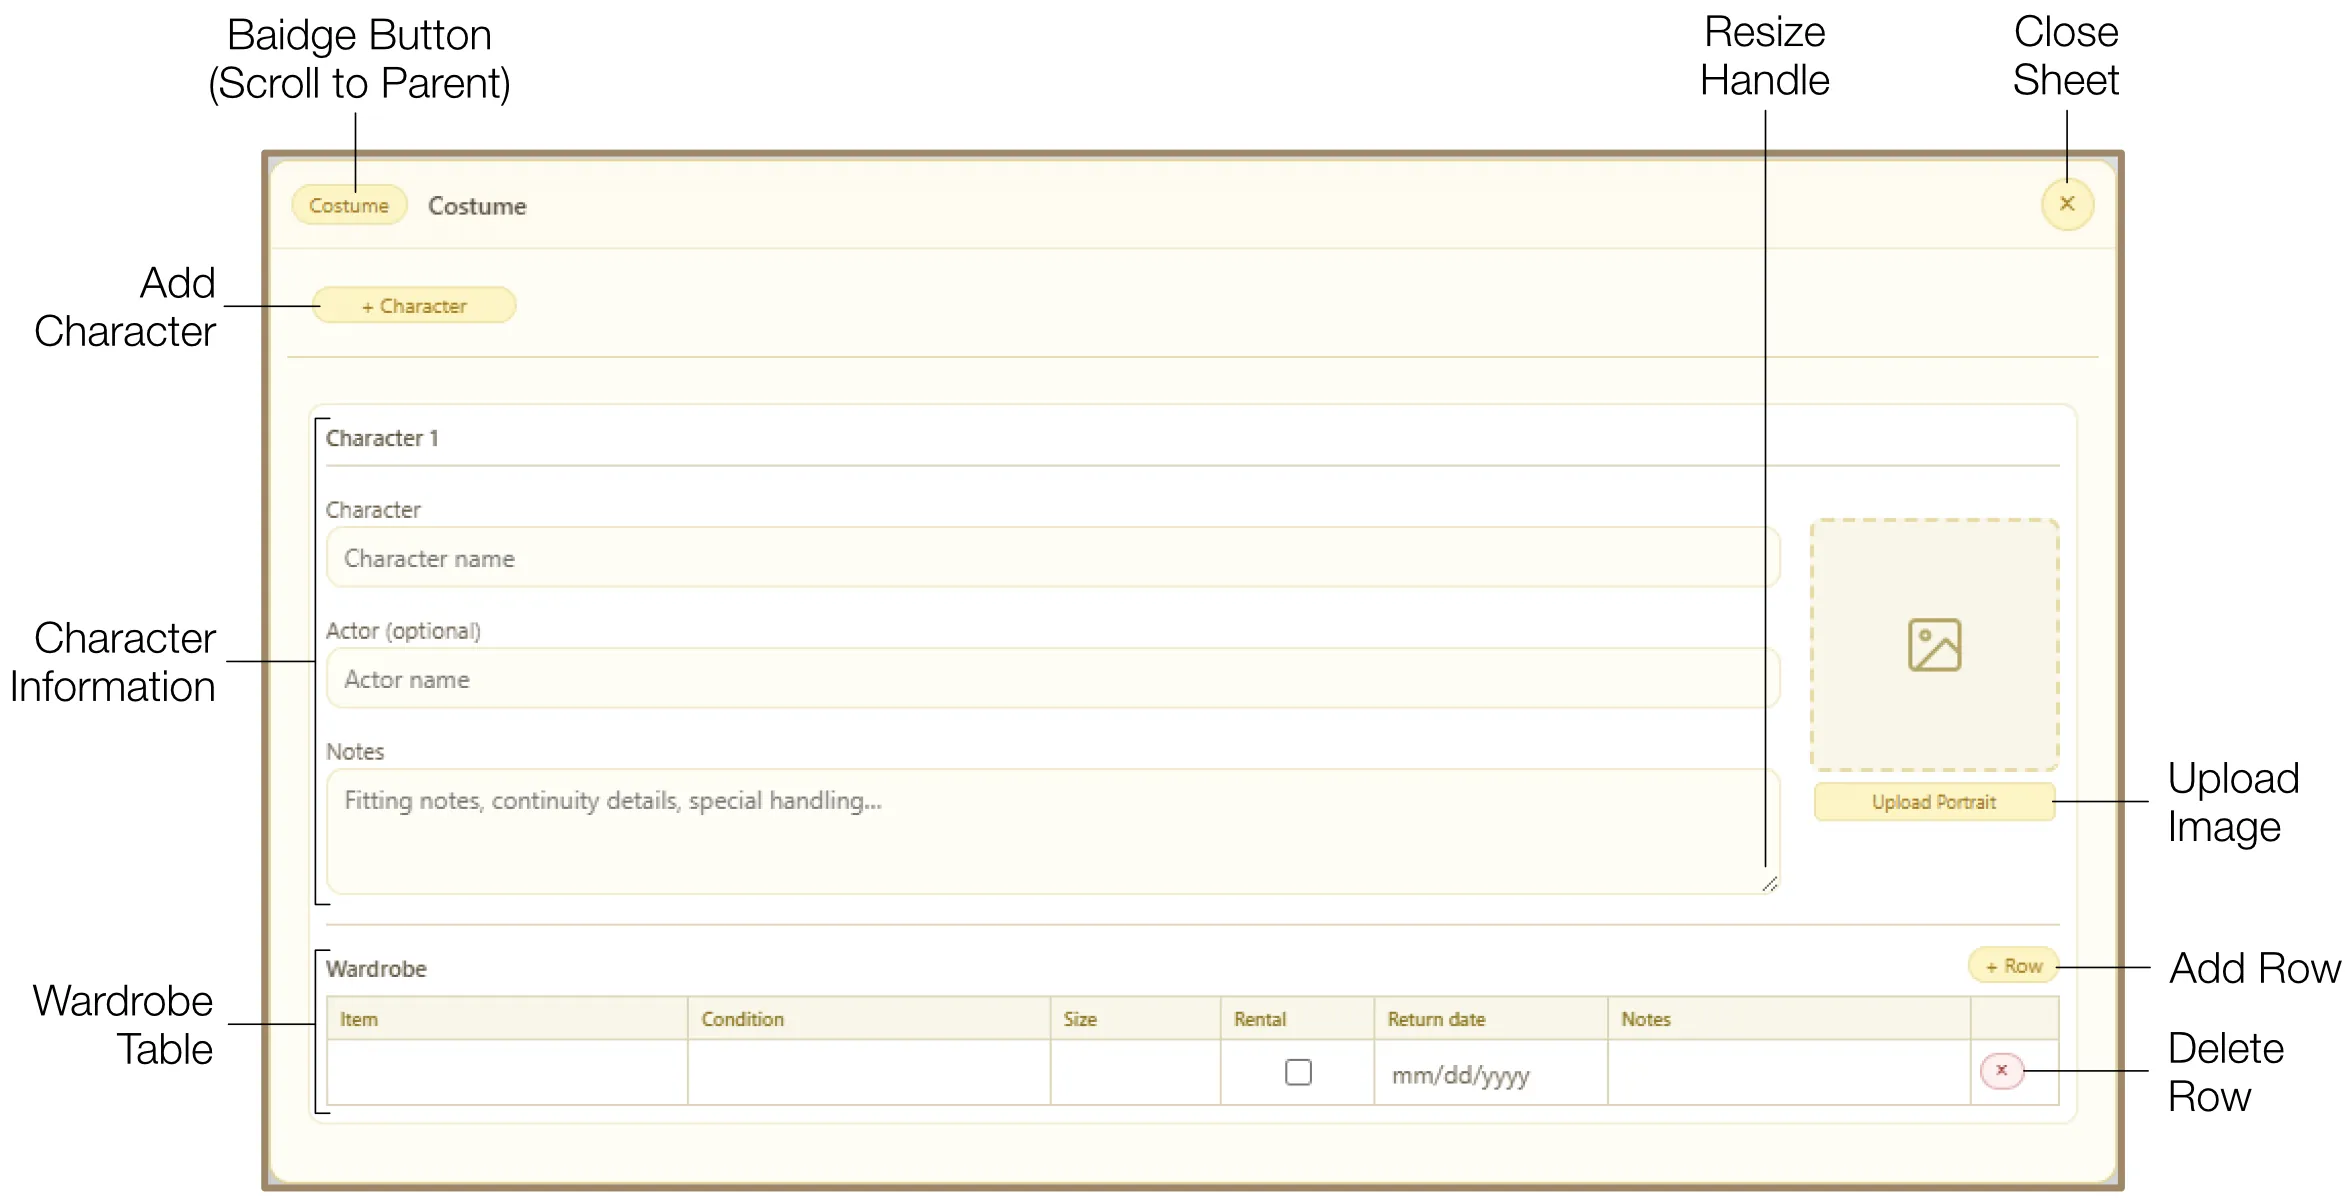
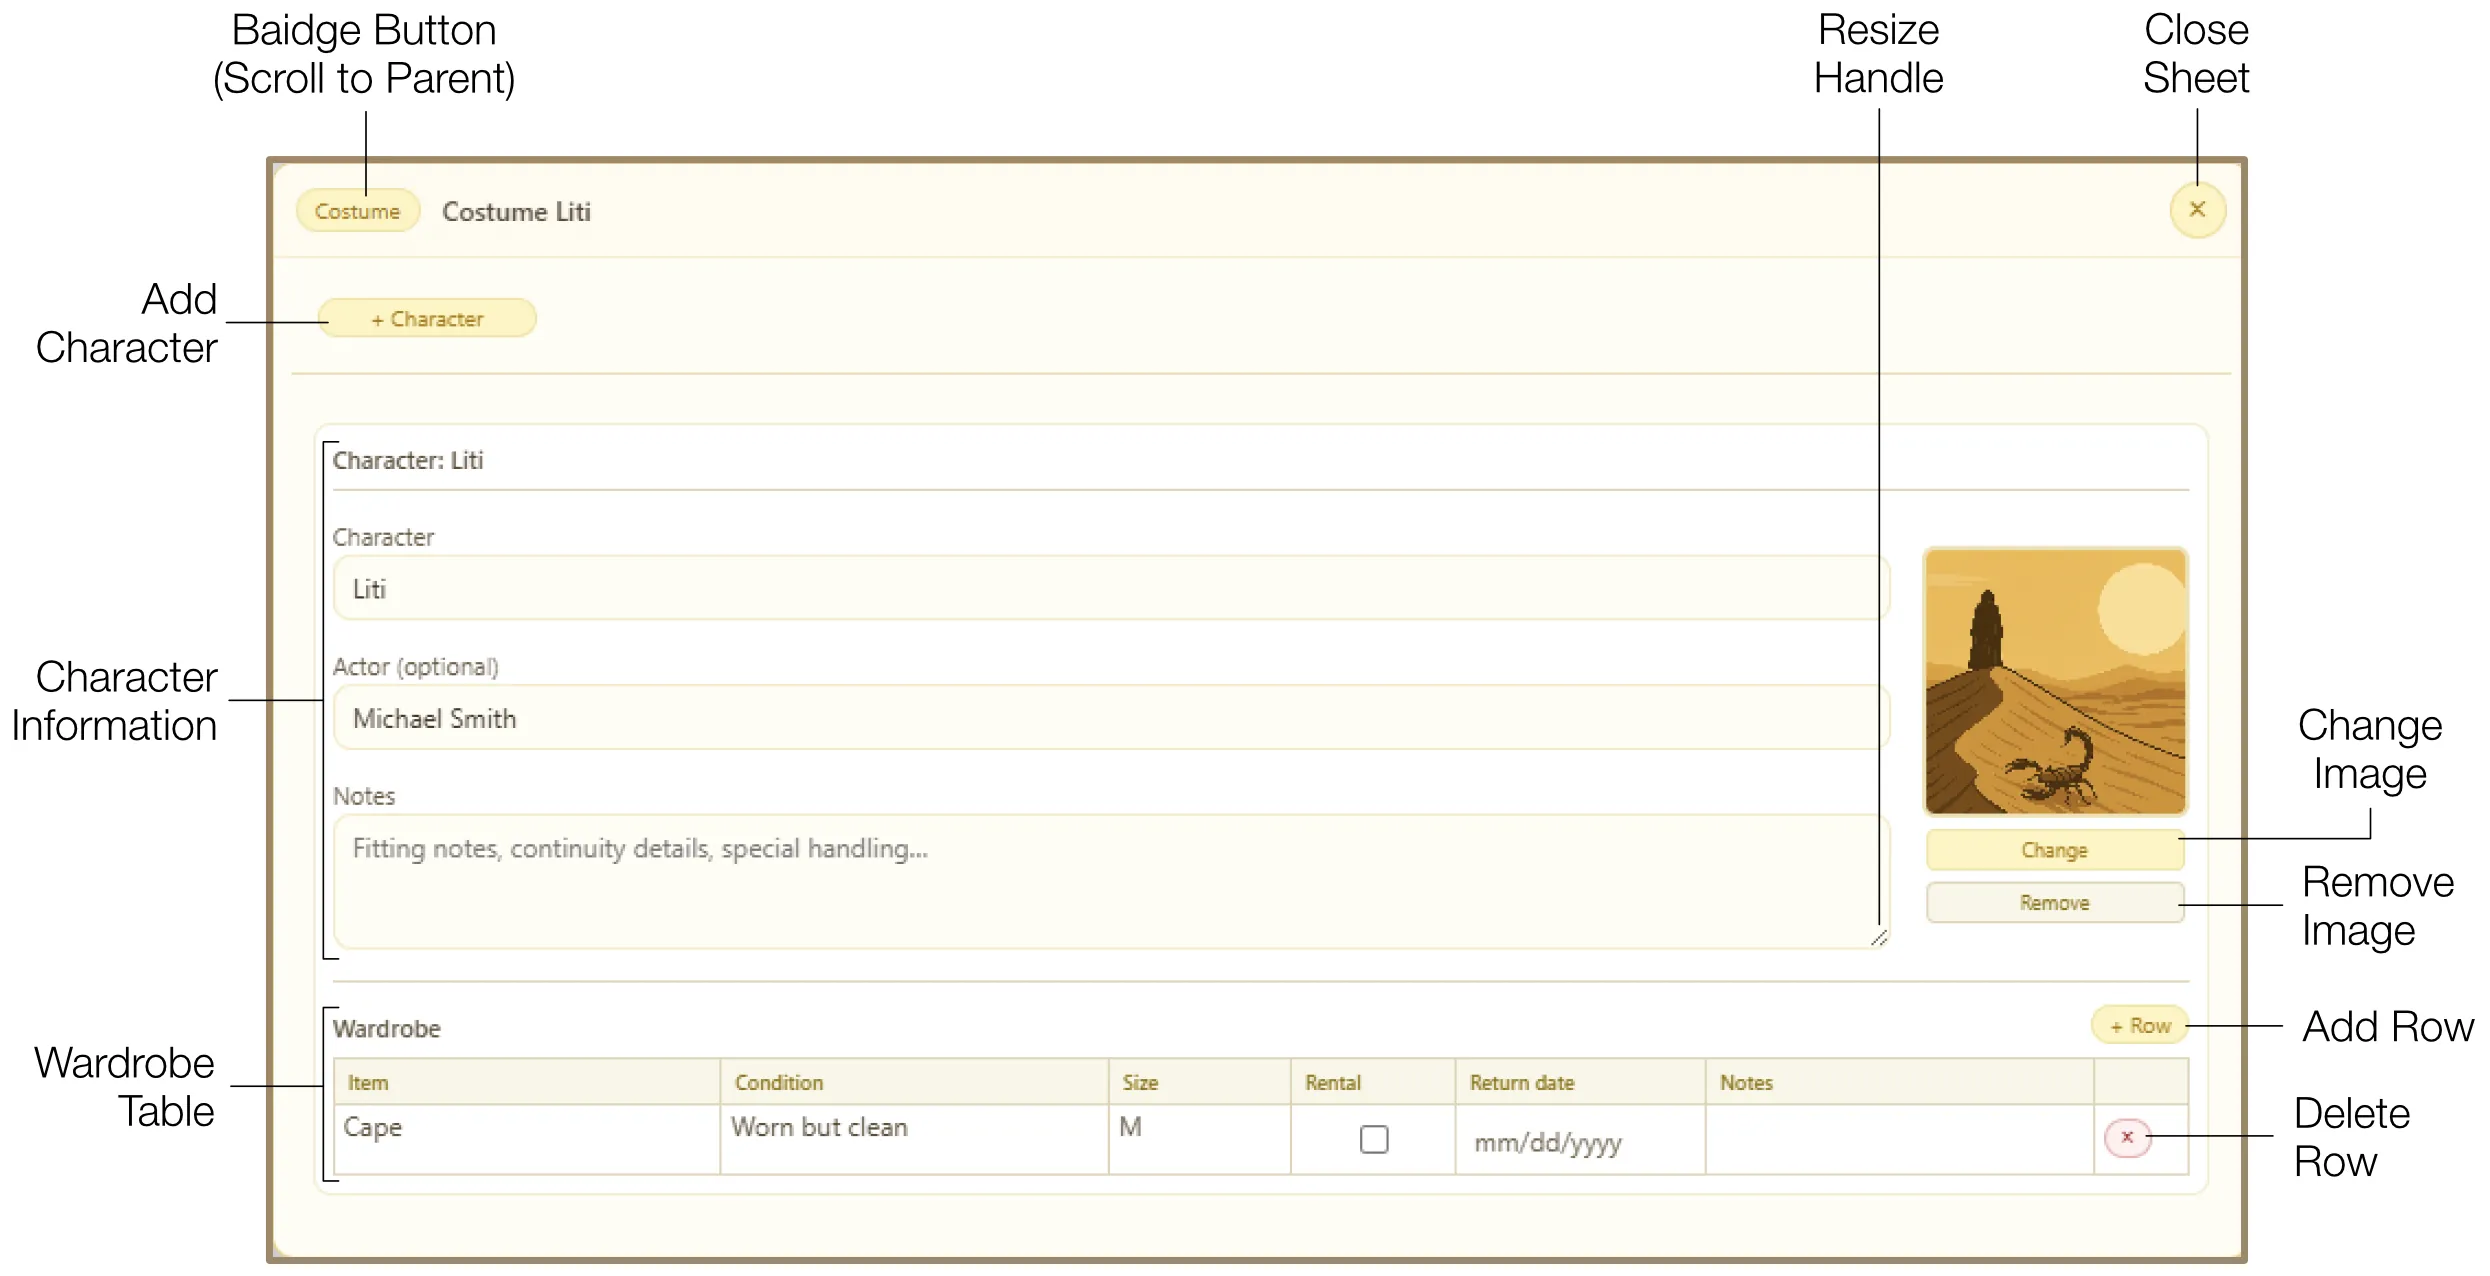
A comprehensive wardrobe management system for tracking looks, fittings, and rental logistics across multiple characters. Each character gets an independent section with:
- Character Information: Character Name, Actor Name, General Notes (resizable), and Portrait upload with fullscreen preview.
- Wardrobe Table: Itemize garments with columns for Item, Condition, Size, Rental (with return date via calendar picker), and Notes.
12.7 Freeform Spreadsheet
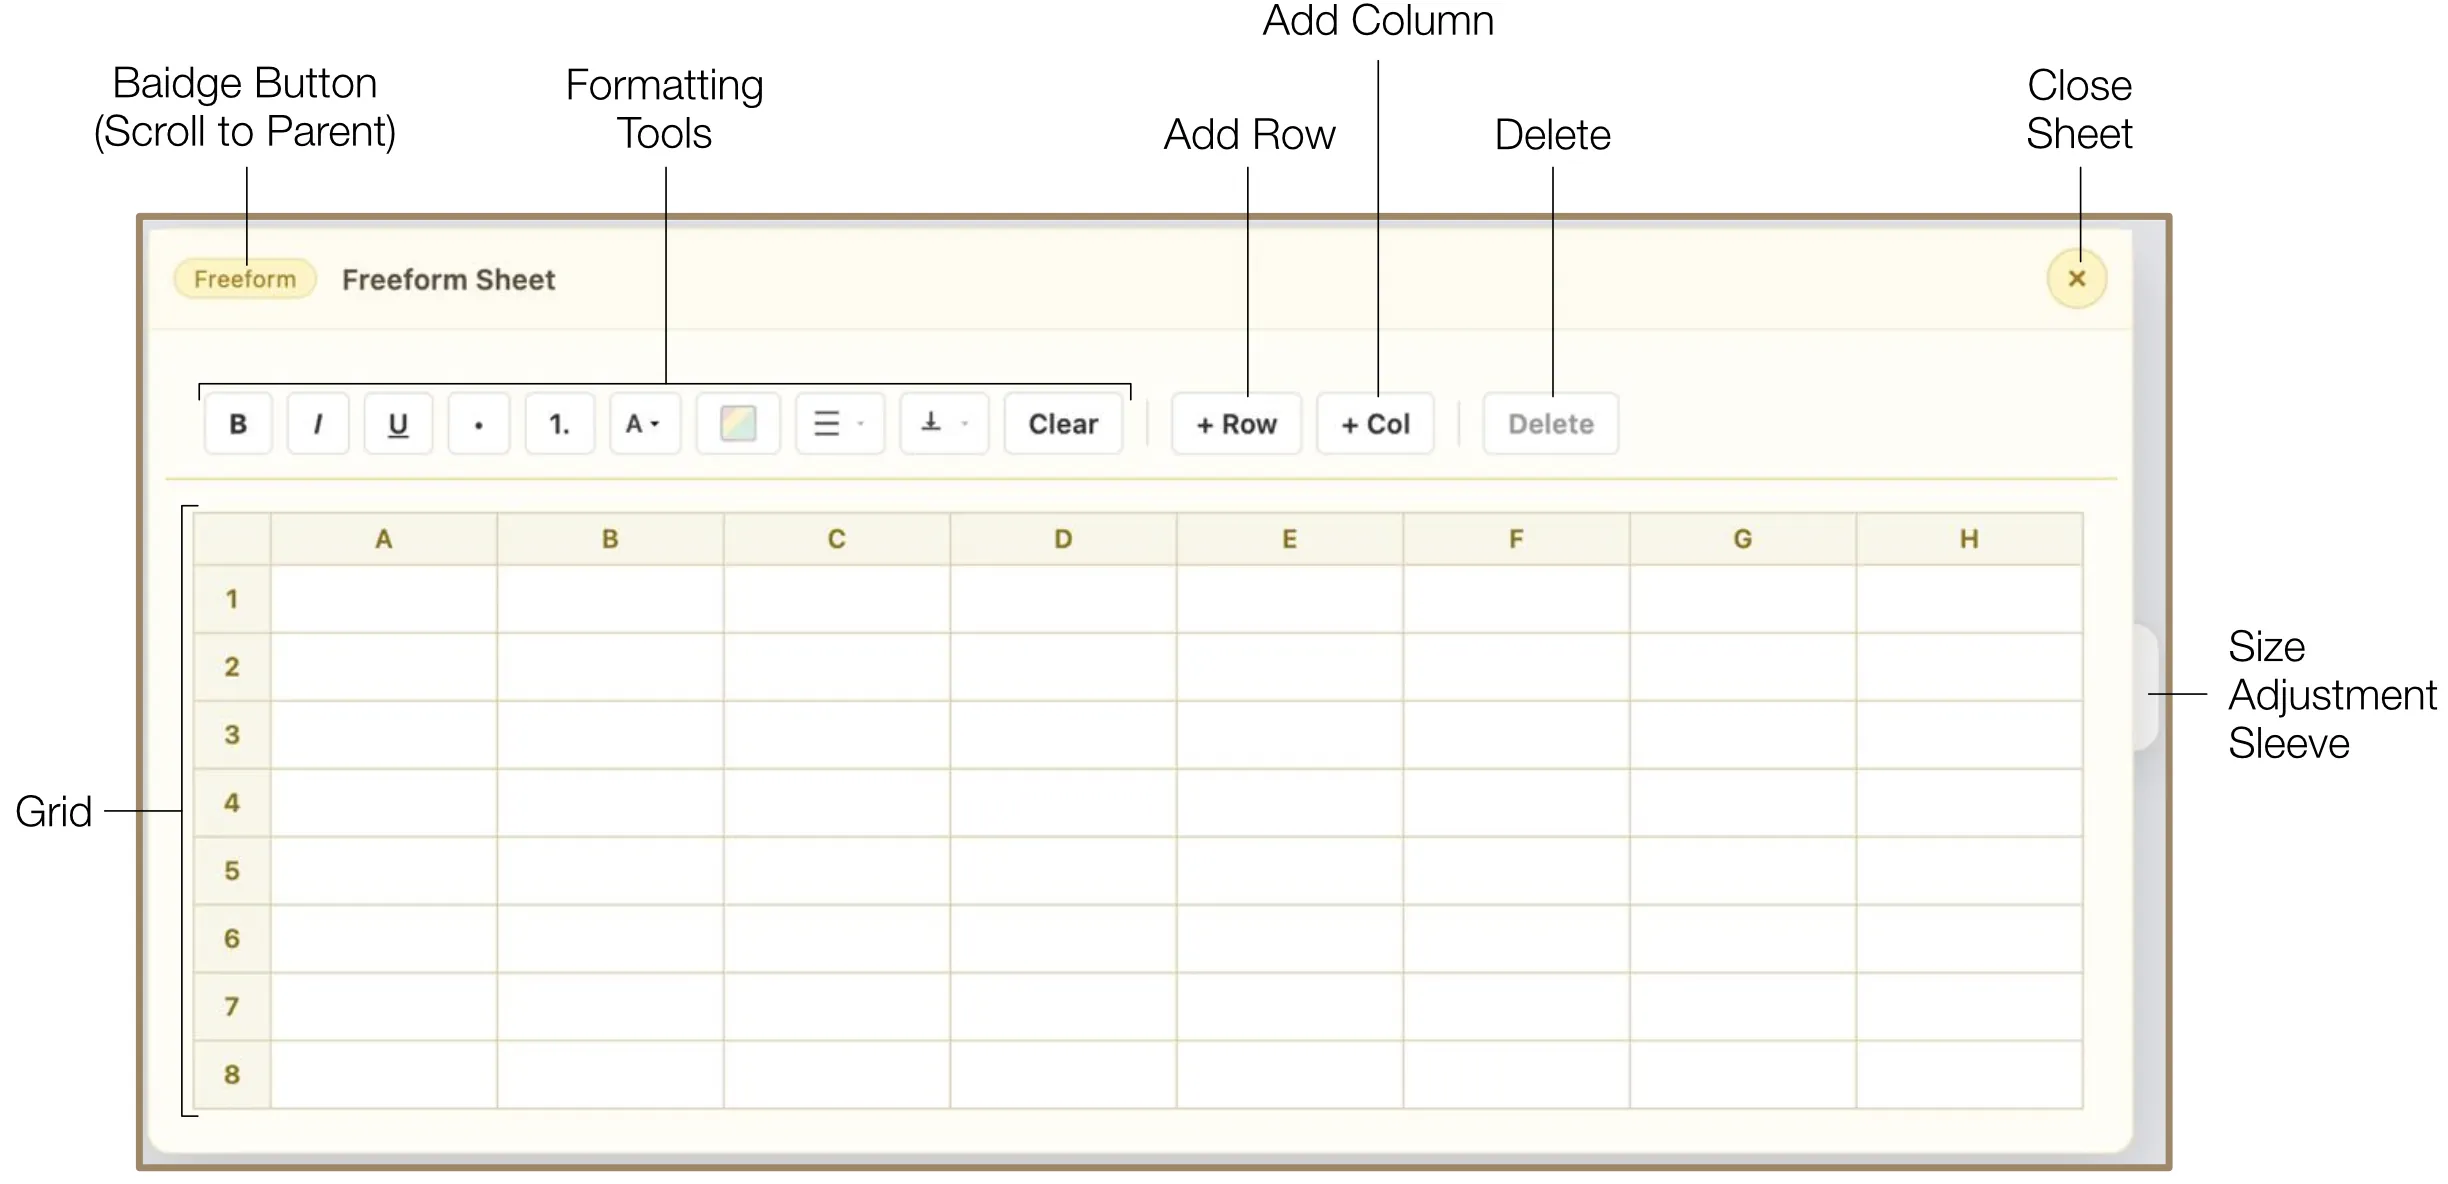
A versatile grid-based tool for custom data organization that does not fit into specialized templates. The grid starts as an 8x8 matrix and expands indefinitely as your project grows.
- Add or delete rows and columns using toolbar buttons.
- Drag row or column headers to move contents to a new position.
- Resize by dragging borders between headers or using the Size Adjustment Sleeve.
- Formula support:
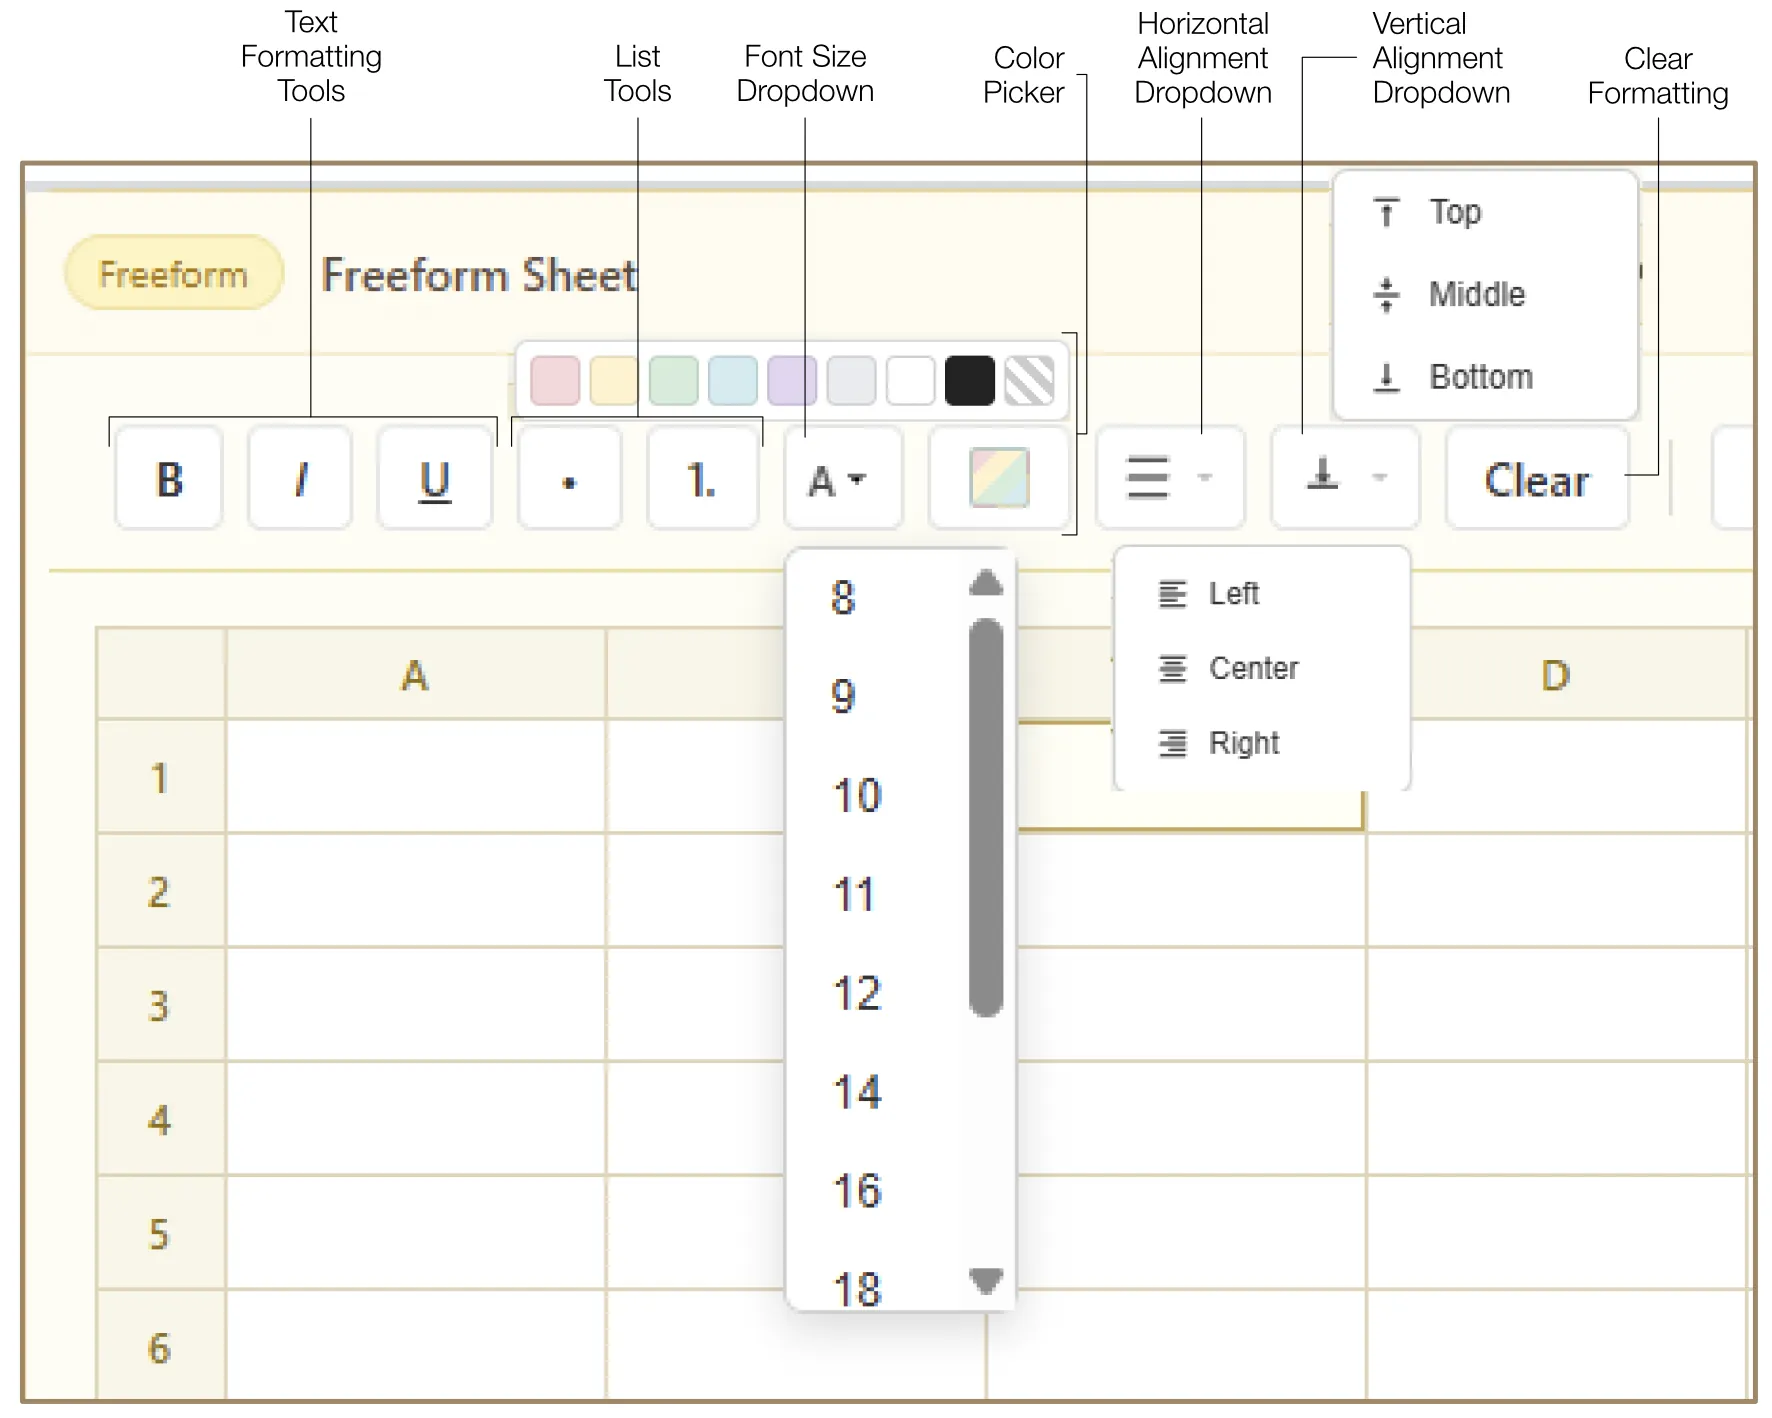
=SUM(A1:A10)for addition,PROD(A1:A10)for multiplication. - Full text formatting: Bold, Italic, Underline, bulleted/numbered lists, font size dropdown, color picker, horizontal and vertical alignment, and clear formatting.
- Use Alt + Arrow keys for keyboard navigation between cells.
13. Event Notes & Event Graph
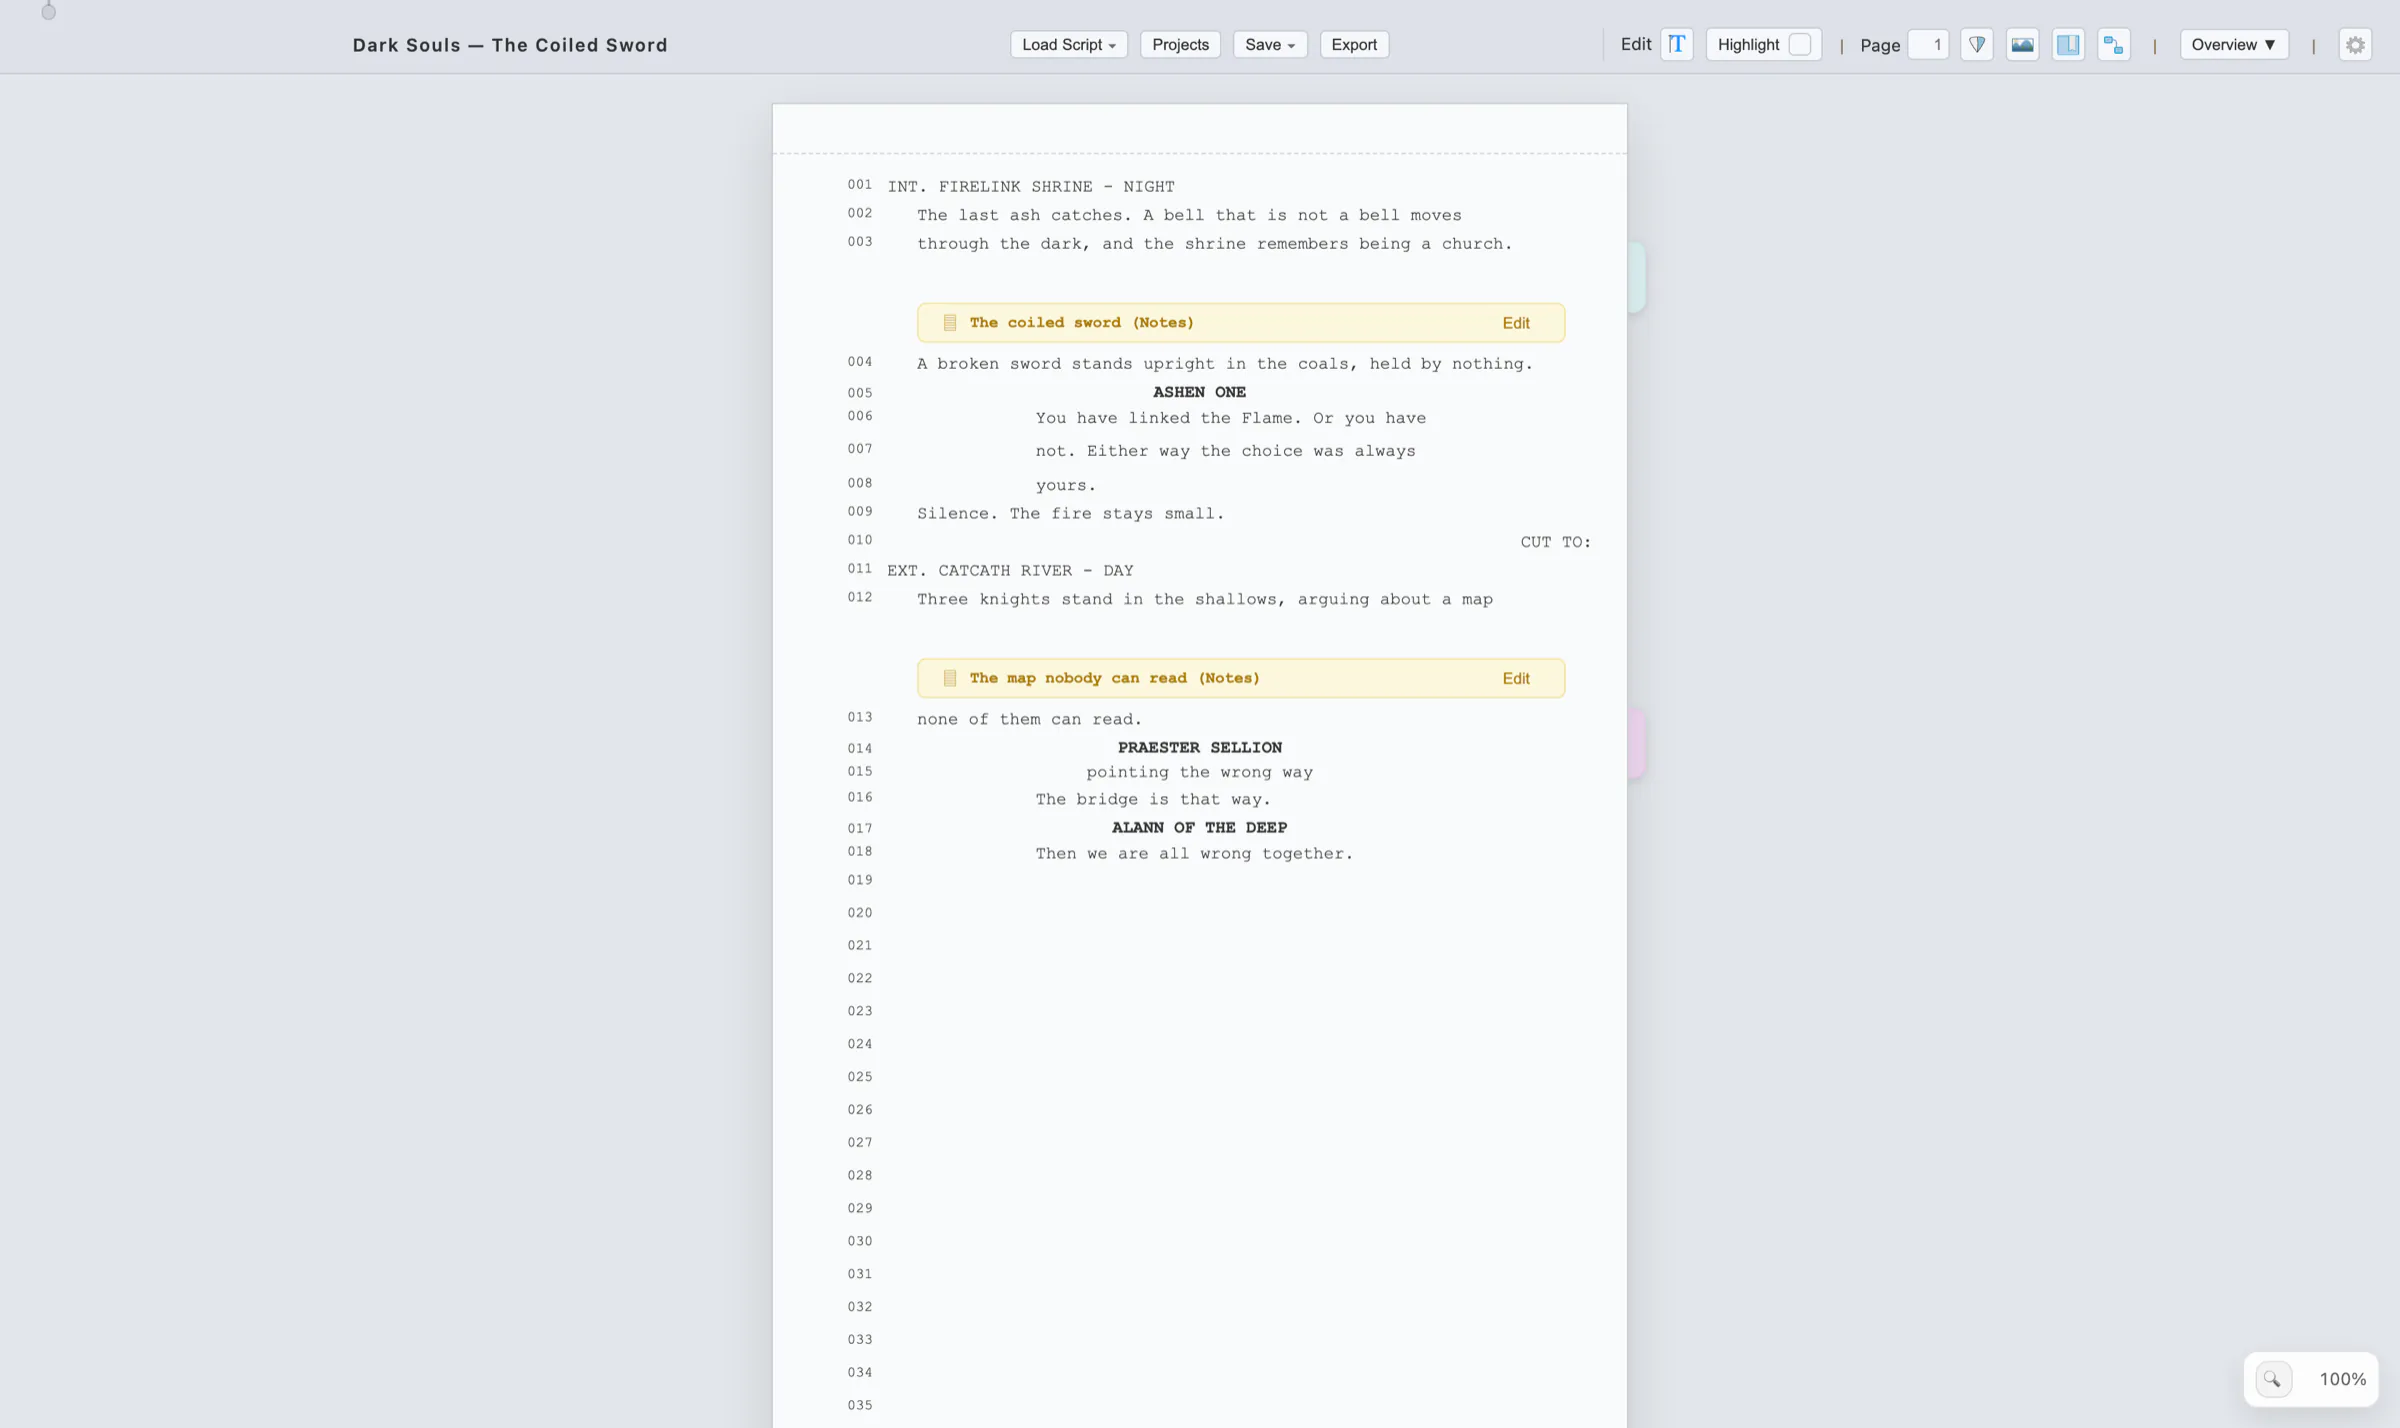
An Event Note is a story-level note that belongs to a range of script lines rather than to a single point in the page. It lives in two places at once: as a coloured sleeve tucked beside the lines it covers, and as a card you can move around and connect inside the Event Graph. Use it for the things that are true across several lines — a reveal, a continuity problem, a prop that has to be in three scenes, a beat that is not landing yet.
13.1 What an Event Note Is
- A range, not a row. Each note is bound to a first and last script line by their stable row identity. Move, split or re-wrap the lines and the note follows them.
- Separate from your notes. Creating an Event Note does not consume the Notes injection it came from. The box stays in the script and can be applied again as a plain note, or reused to make more Event Notes.
- Part of the project file. Notes, their positions, their connections and everything drawn on the graph are saved and restored with the project, and every change goes through the same undo history as the script itself.
- Not printed. Event Notes are working material. They do not appear in the screenplay text and are not part of a clean export.
13.2 Creating One & Reading Sleeves
In Edit Mode, add a Notes injection where the event happens, set its Lines range if the default is not right, type the note, then open "Apply to script" and choose Apply as Event Note.
An empty note is refused: the box tells you so and leaves your range values untouched. Applying the same box twice creates two independent Event Notes, which is how you keep several notes on one passage.
In the script, notes appear as sleeves in the right-hand gutter, level with the lines they cover:
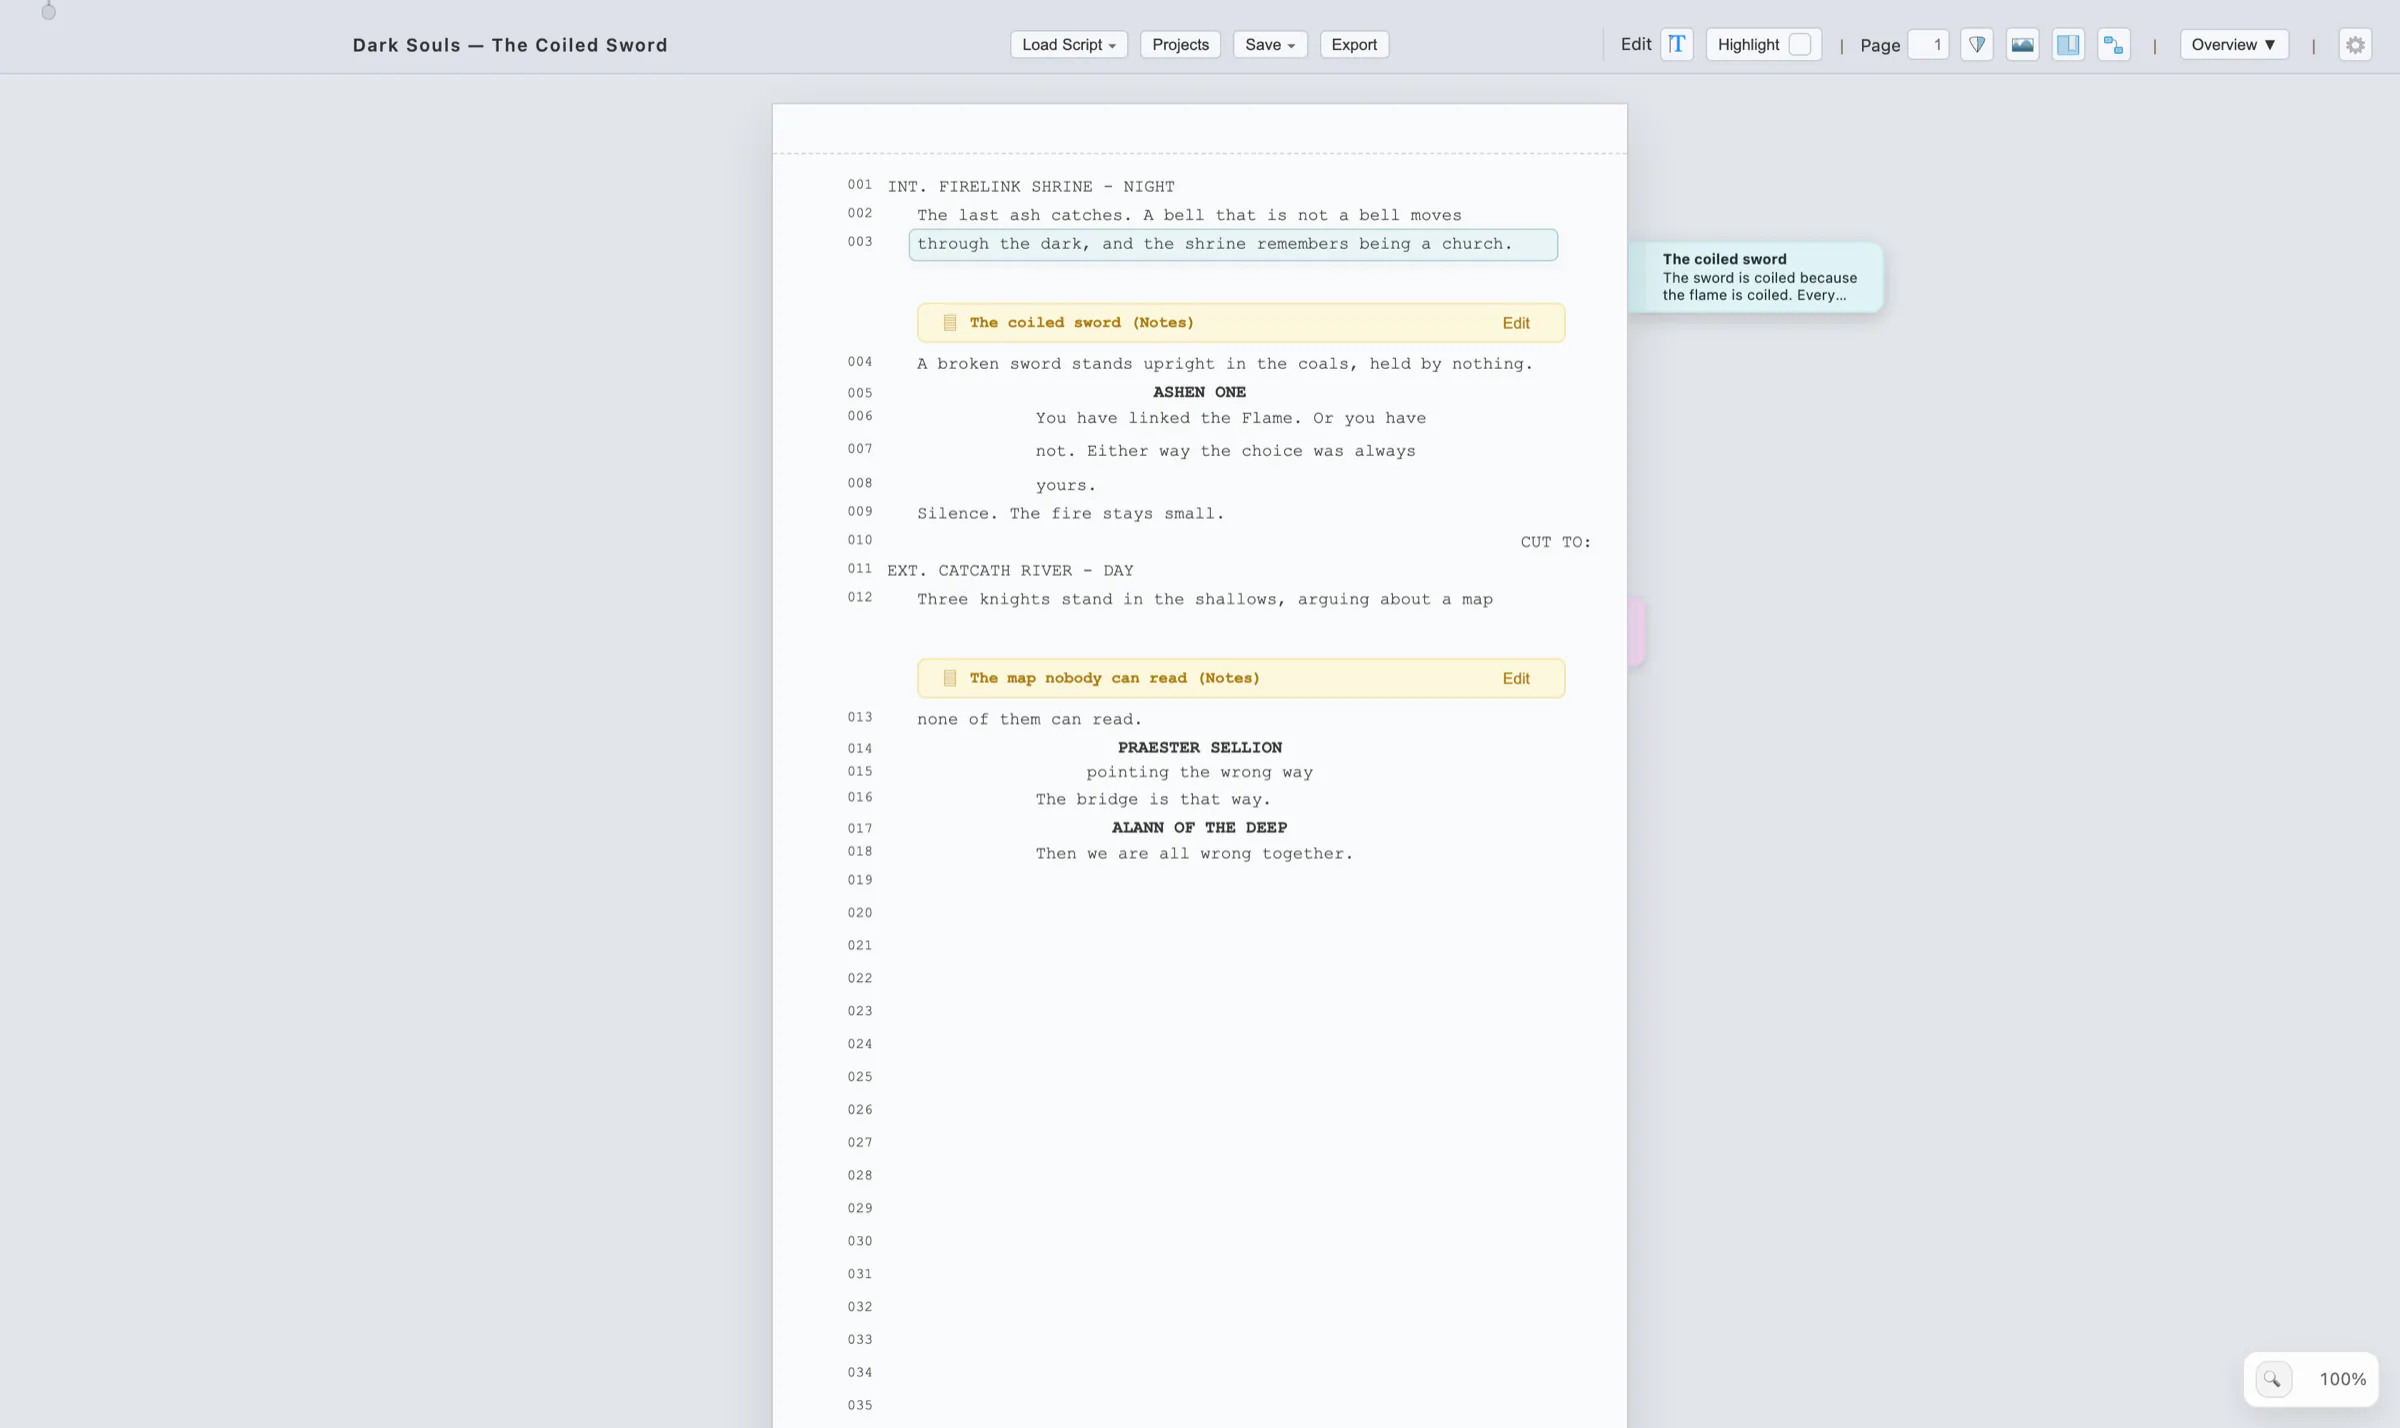
- Colour tab marks the first line of the range; the sleeve shows the title and the opening of the text.
- Click a sleeve to see its passage. The covered lines are wrapped in a soft band of the note's colour and stay marked while the sleeve is selected; click again to release.
- Double-click a sleeve to open the Event Graph straight to that note.
- Several notes on one range stack into a layered tab. Three are shown; more are folded behind a +N more tab that expands and collapses the stack. Drag a sleeve onto another to reorder the stack.
- Sleeves stay live in every mode. Unlike the screenplay text, an Event Note can be opened, edited, recoloured or deleted from its sleeve in Write, Read and Edit modes alike — the note is not part of the screenplay. Only a project saved as read-only locks it, and then the sleeve tells you so.
13.3 Editing, Colour, Range & Stacking
Right-click a sleeve for its menu:
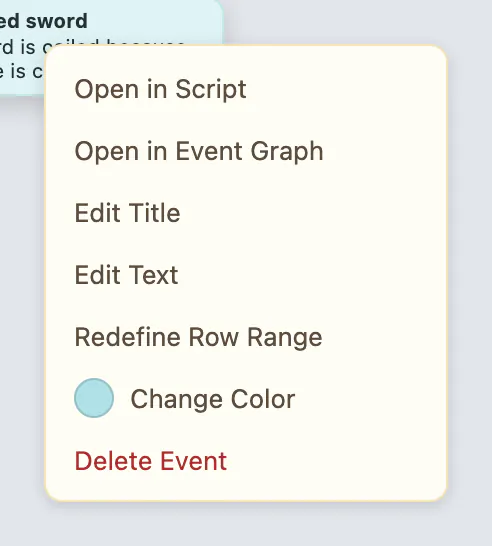
- Edit Title / Edit Text open a small editor anchored to the sleeve, with a Title field and a multi-line Text field. The text field keeps line breaks, so a note written on several lines comes back out on several lines. "Esc" or Cancel discards the change; "Save" commits it.
- Change Color opens the swatch palette — your profile's custom colours when you have saved any, otherwise the twelve soft defaults. Colour is the note's identity everywhere: sleeve, band, card, and the dot beside it in the Layers panel.
- Redefine Row Range lets you set the first and last line numbers by hand, which is the fix when a note has drifted off its passage.
- Open in Script closes the graph and scrolls the covered lines into view; Open in Event Graph does the opposite.
- Delete Event asks for confirmation and removes the note together with its connections. The screenplay text is never touched.
When the lines a note was bound to stop existing, the note is not discarded. It is reported as needing attention (one boundary survived) or detached (neither did), and the graph header counts them: "2 Events · 1 need attention". Re-aim it with Redefine Row Range.
13.4 The Event Graph
The graph is a board where your notes become cards you can arrange. Open it with the Event Graph icon in the top toolbar, by double-clicking a sleeve, or from a sleeve or card menu. "Back" returns to the script; "Esc" does too, unless something is mid-action (a pending connection, a pen path, a text edit), in which case the first press cancels that instead.
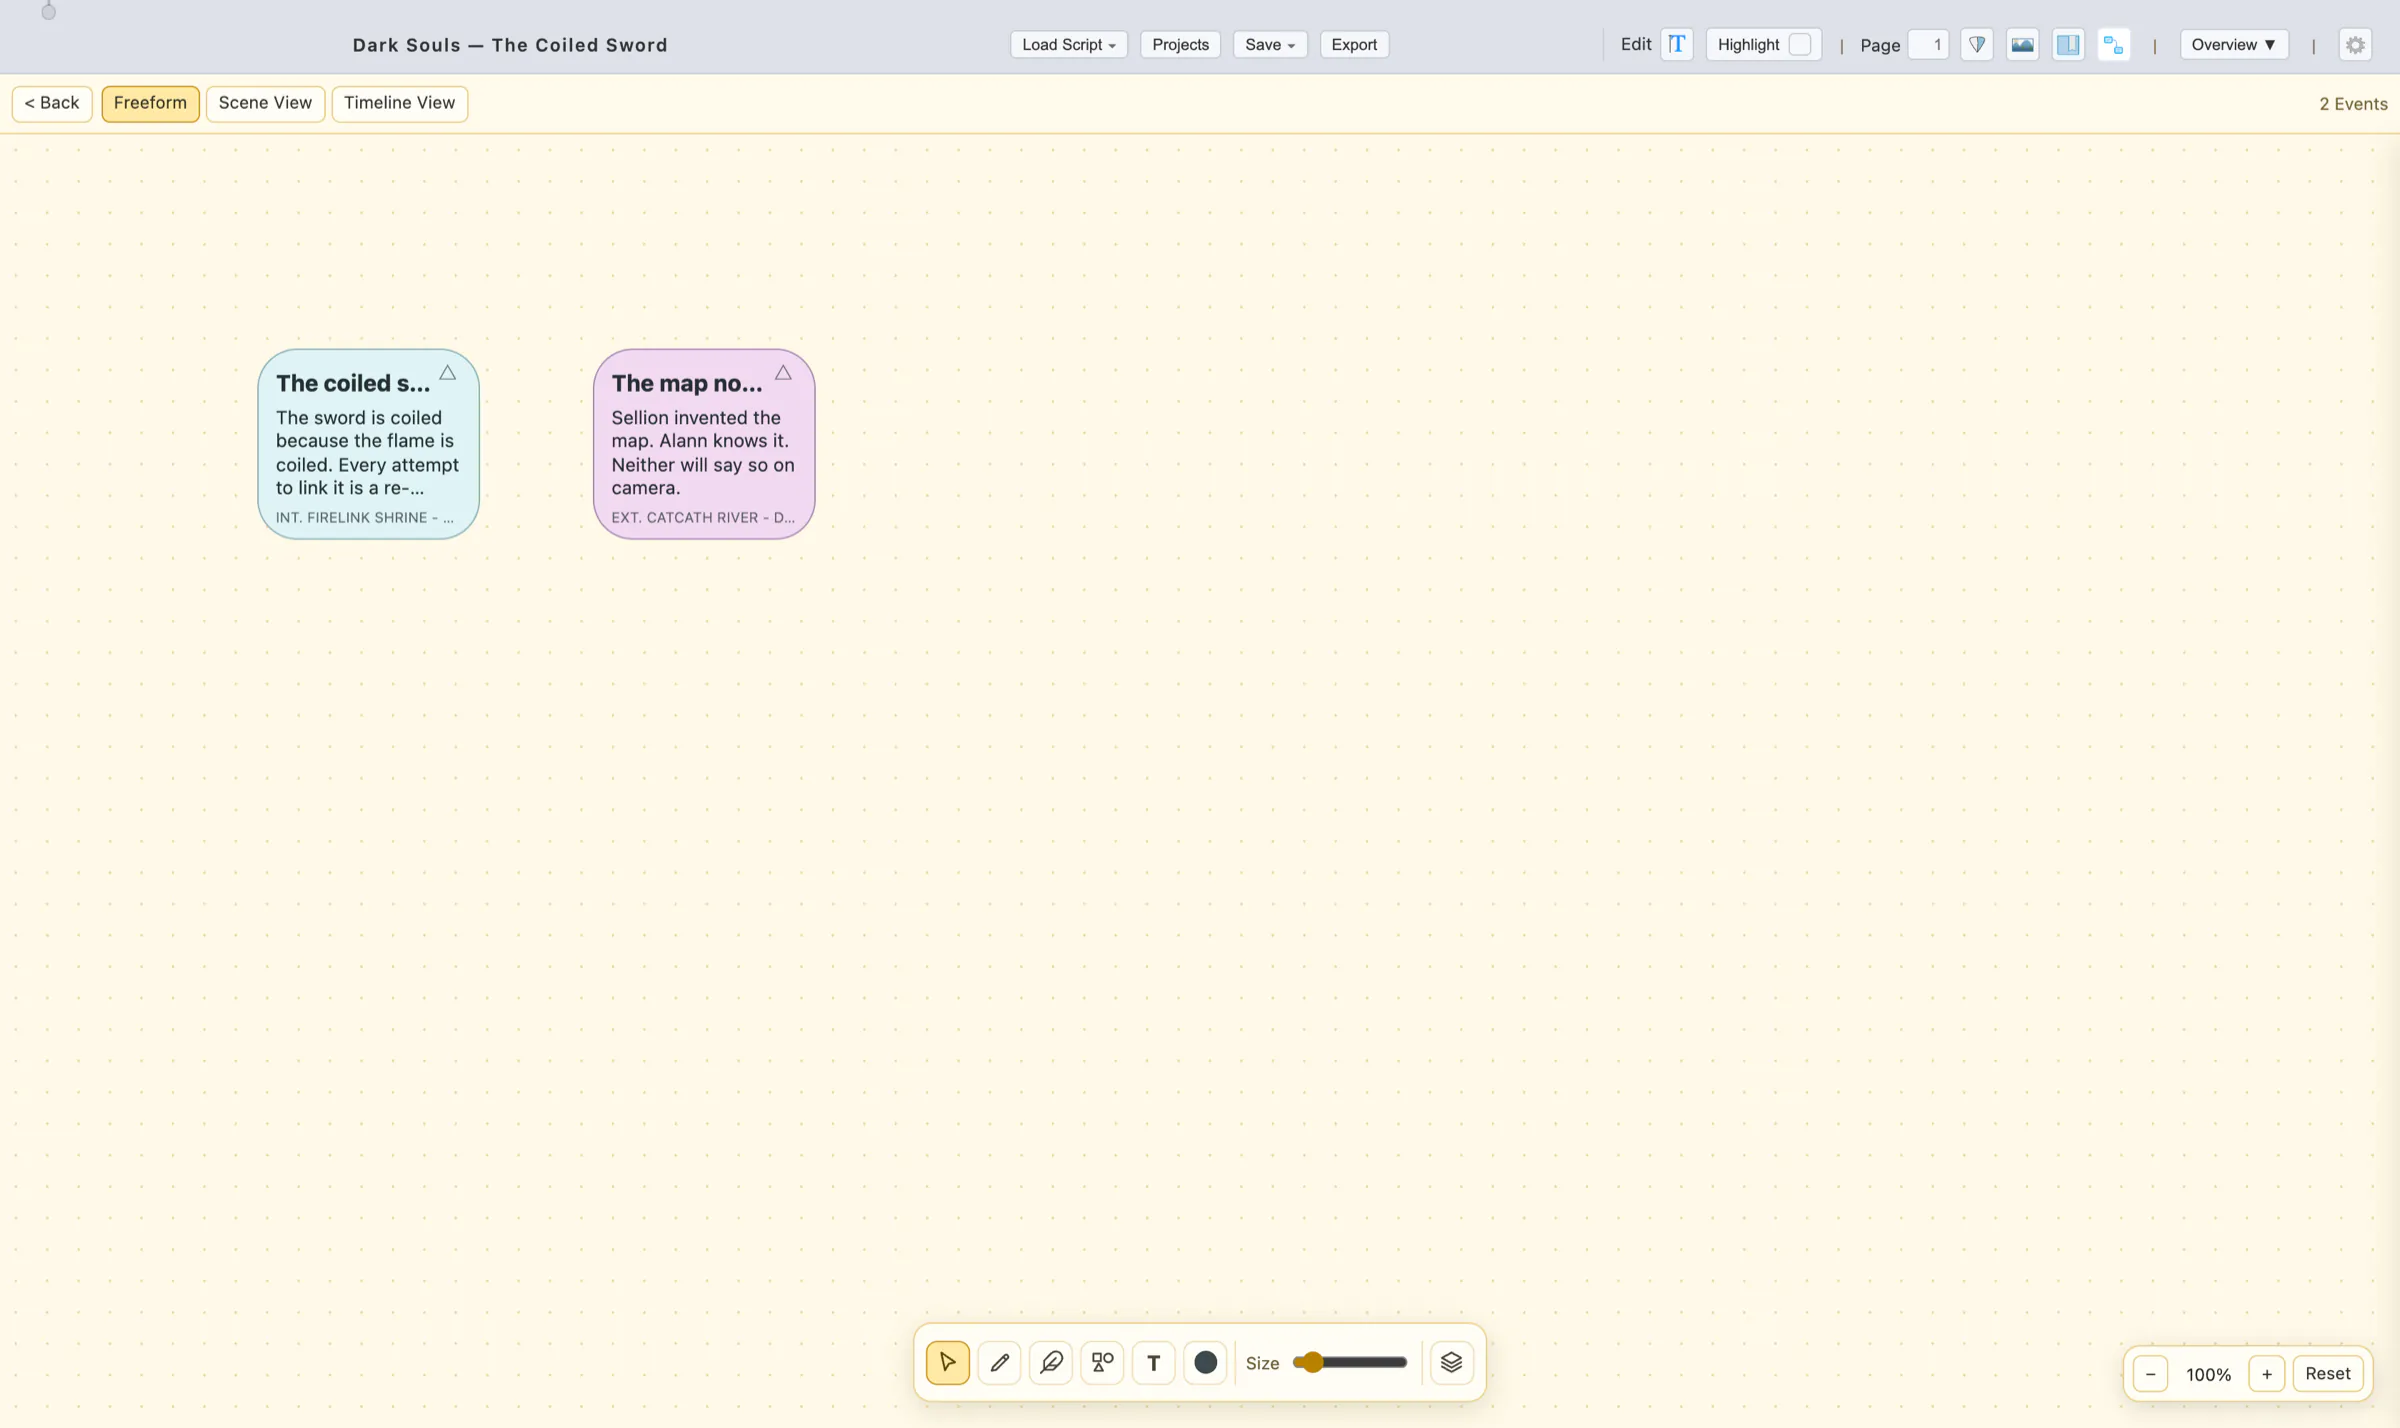
- Cards show the title, the note text, and the scene the passage starts in. Drag a card anywhere in Freeform; its position is saved.
- Edit in place. Double-click the title to rename ("Enter" commits), or double-click the body to rewrite the text ("Cmd/Ctrl+Enter" commits, "Esc" cancels). Both go through the same history as the sleeve editor.
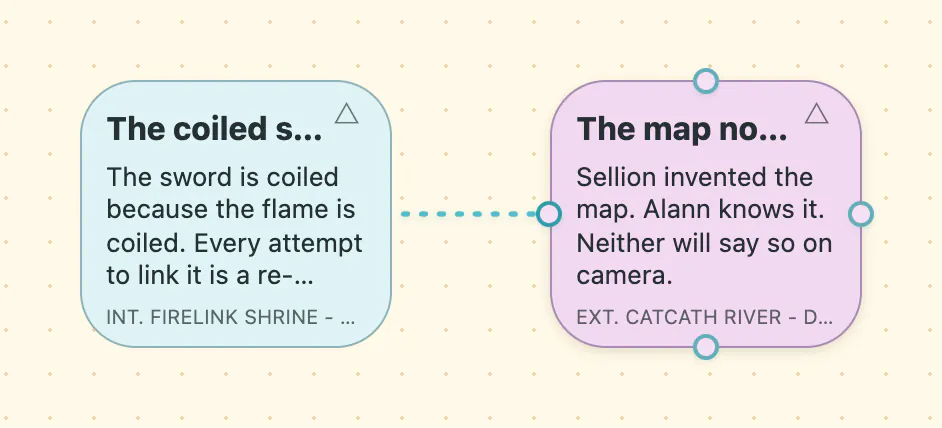
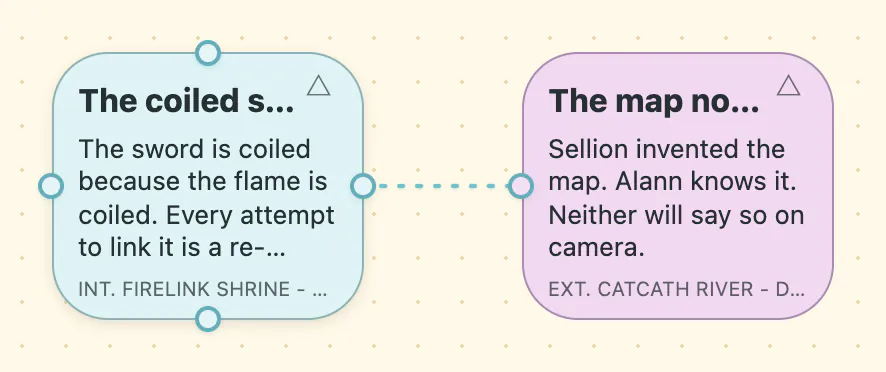
- Connections. Each card has a port on all four sides. Drag from a port to another card's port to link them; the link is drawn as a curve. Right-click a connection for Bezier, Linear, a line colour picker, or Delete Connection. Hold "Cmd" (or "Ctrl") and click a port to detach the connection attached to it.
- Source passage. The small triangle on a card opens the actual script lines behind that note, formatted as they read on the page, with "−" and "+" to size the text. "Cmd/Ctrl"+click a card to jump straight to its lines in the script.
- Right-click a card for the same menu as the sleeve, so nothing is reachable only one way.
- Zoom with the −, + and Reset buttons, or "Cmd/Ctrl" + mouse wheel, between 25% and 250%. The board is 4000 × 2800, so scroll to reach it all.
- Selecting several cards with a drag-marquee on empty board (Select tool active) moves them together.
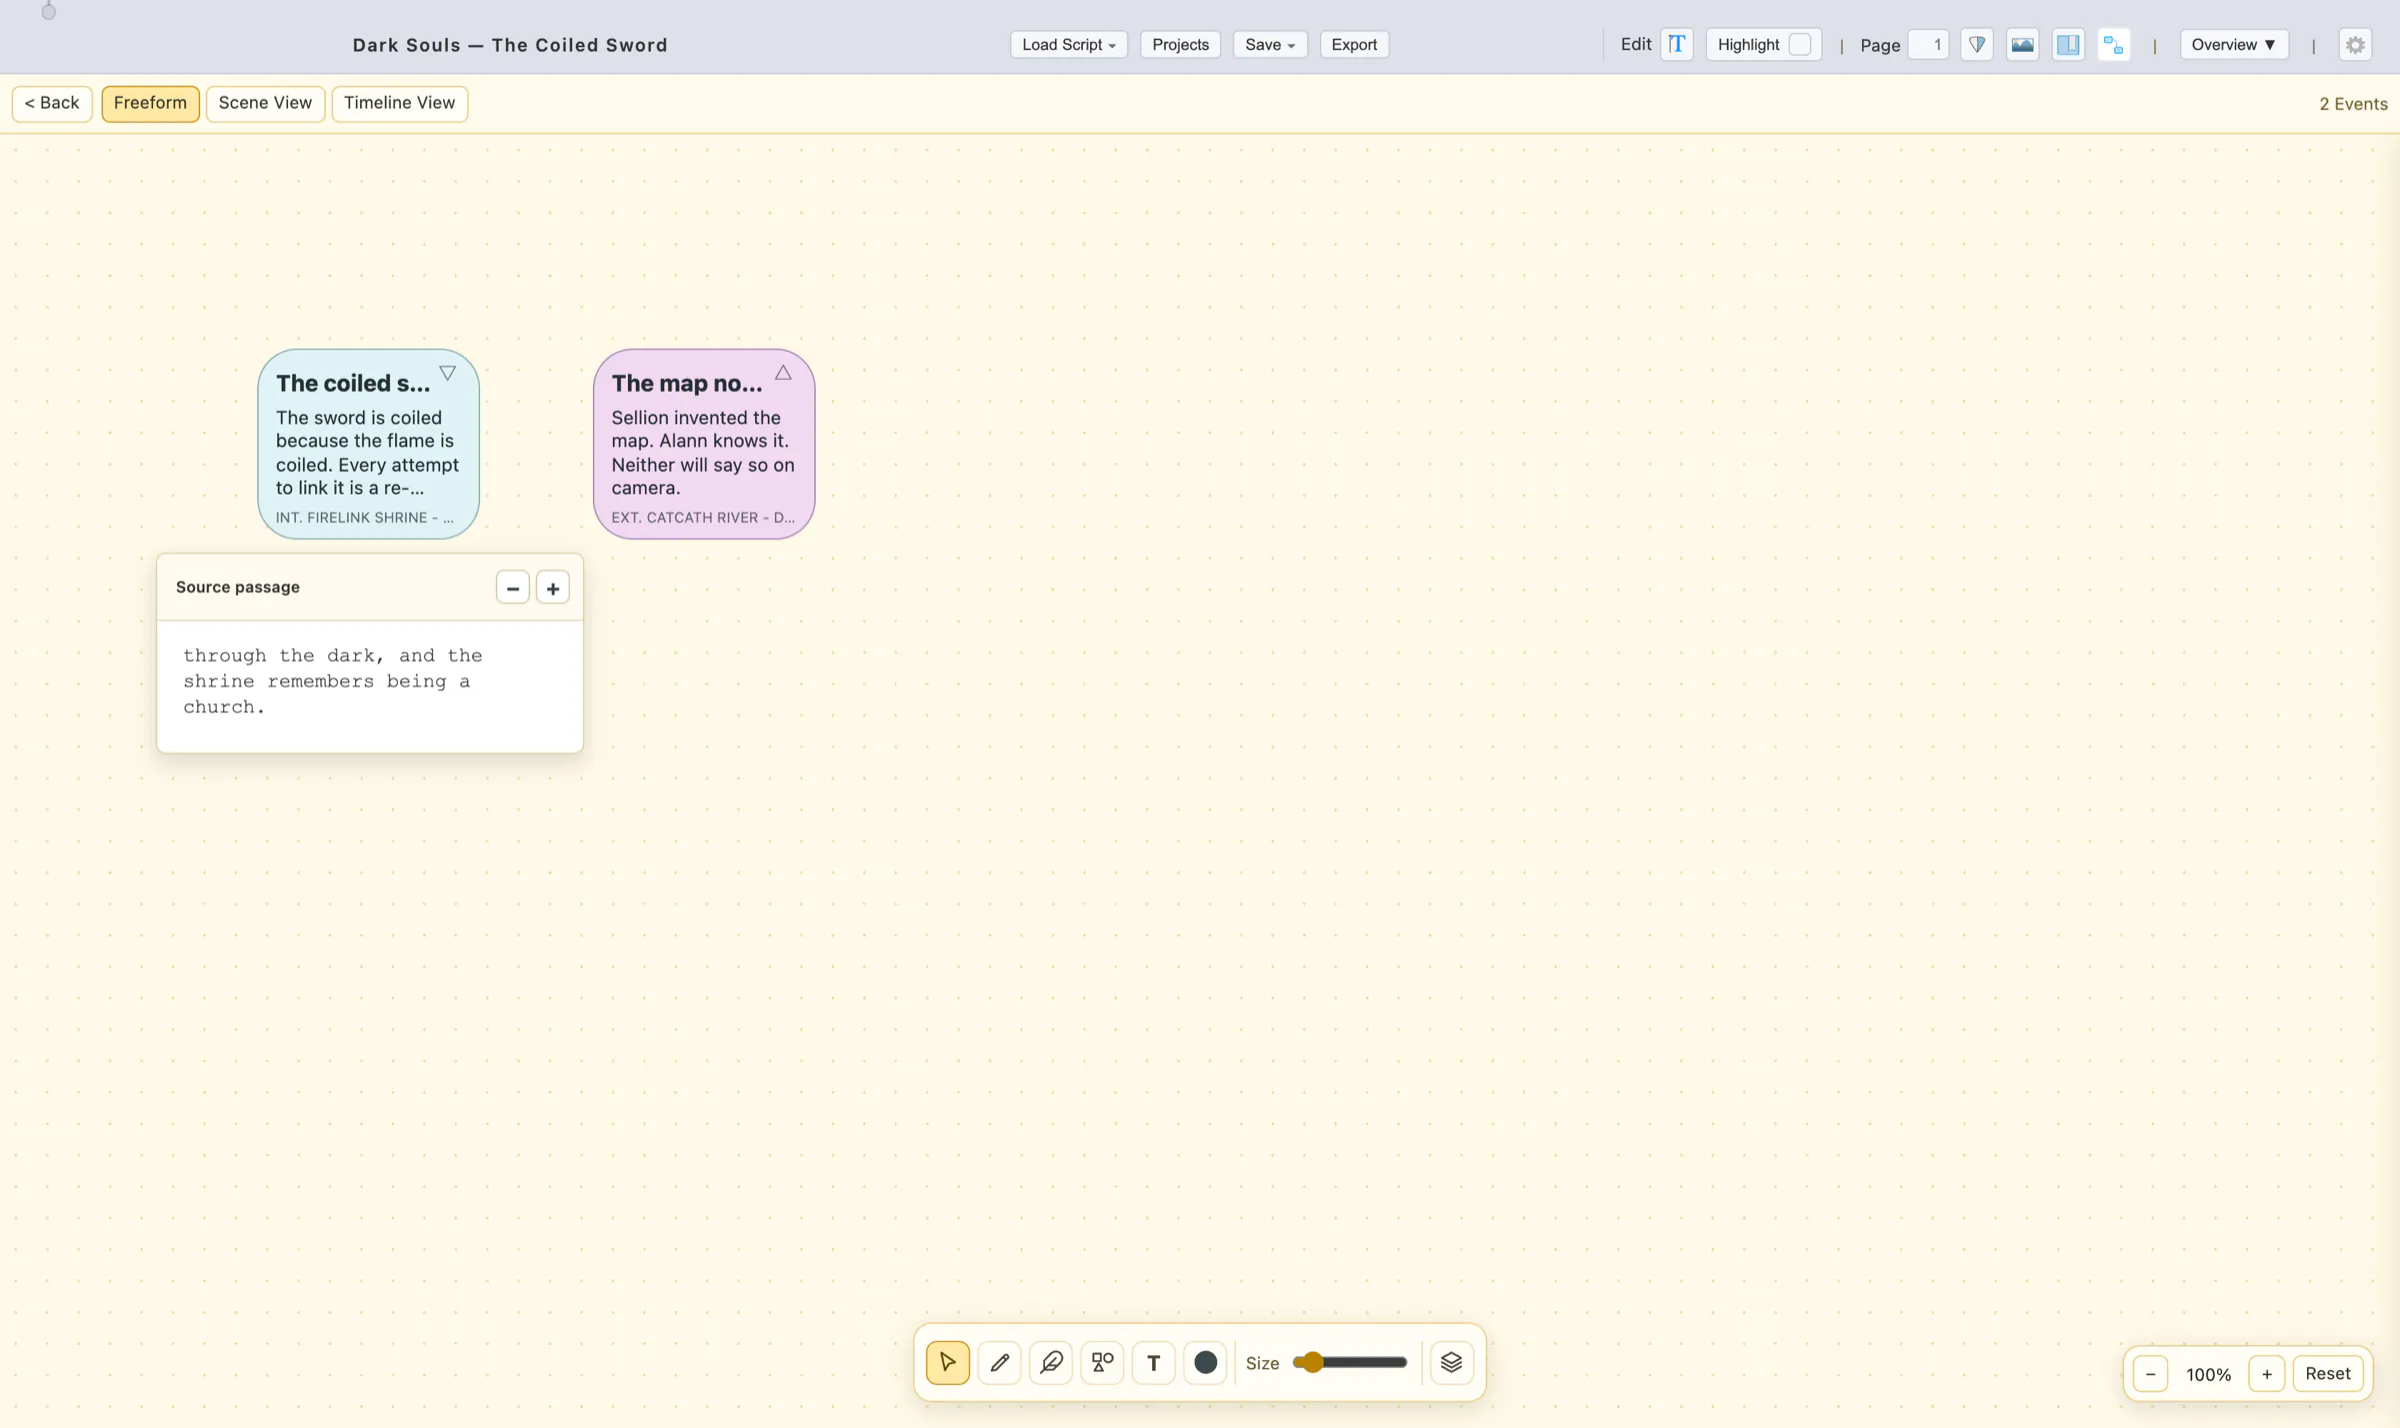
13.5 Freeform, Scene & Timeline Views
Three tabs across the top of the graph show the same notes in three arrangements. Switching views cancels any connection you were mid-drag, so a preview never spills into the wrong board.
- Freeform — the open board described above. Card positions and the camera are yours, and are stored per view.
- Scene View — one column per scene heading, in script order, with each note placed in the column its passage starts in; notes that no longer resolve to a scene gather in a final Detached / Needs Attention column. Cards move freely inside their own column and stay clamped to it, and connections are still available. A note whose passage crosses two headings is marked as crossing.
- Timeline View — a horizontal band per scene, with a coloured bar for each note positioned along the band by where its lines fall in the scene. Hover a bar for its title and text; click it to select the note and mark its passage. Notes stacked on the same range sit one above the other. Connections are not drawn here, because the point of this view is sequence, not linkage.
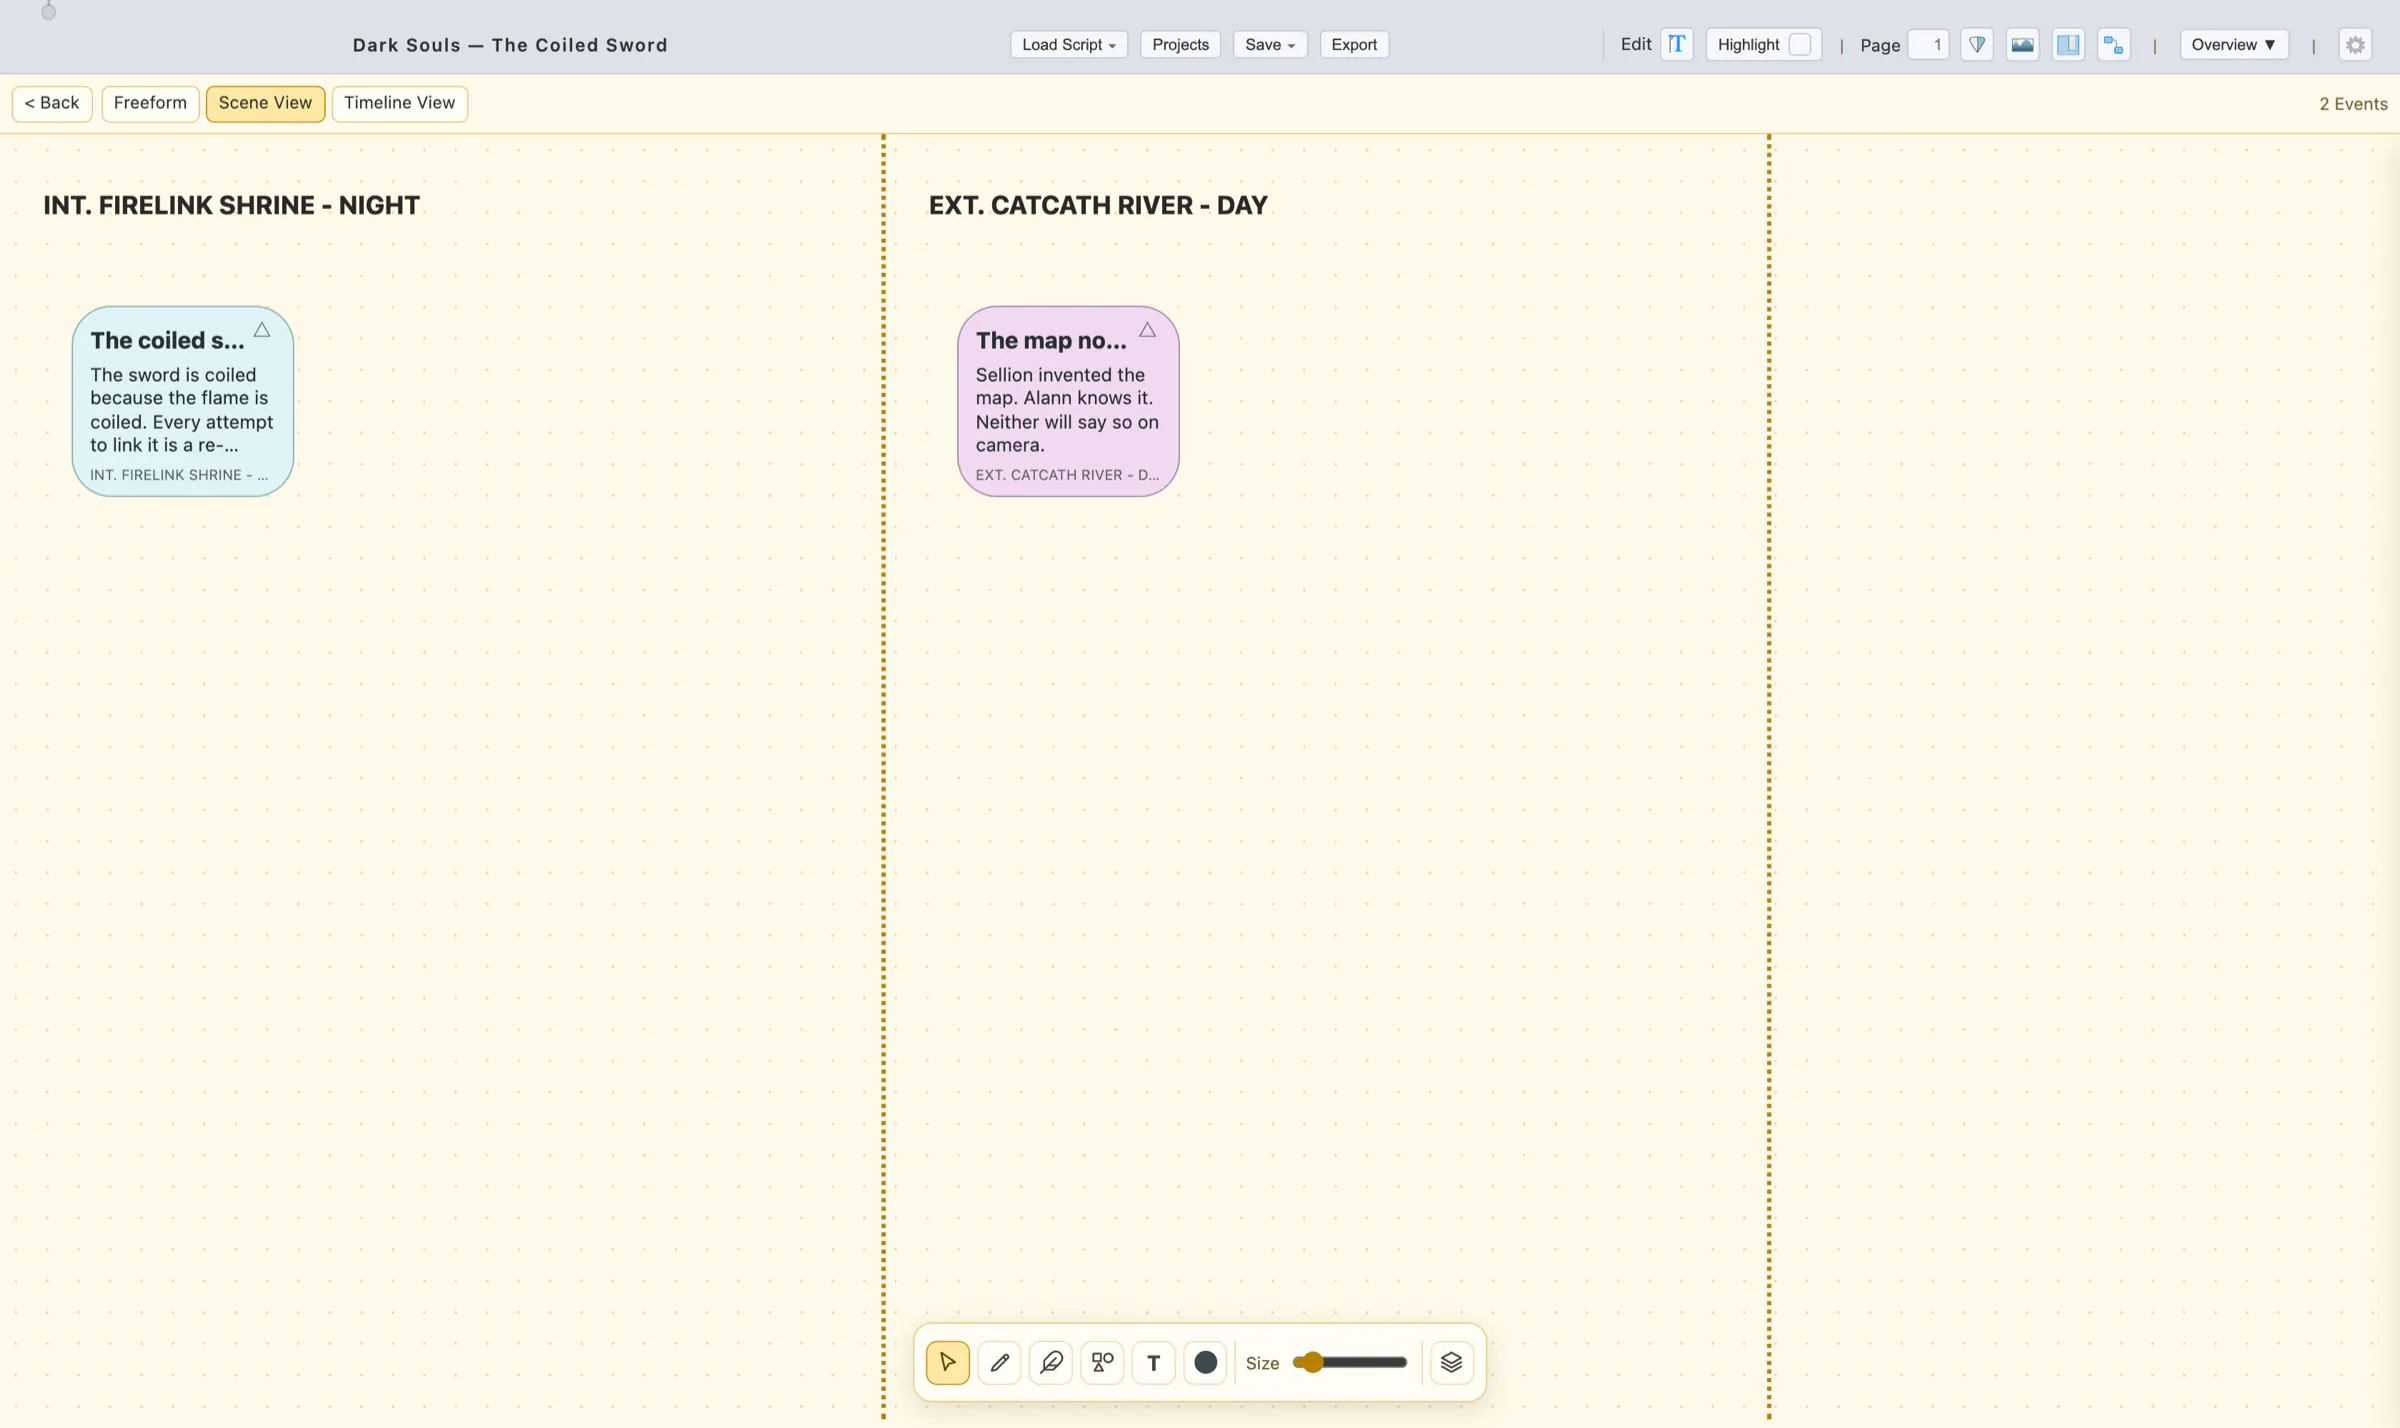
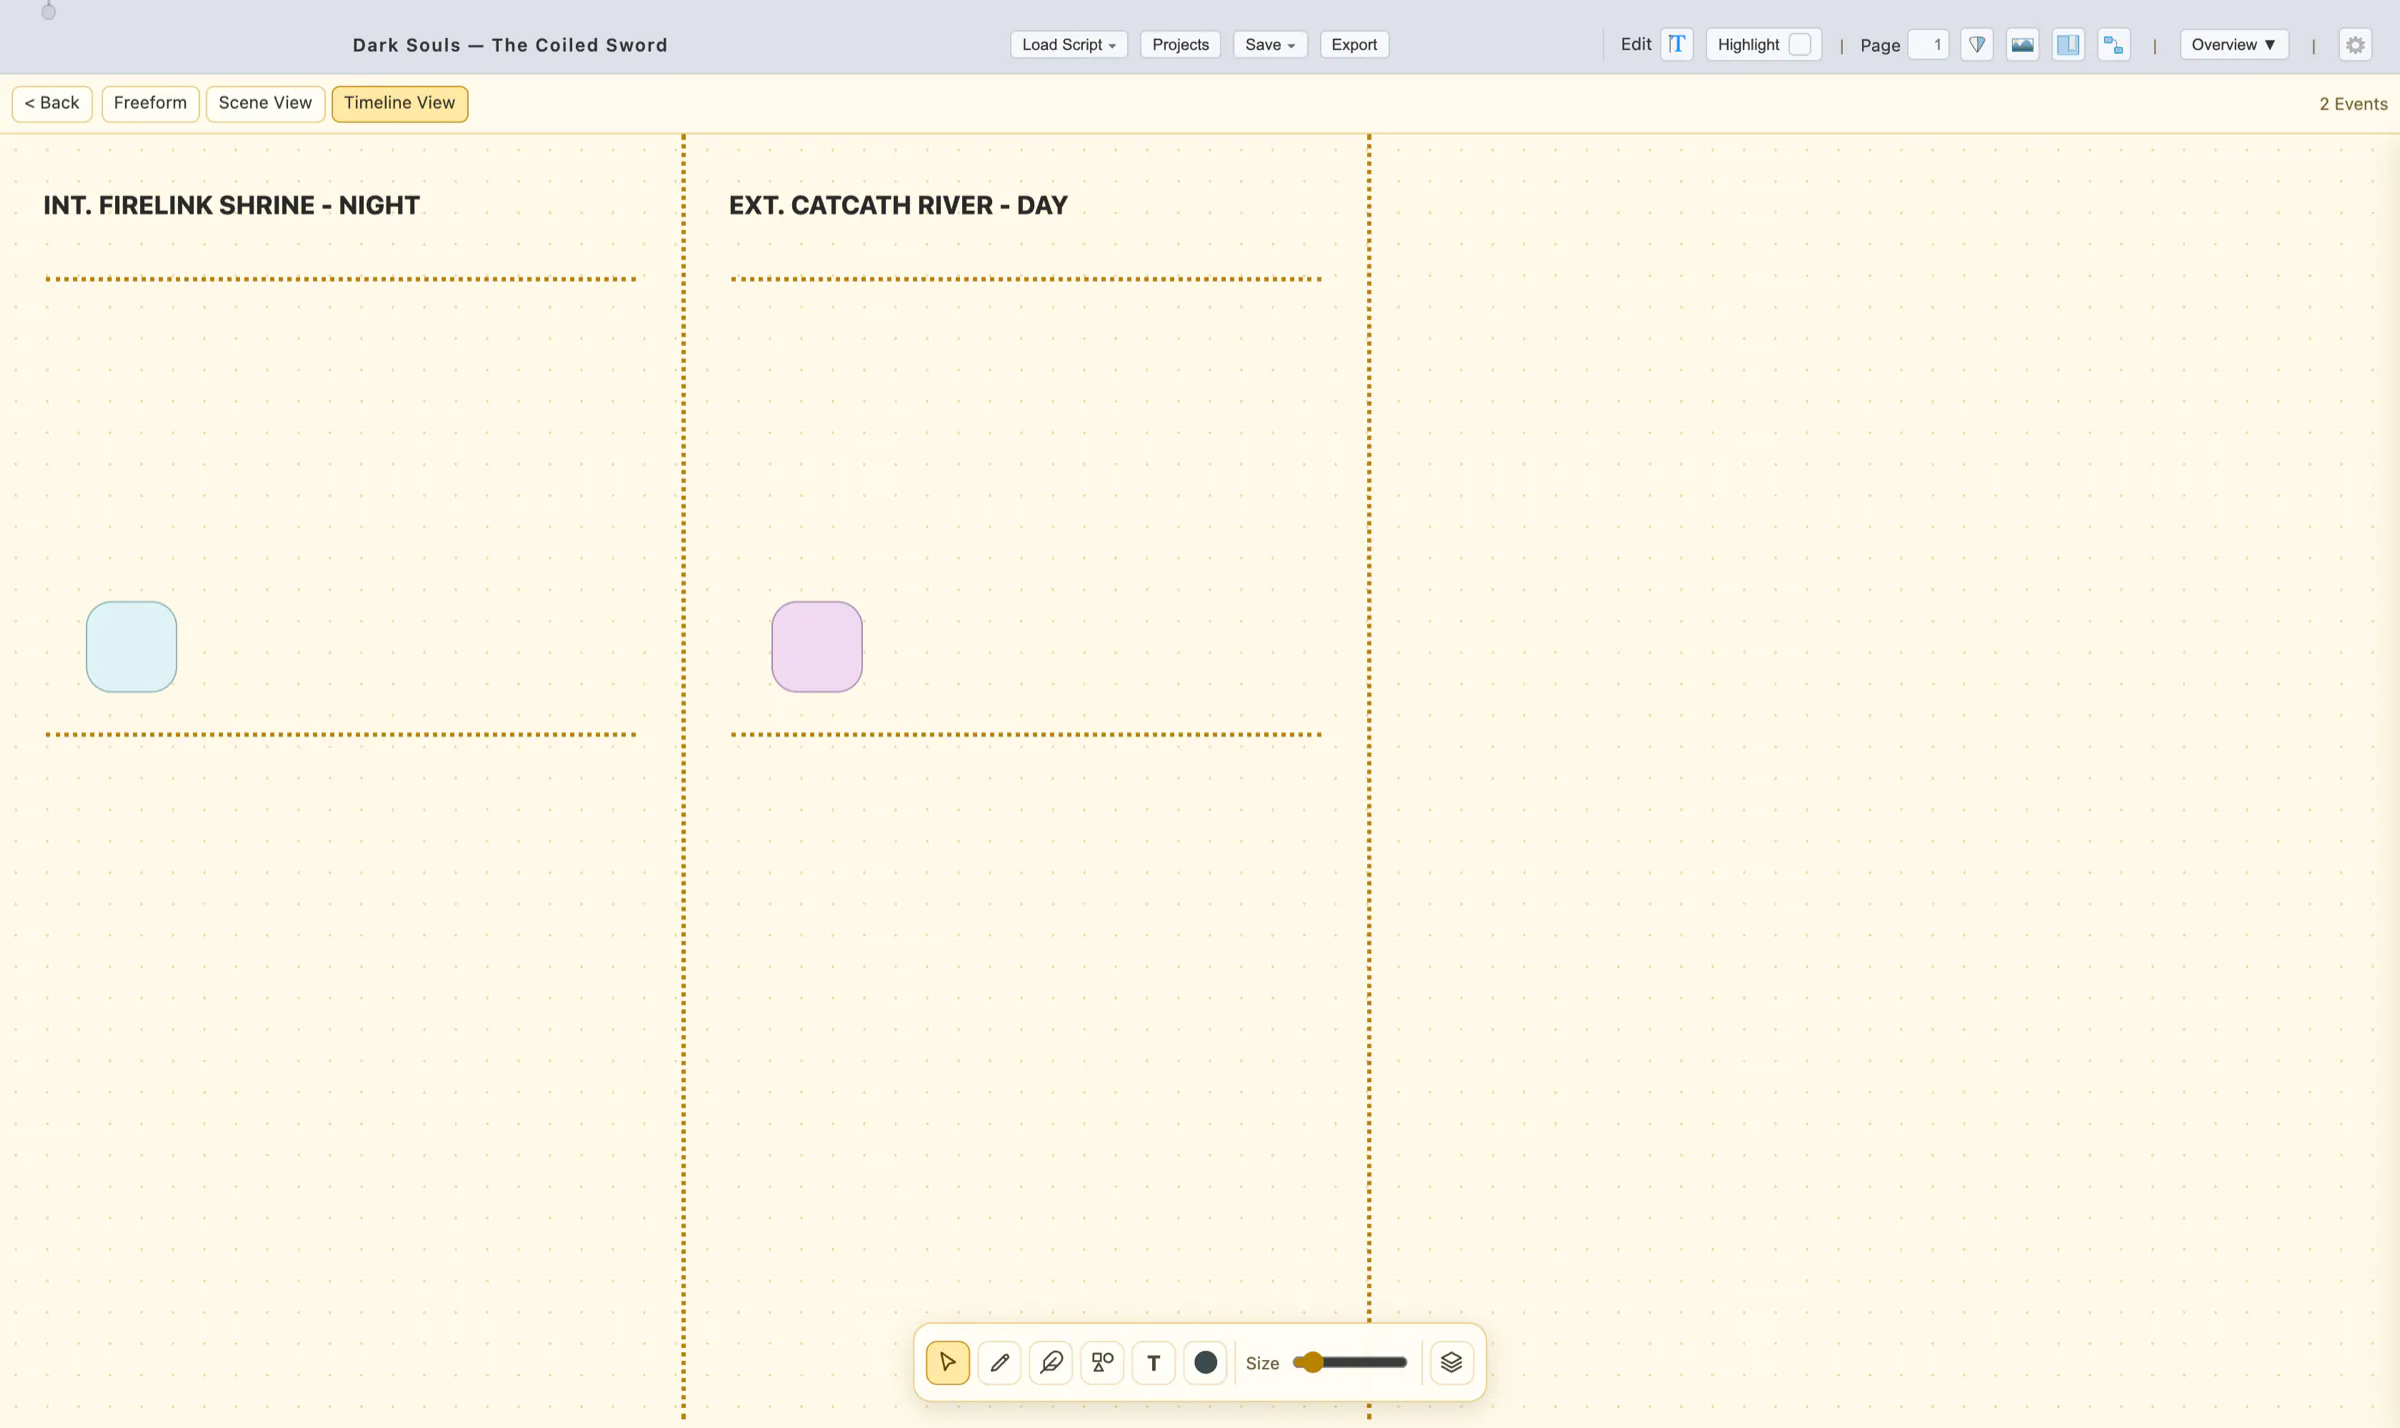
13.6 Drawing & Layers on the Graph
A floating toolbar at the bottom of the graph turns any view into a whiteboard for sketching structure around the cards.
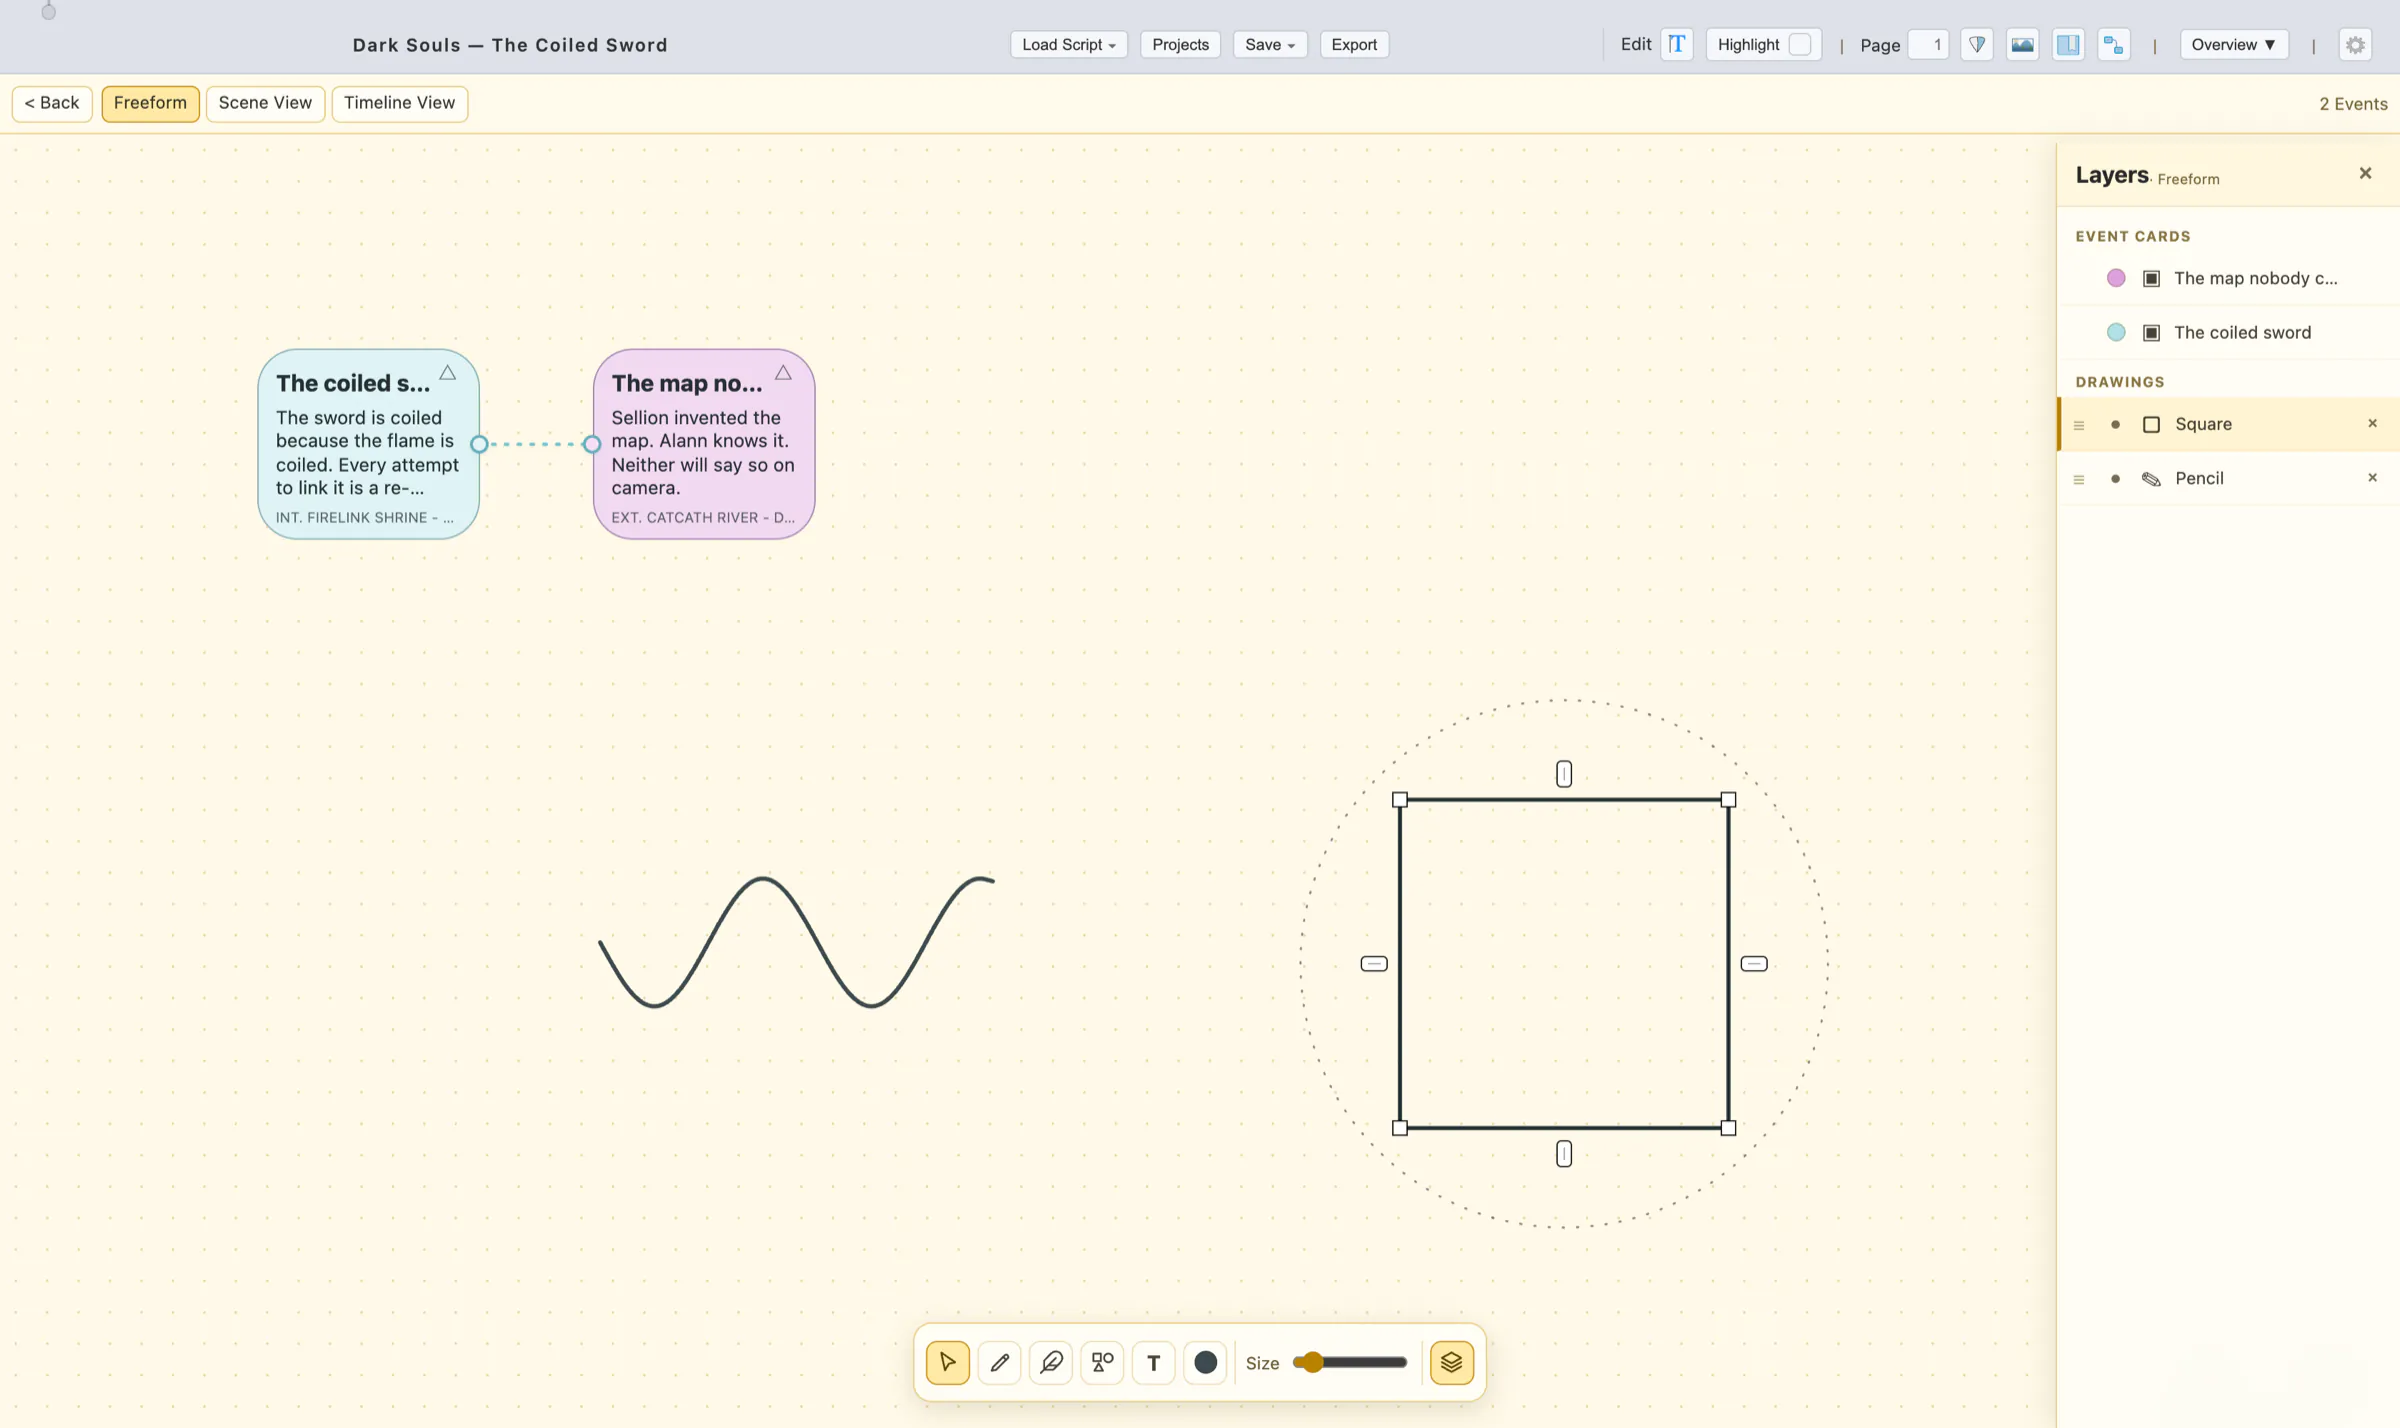
- Tools: Select and transform, Pencil (freehand), Pen (point by point — press "Enter" to finish the path, "Esc" to abandon it), Shapes (square, circle, triangle), and Text. "Color" sets the stroke, the slider sets line width and text size.
- Transform: drag a shape's handles to resize (hold "Shift" to keep proportions), the round handle above it to rotate. With an anchor point of a pen path selected, "Space" toggles that point between a corner and a curve.
- Selection commands: "Cmd/Ctrl+G" groups the selected layers, "Cmd/Ctrl+Alt+G" ungroups; "Cmd/Ctrl+C" and "Cmd/Ctrl+V" copy and paste a selection; "Delete" or "Backspace" removes the selected layer.
- Layers panel: the current view's contents are listed under Event Cards and Drawings. Each event card row shows its colour swatch and title; each drawing row shows a visibility dot (●/○), a shape icon, its name, and an × to delete. Click a row to select it, double-click a name to rename it, use the dot to hide a drawing, and drag the grip to reorder. "Shift"+click adds to the selection.
- Per view. Drawings belong to the view they were made in — Freeform, or one specific scene column — so a sketch on a scene stays with that scene.
- Undo. Drawings, colours, card moves and connections all go through the project's undo history, and everything is saved in the project file with the notes.
14. Overview
The Overview panel provides a structural map of your entire project. It is accessible via the Overview icon in the navigation tools and serves as a central hub for navigating your script, managing injections, and reviewing comments.
14.1 Project Structure
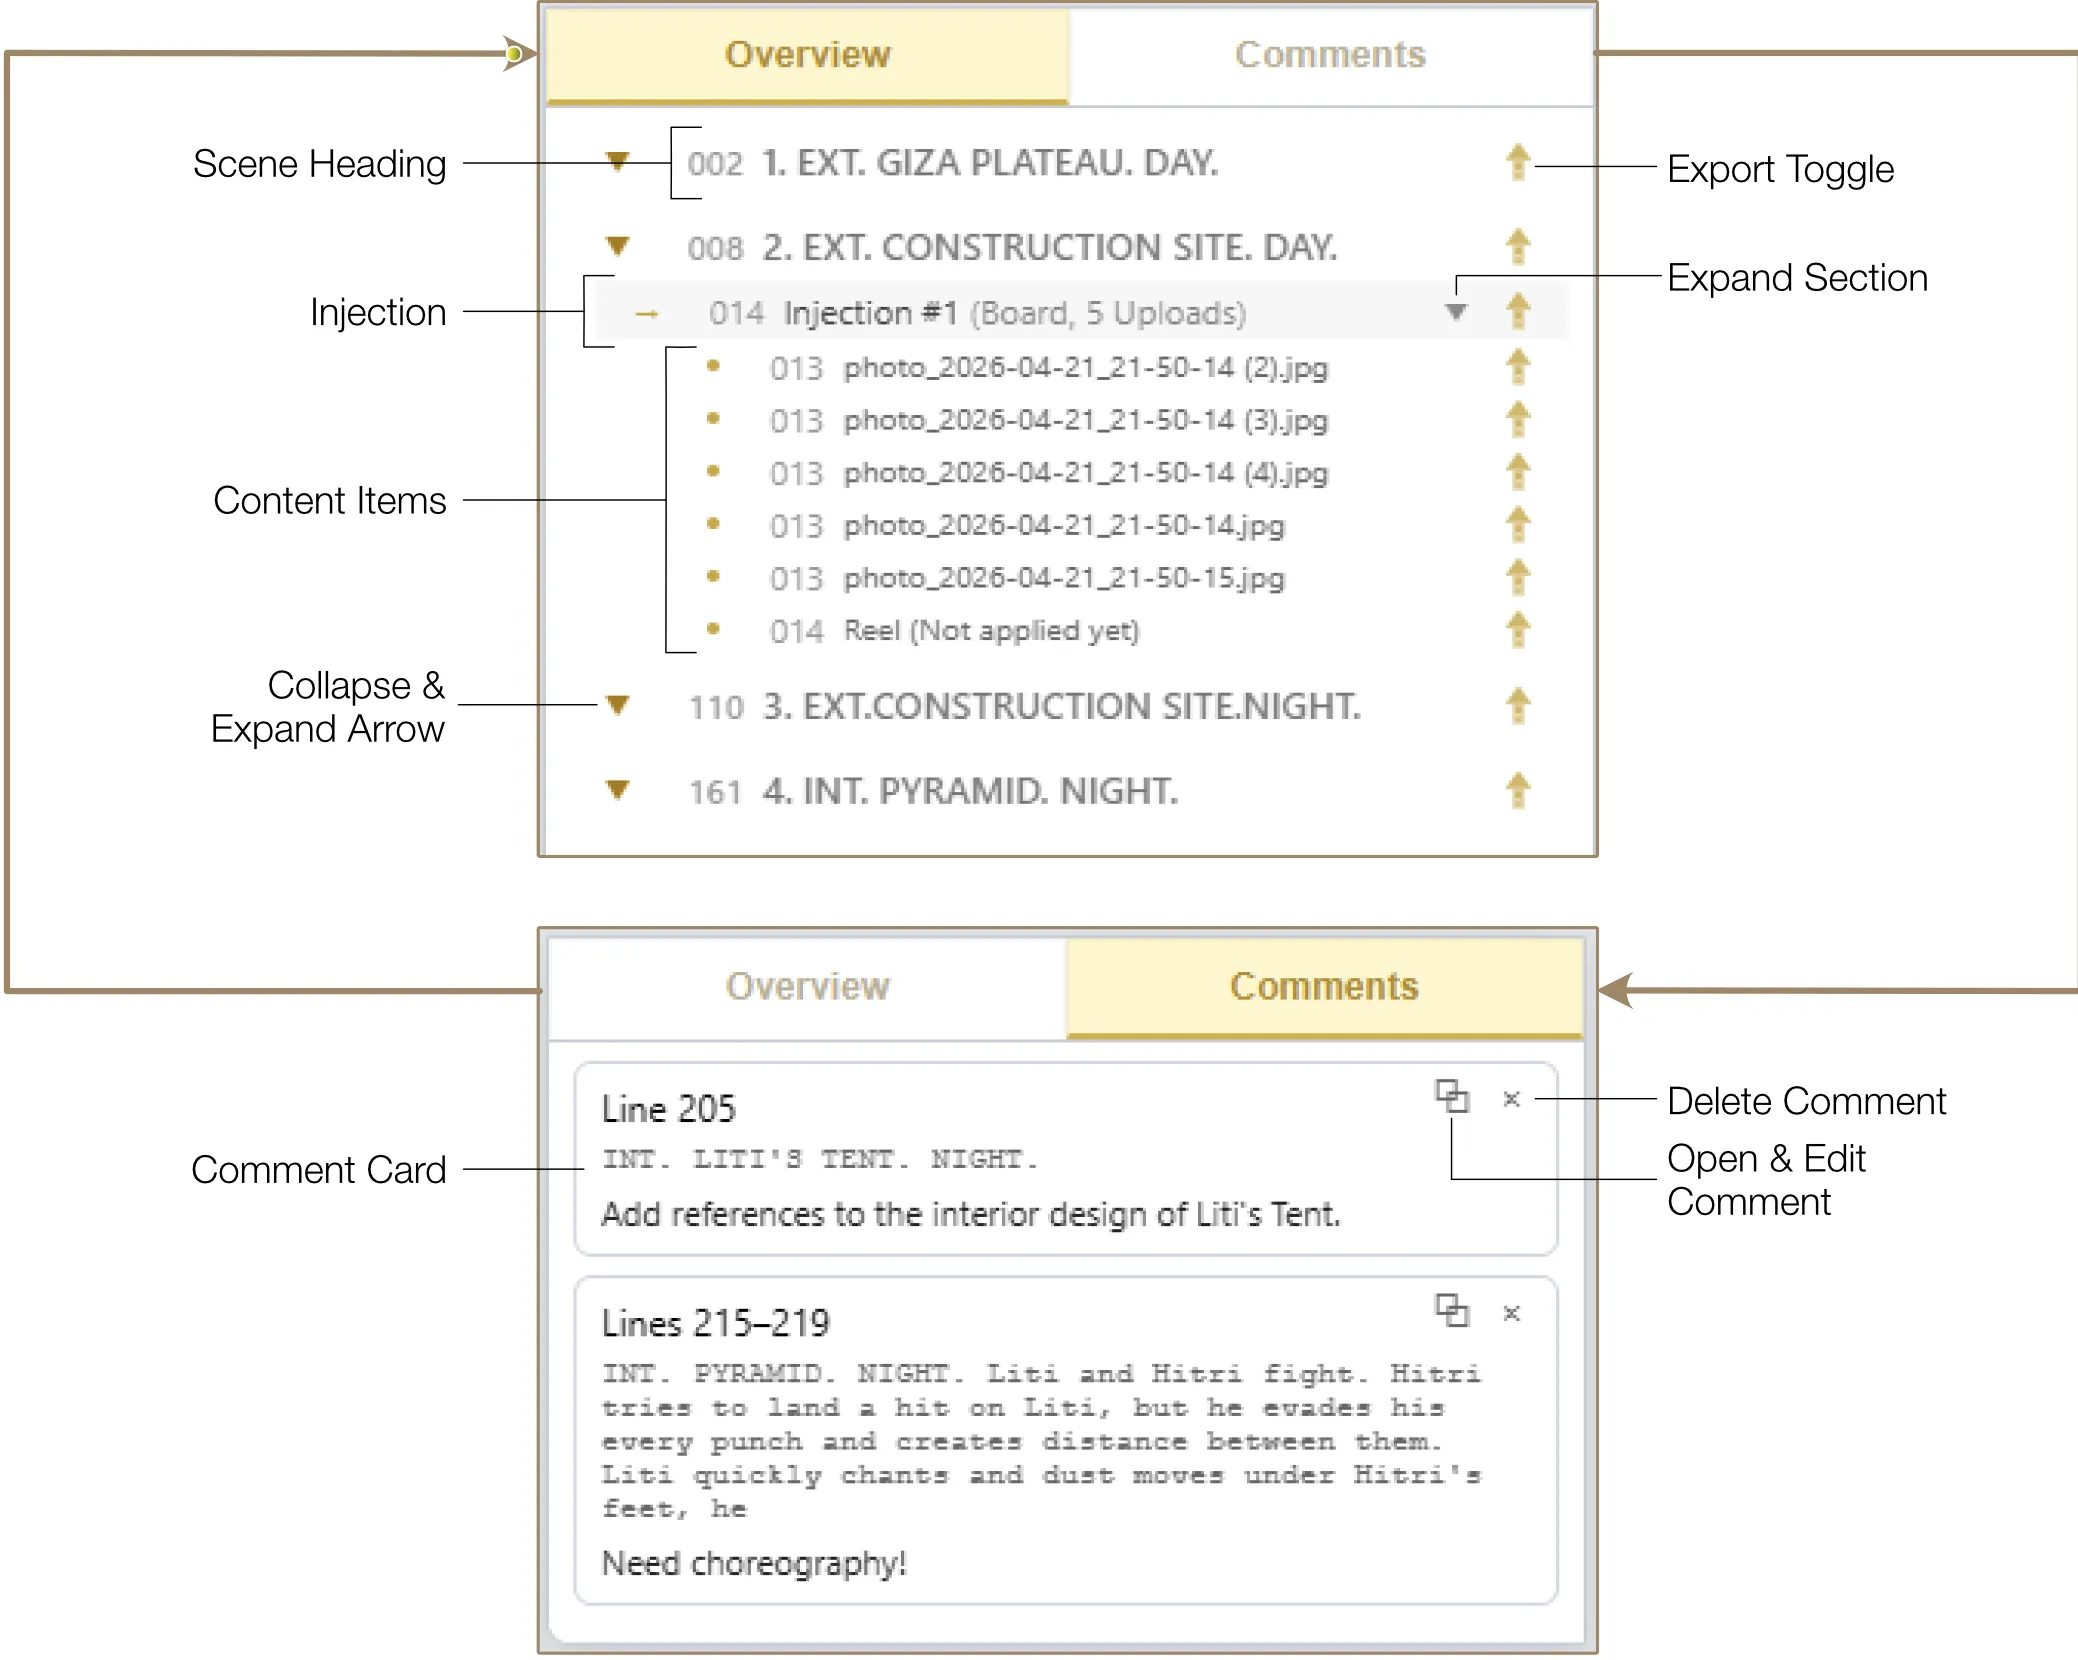
The Overview displays your entire project as a hierarchical tree. Every scene heading is listed as a primary branch. Injections and content items attached to lines appear nested under their respective scenes. You can collapse or expand branches by clicking the Dropdown Arrow icons.
Rapid Navigation
Double-clicking a scene heading or any item scrolls the script directly to that location. When you jump to an item from the Overview, the target line in the script flashes briefly to help you orient yourself.
Rename
You can right-click any non-scene item in the Overview tree and select "Rename" to give it a custom label. This does not change the script text itself.
Export Toggles
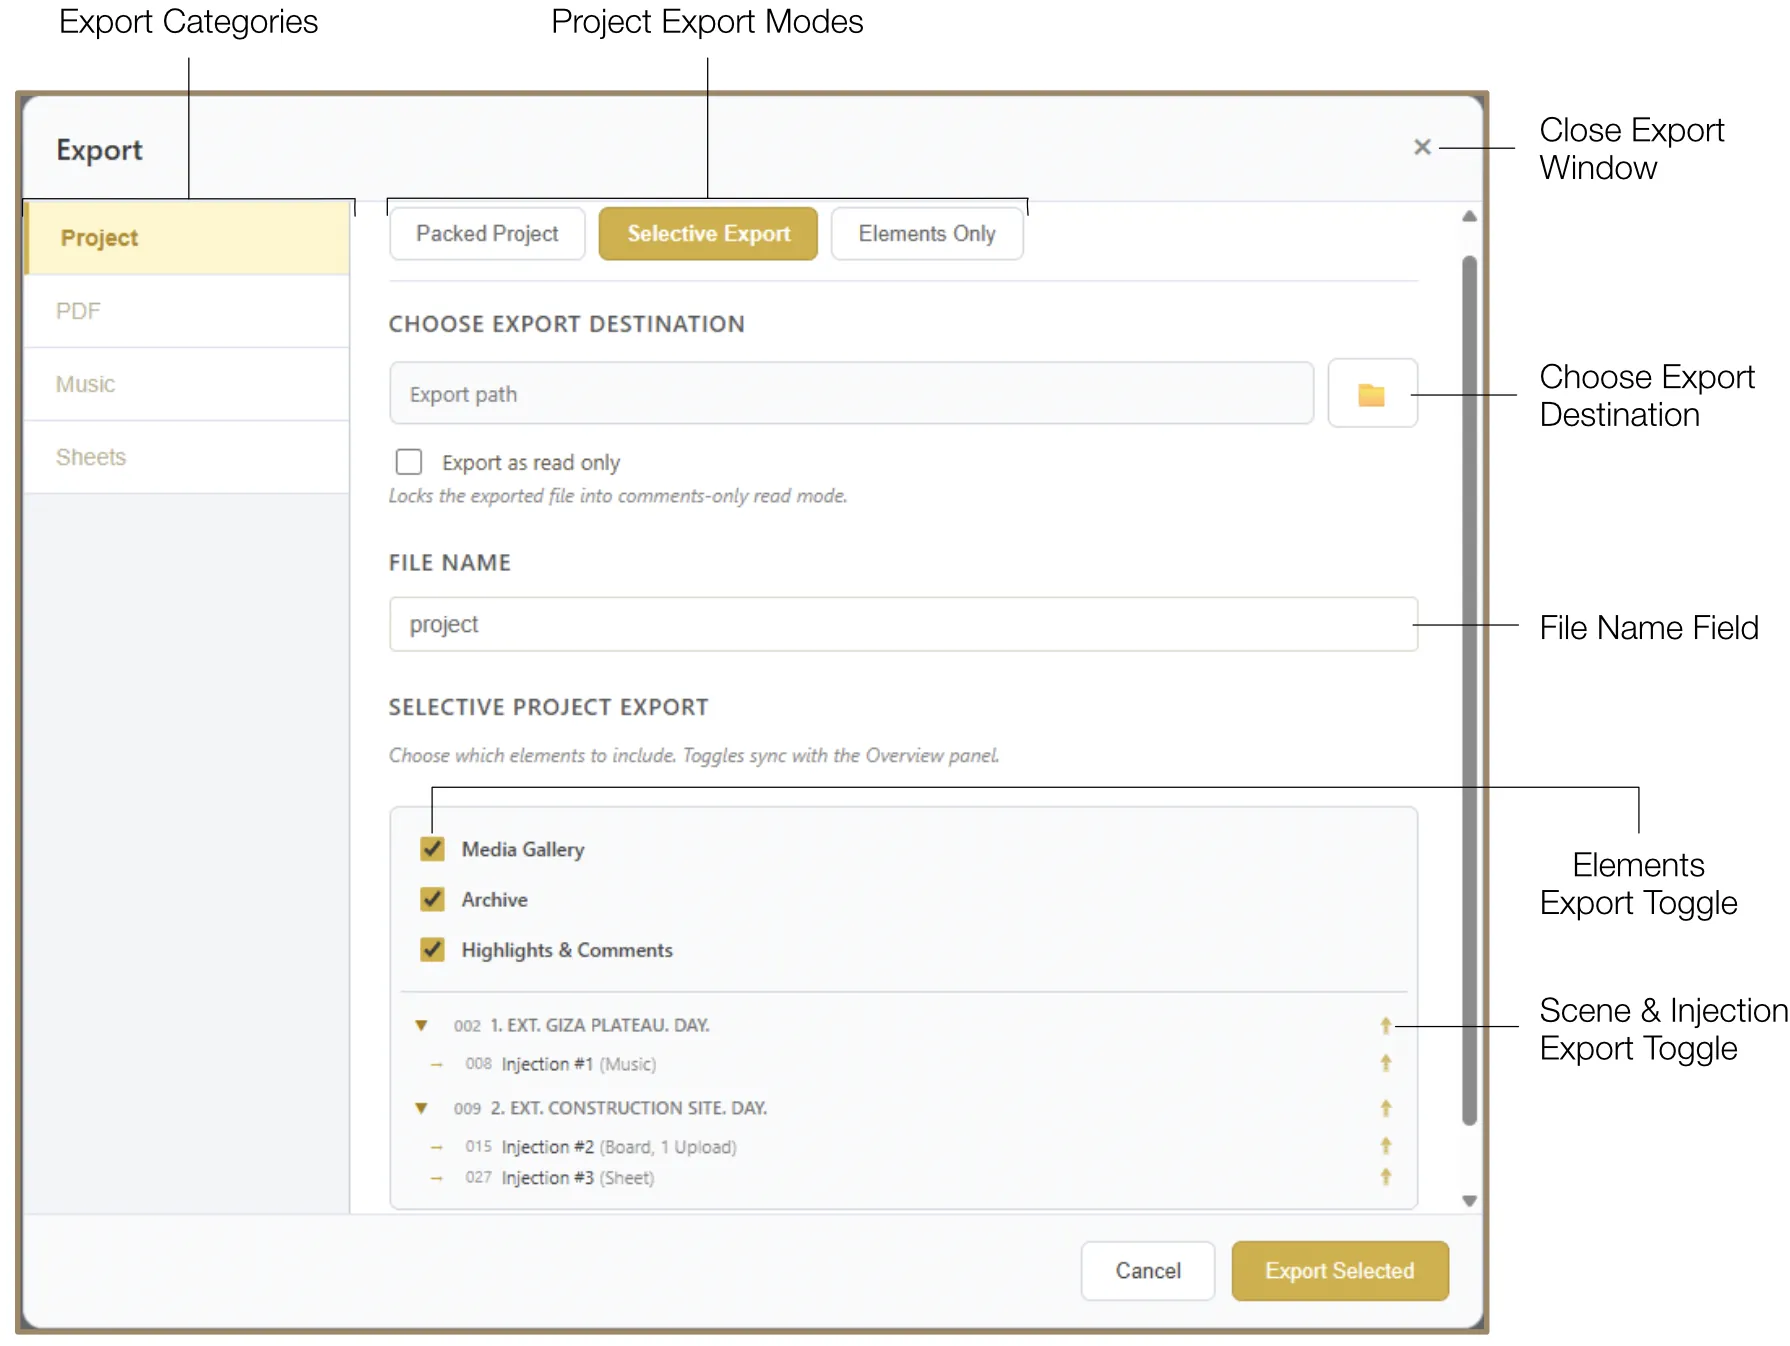
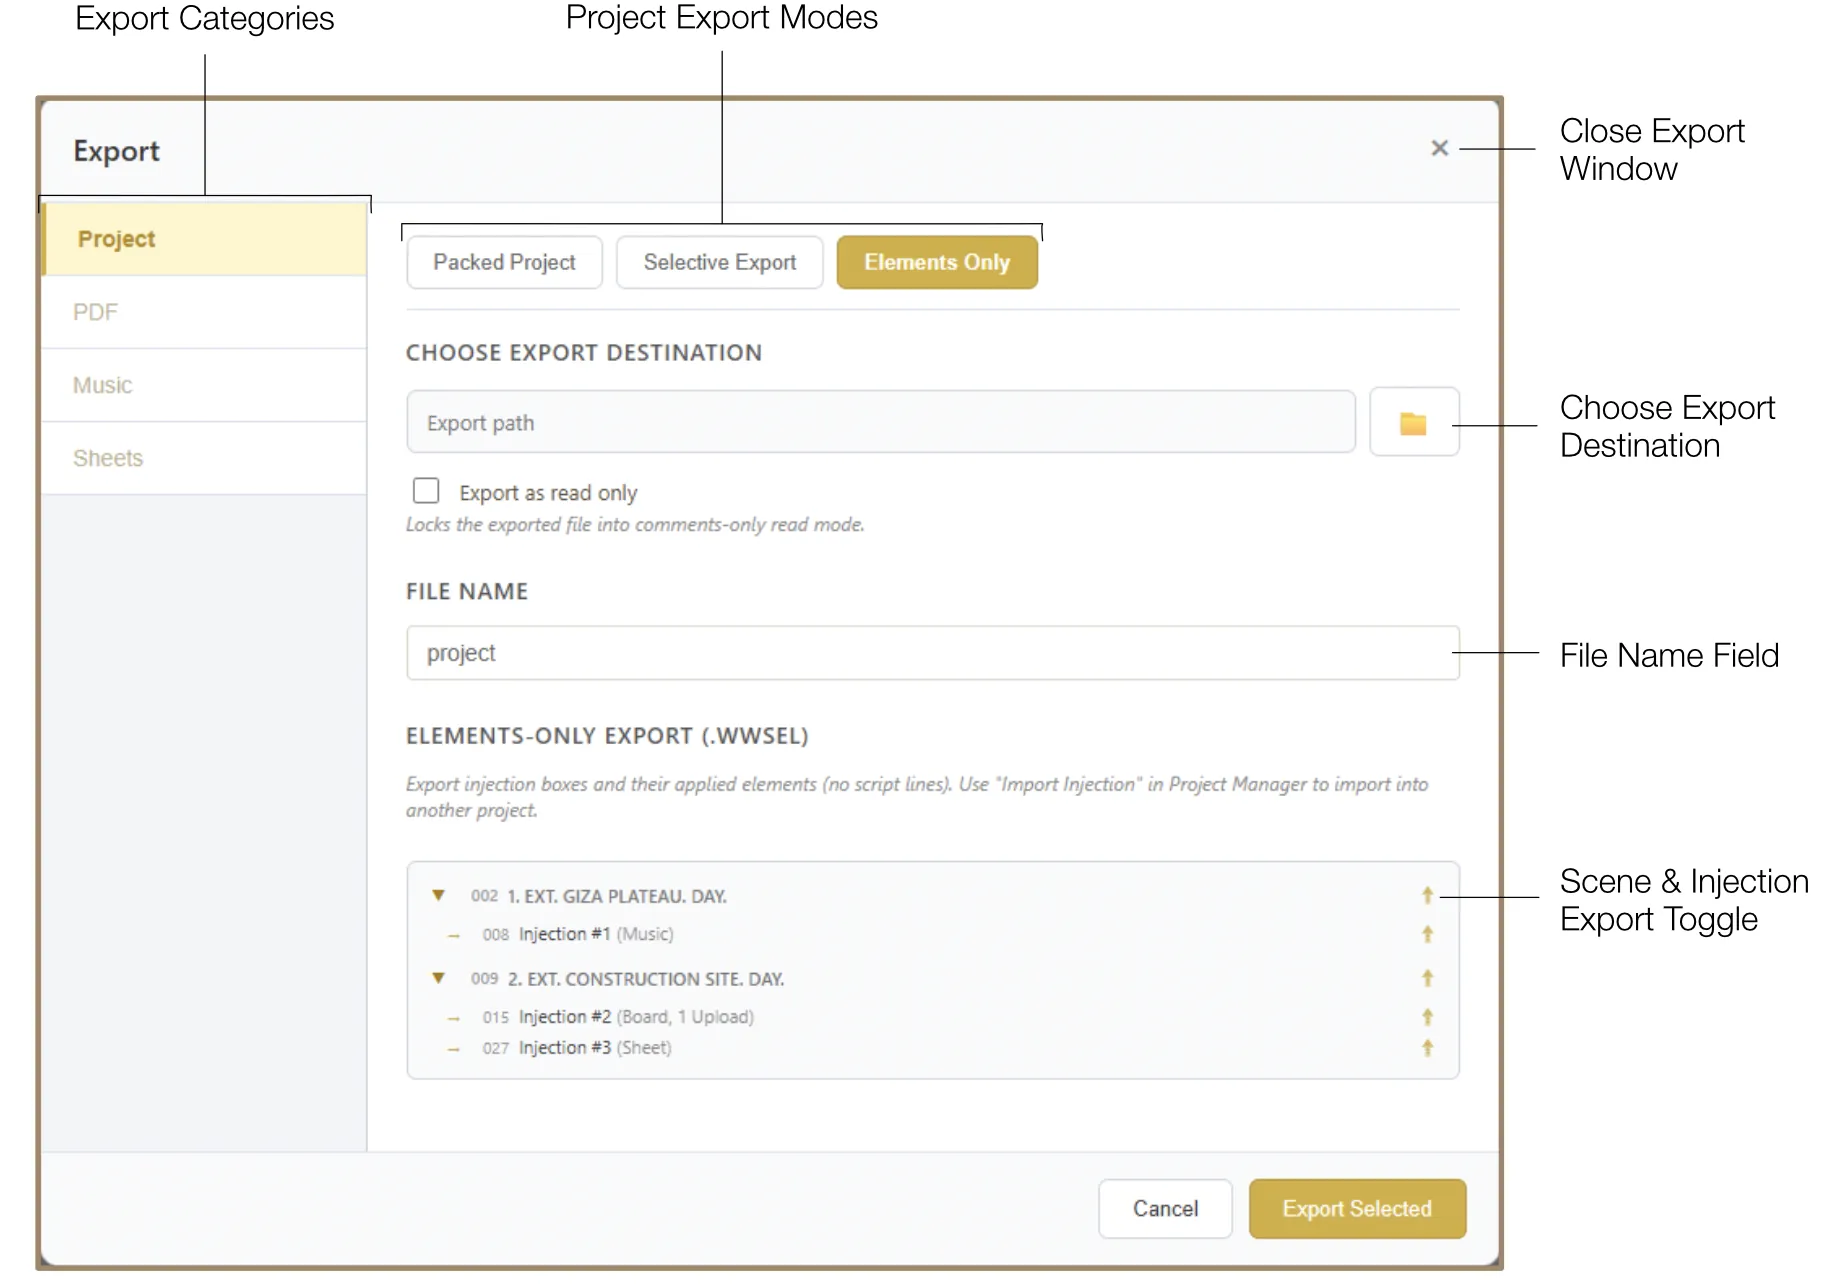
Each item in the tree has a small Export Icon on the right. You can toggle it to include or exclude specific scenes, injections, or media items from your final PDF and package exports. These selections are synced with the Selective Export and Elements Only export windows.
14.2 Comments Tab
The Overview also contains a dedicated tab for Comments. This provides a centralized list of all feedback and notes added by collaborators, making it easy to review and address input without scrolling through the entire script.
Comment Cards
All comments appear as cards displaying the line number(s), the quoted text, and the comment itself. Each card is automatically tagged with the name and color of the active Profile, allowing teams to track who made which suggestion.
Navigating to Comments
Clicking any comment card scrolls the script to the commented passage immediately. The corresponding color-coded comment bar in the left margin flashes to help you identify the location.
Managing Comments
- View: Comments are visible both in the Overview > Comment tab and as vertical color-coded bars in the left margin next to commented lines. The bar color can be changed in Profile Settings.
- Edit: To open and edit a comment, Ctrl+Click (or Cmd+Click on Mac) any vertical comment bar, or click the Expand Comment icon on the comment card.
- Delete: Click the Delete icon on the comment card to remove it.
Note: Only the author of a comment can edit its text or delete it.
15. Export
The Export system is a comprehensive tool for sharing your work, creating production documents, and archiving different versions of your project. Click the "Export" button in the global toolbar to open the Export Window.
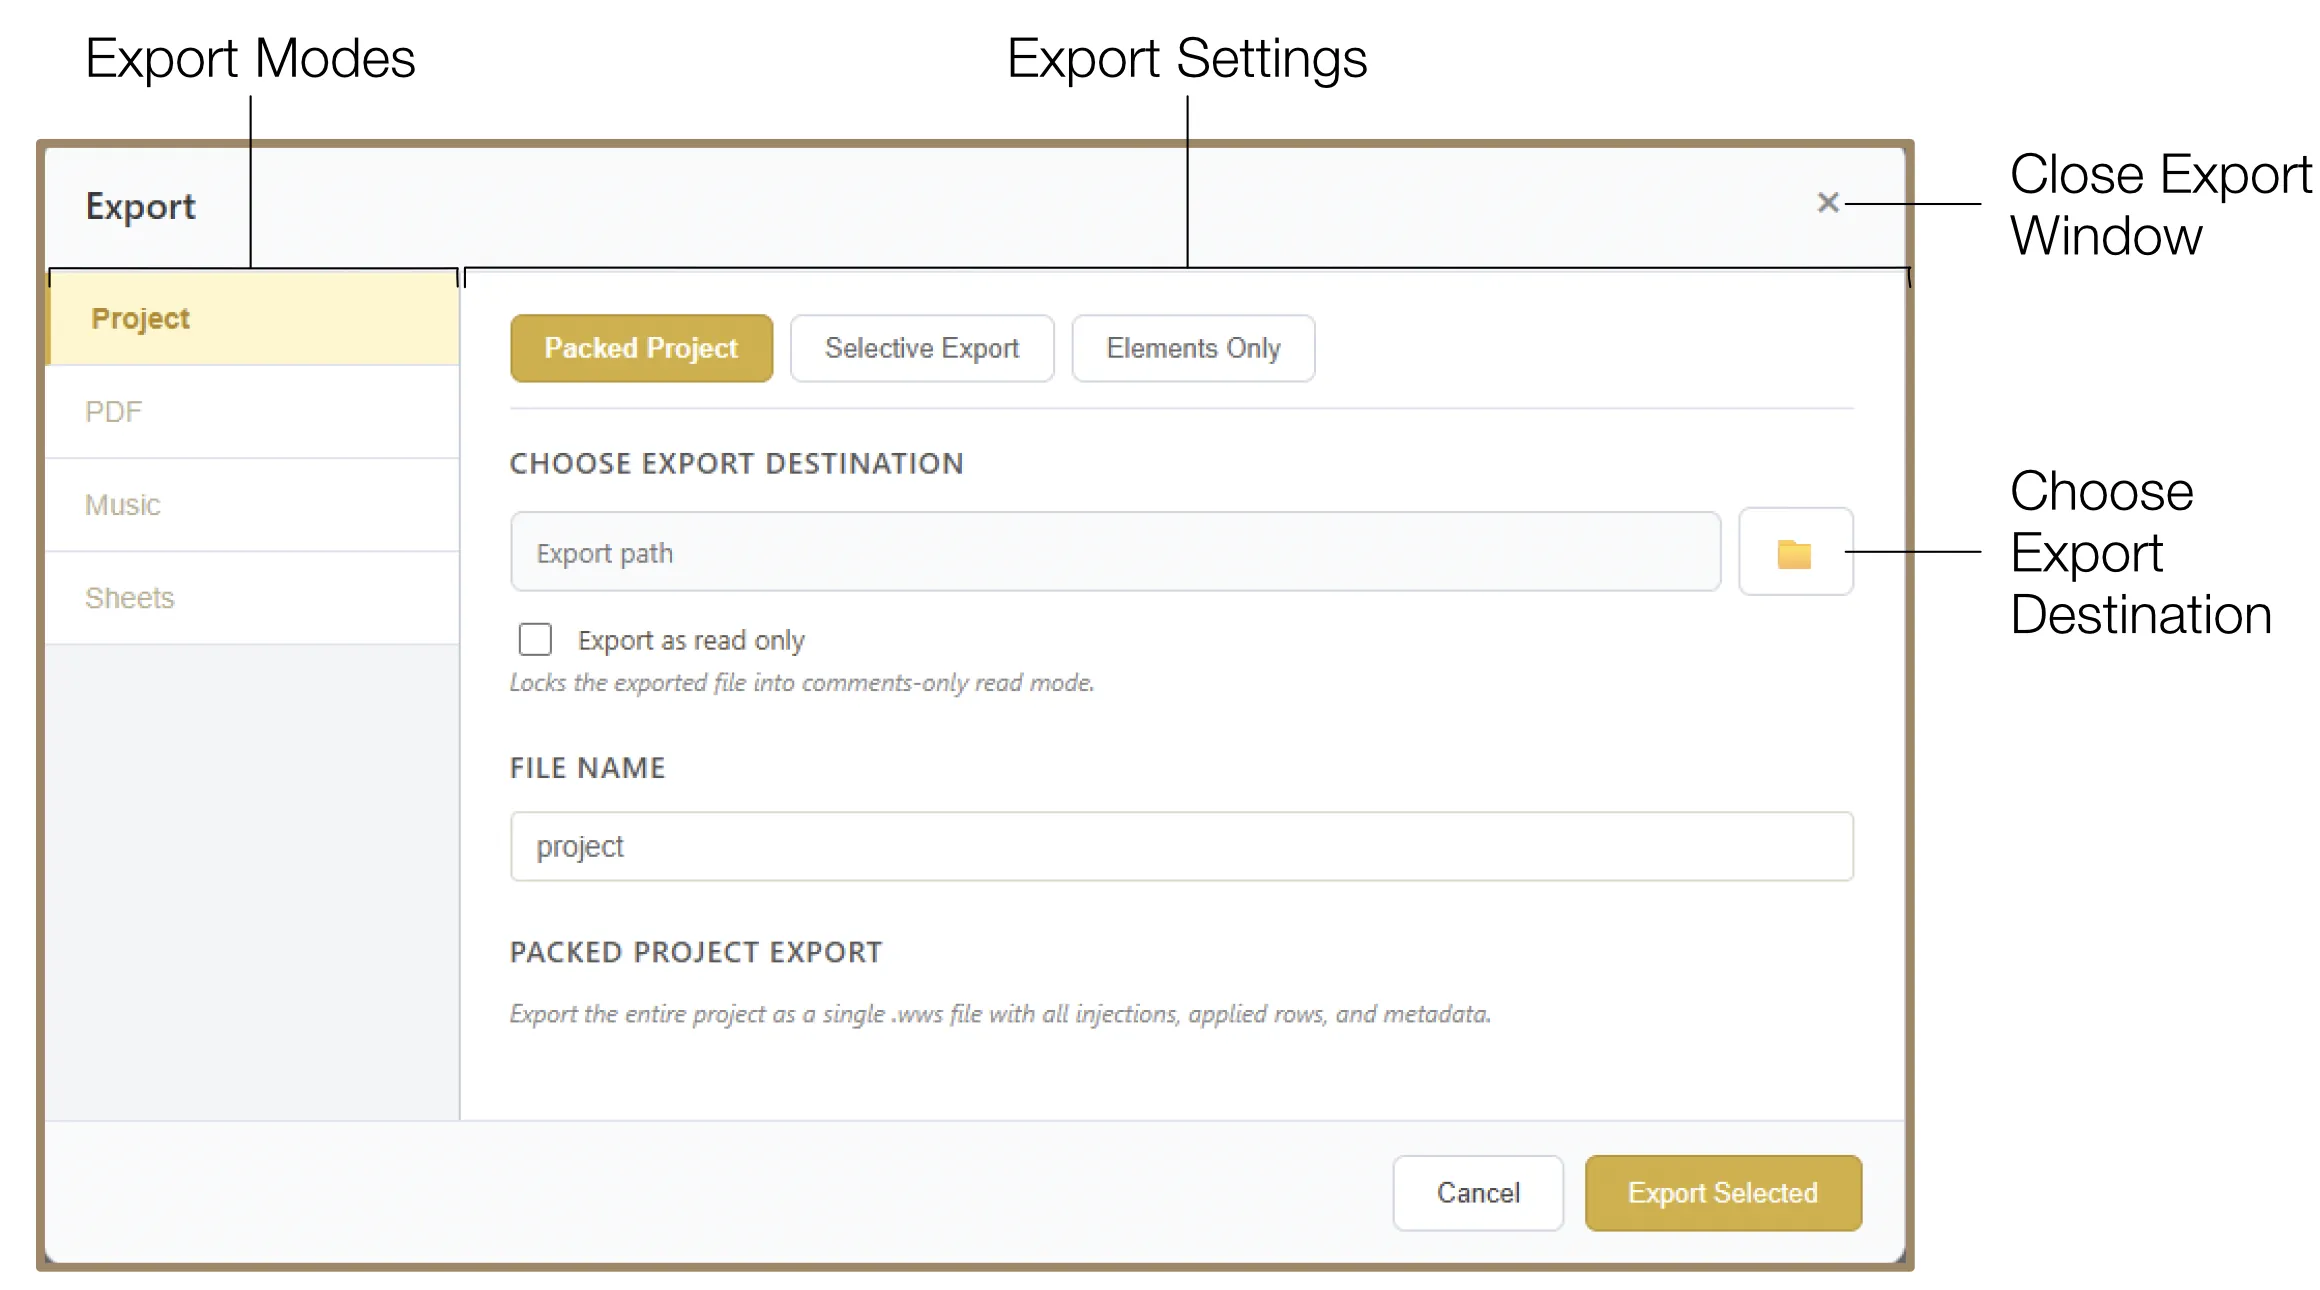
The Export Window is divided into two main areas: the left sidebar displays four specialized export modes (Project, PDF, Music, Sheets), and the main area displays the settings for the selected mode. To select a destination folder, click the Folder icon and browse your system. When ready, click "Export Selected" in the bottom toolbar.
When you create a project, the system automatically creates a structured folder tree including specialized export folders (e.g., exports/pdf, exports/music), making it easy to keep your files organized.
15.1 Project Export
Project Export allows you to save and share the interactive document with other users of the software. You can lock a project export into a Read-Only version, allowing recipients to view and add comments without modifying the script or injections.
- Packed Project (.wws): Exports a single-file archive containing the entire project, including all media, injections, and metadata.
- Selective Export: Allows you to choose specific scenes with added elements from the project tree to export into a smaller, focused file. You can include or exclude Gallery, Archive, and Highlights & Comments elements by toggling the corresponding checkbox. Selections are synced with the Overview toggles.
- Elements Only (.wwsel): Exports only the injections and their data without the script lines. Useful for importing a set of technical plans into a different script.
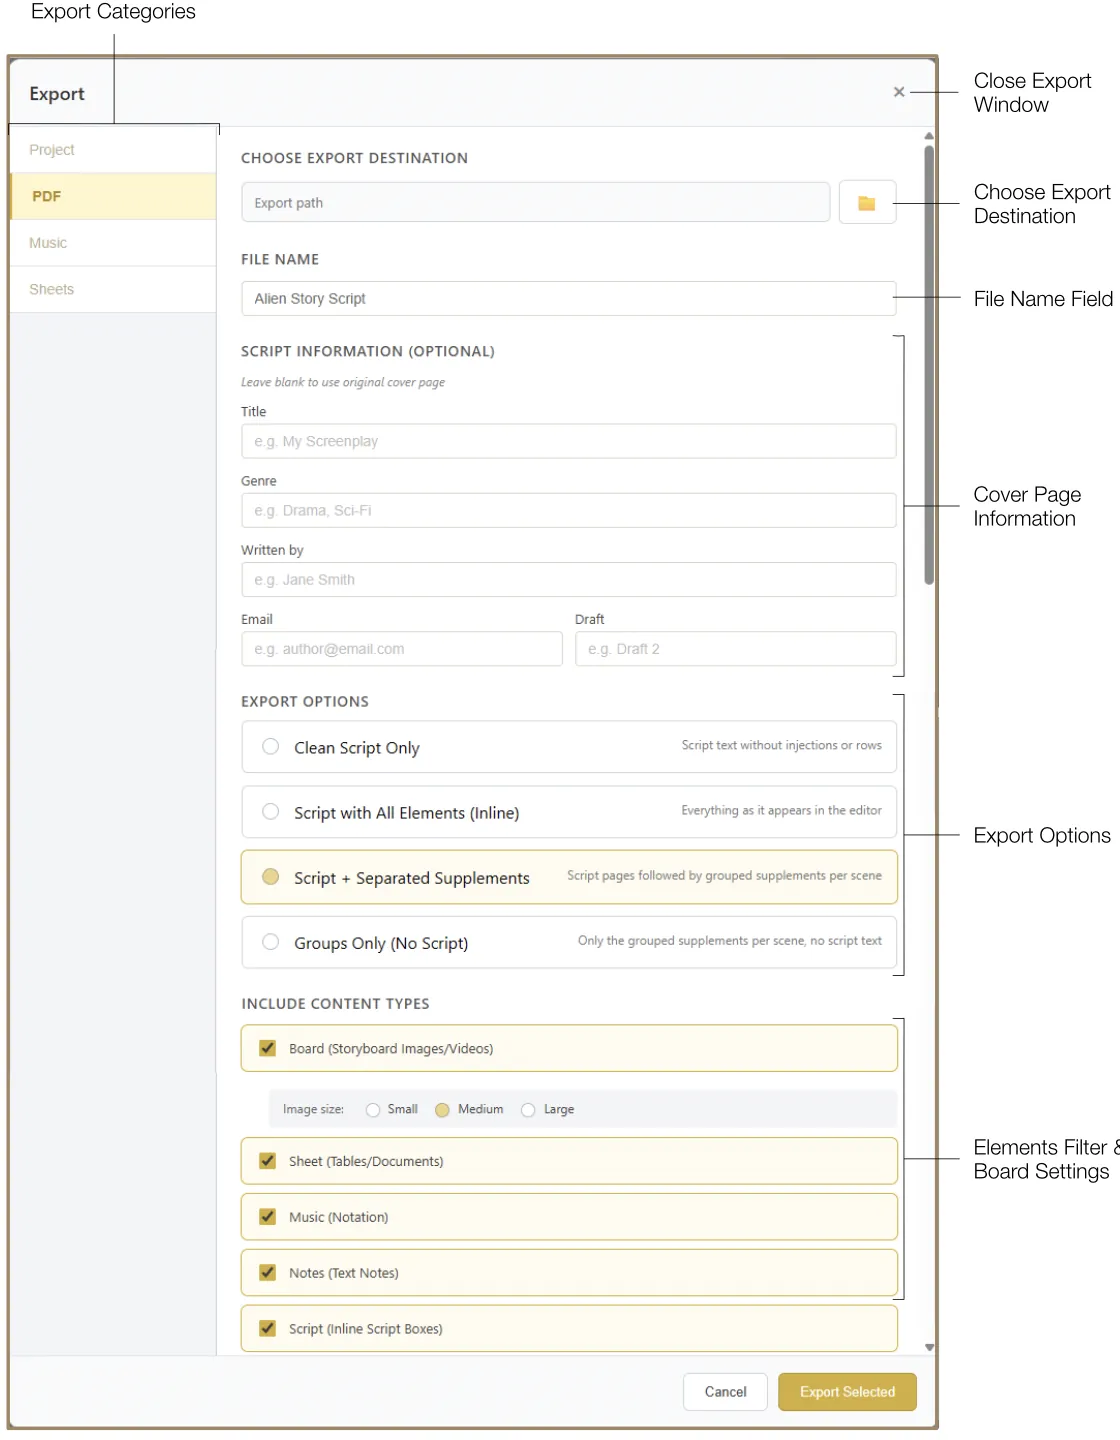
15.2 PDF Export
The primary method for generating professional screenplay documents and production supplements. You can define a project-specific cover page with fields for Title, Genre, Author, Email, and Draft version.
- Clean Script Only: Generates a standard industry-formatted screenplay, removing all injections.
- Script with All Elements (Inline): Exports the script exactly as it appears in the editor, with injection boxes and special lines in their chronological positions.
- Script + Separated Elements: Places the full script first, followed by a section where all elements are grouped by the scene they belong to.
- Groups Only (No Script): Ideal for technical departments — exports only the elements organized by scene, without the screenplay text.
If elements are included, you can filter which injection types to include (e.g., only storyboards and sheets, omitting personal notes) and define the image size (Small, Medium, or Large) for separated element modes.
15.3 Music Export
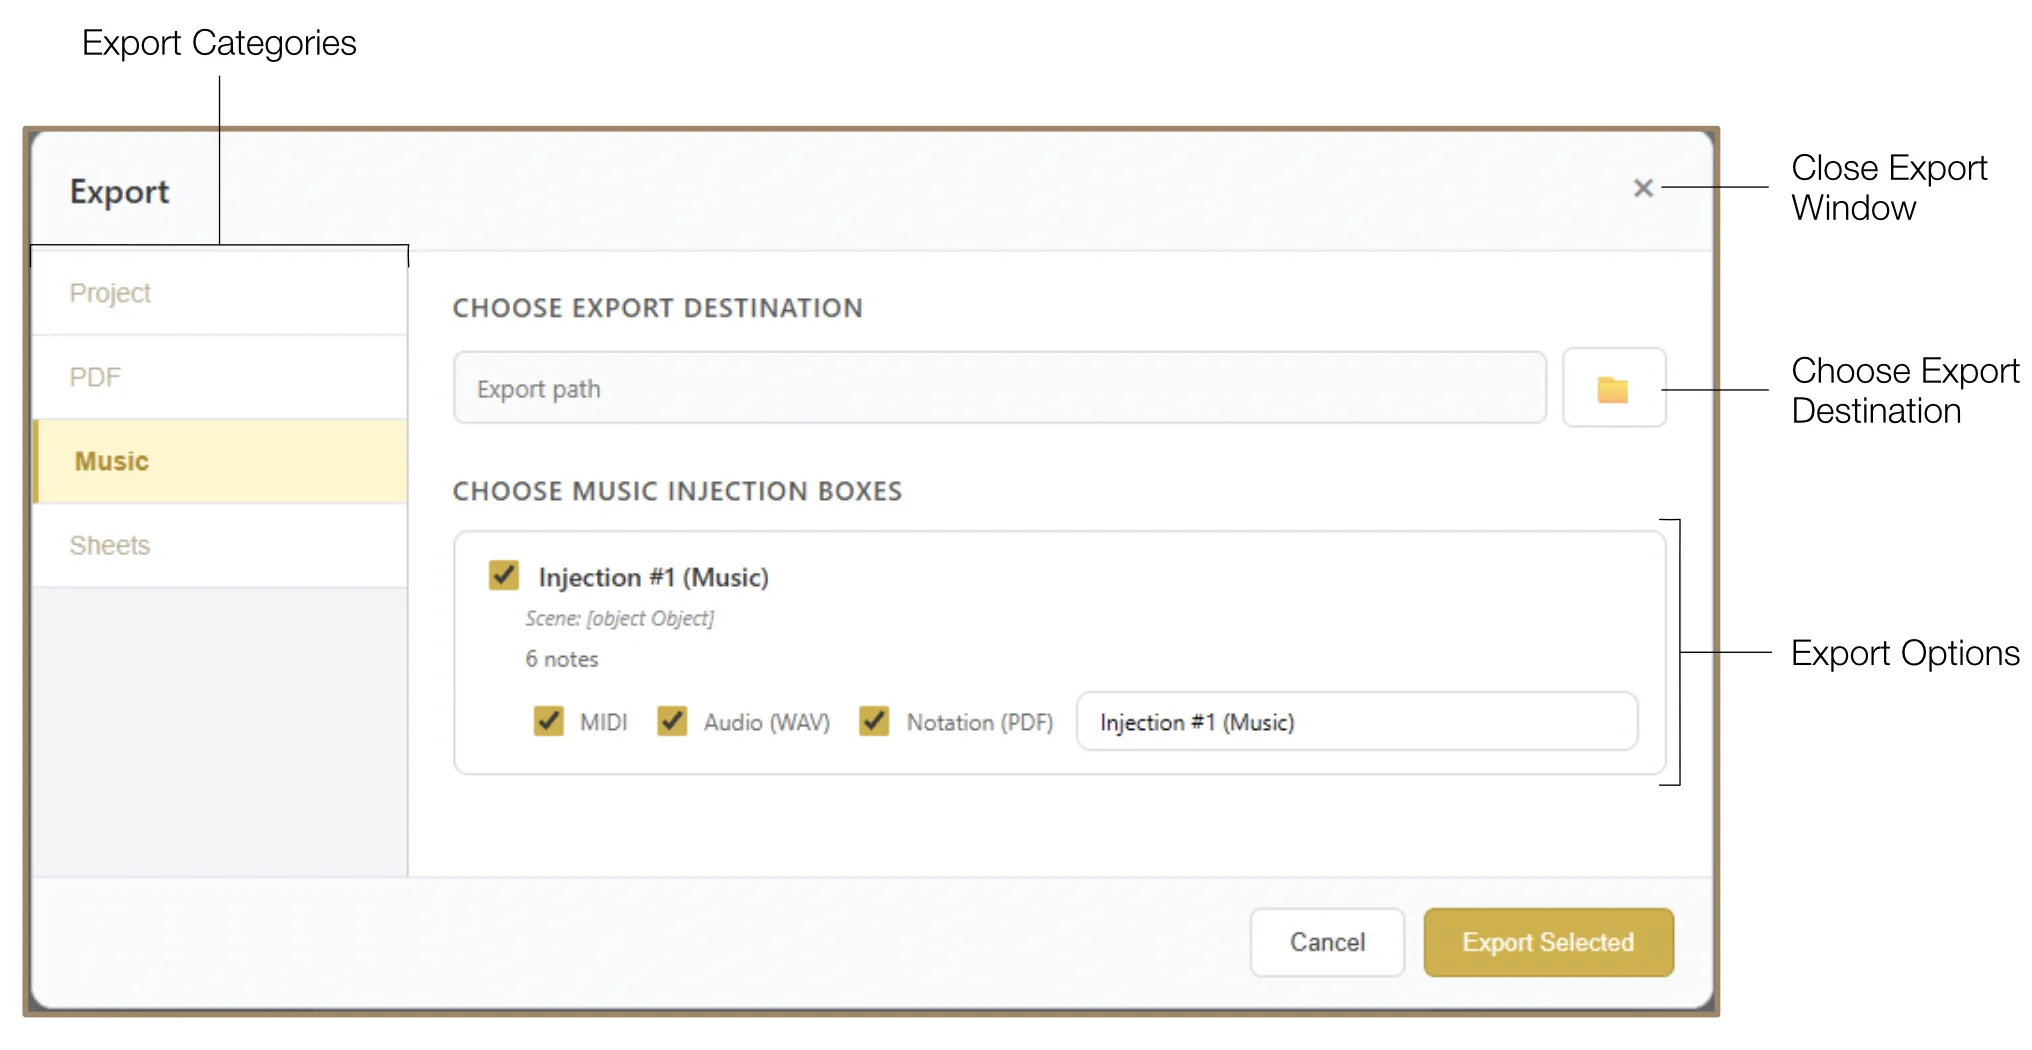
Music can be exported for use in external digital audio workstations (DAWs) or for review. If you have linked multiple music boxes, the system can export the entire sequence as a single combined file.
- MIDI Export: Converts your notation or recorded MIDI data into a standard
.midfile. - Audio (WAV) Export: Generates a WAV audio file of the music box's contents.
- Notation (PDF) Export: Exports the notation as a PDF file.
15.4 Sheets Export
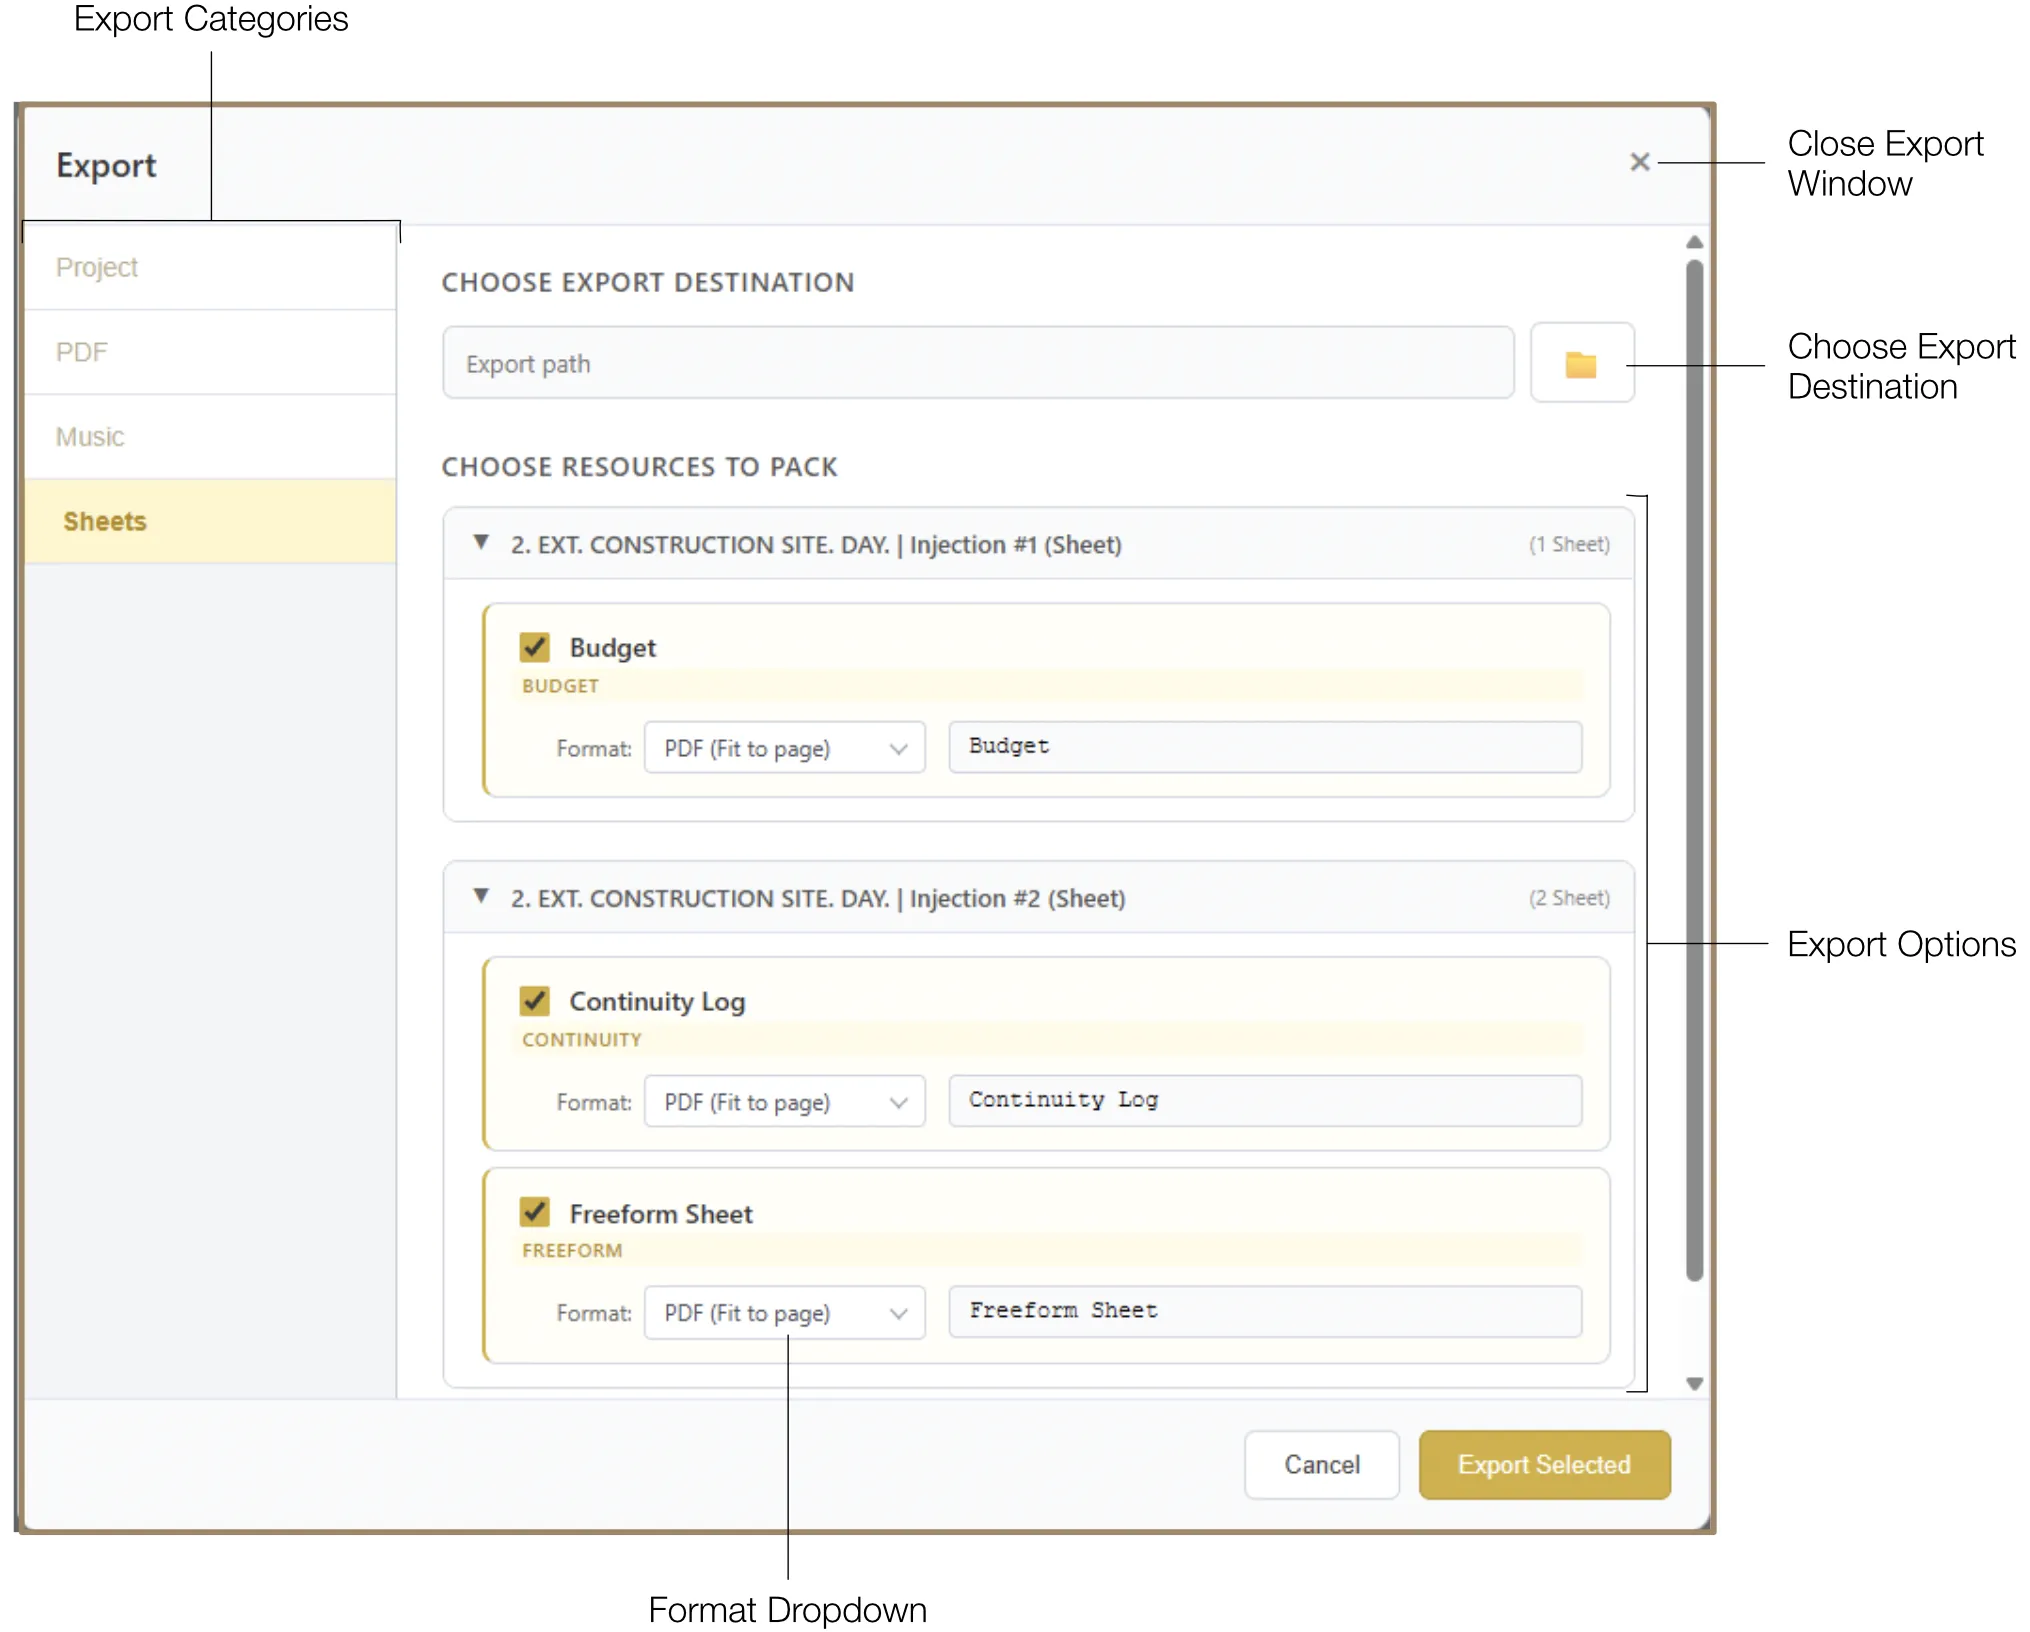
Data managed in Sheet injections can be exported for administrative use. You can filter which sheets to include by toggling checkboxes.
- PDF (Fit to Page): Scales the table to fit within the width of a standard page.
- PDF (Auto-paginate): Automatically splits large tables across multiple pages while maintaining readability.
- CSV (Spreadsheet): Exports the raw data into a
.csvfile compatible with Excel, Google Sheets, or other production accounting software. Supports all sheet types, including Budgets, Call Sheets, and Continuity logs.
16. Settings
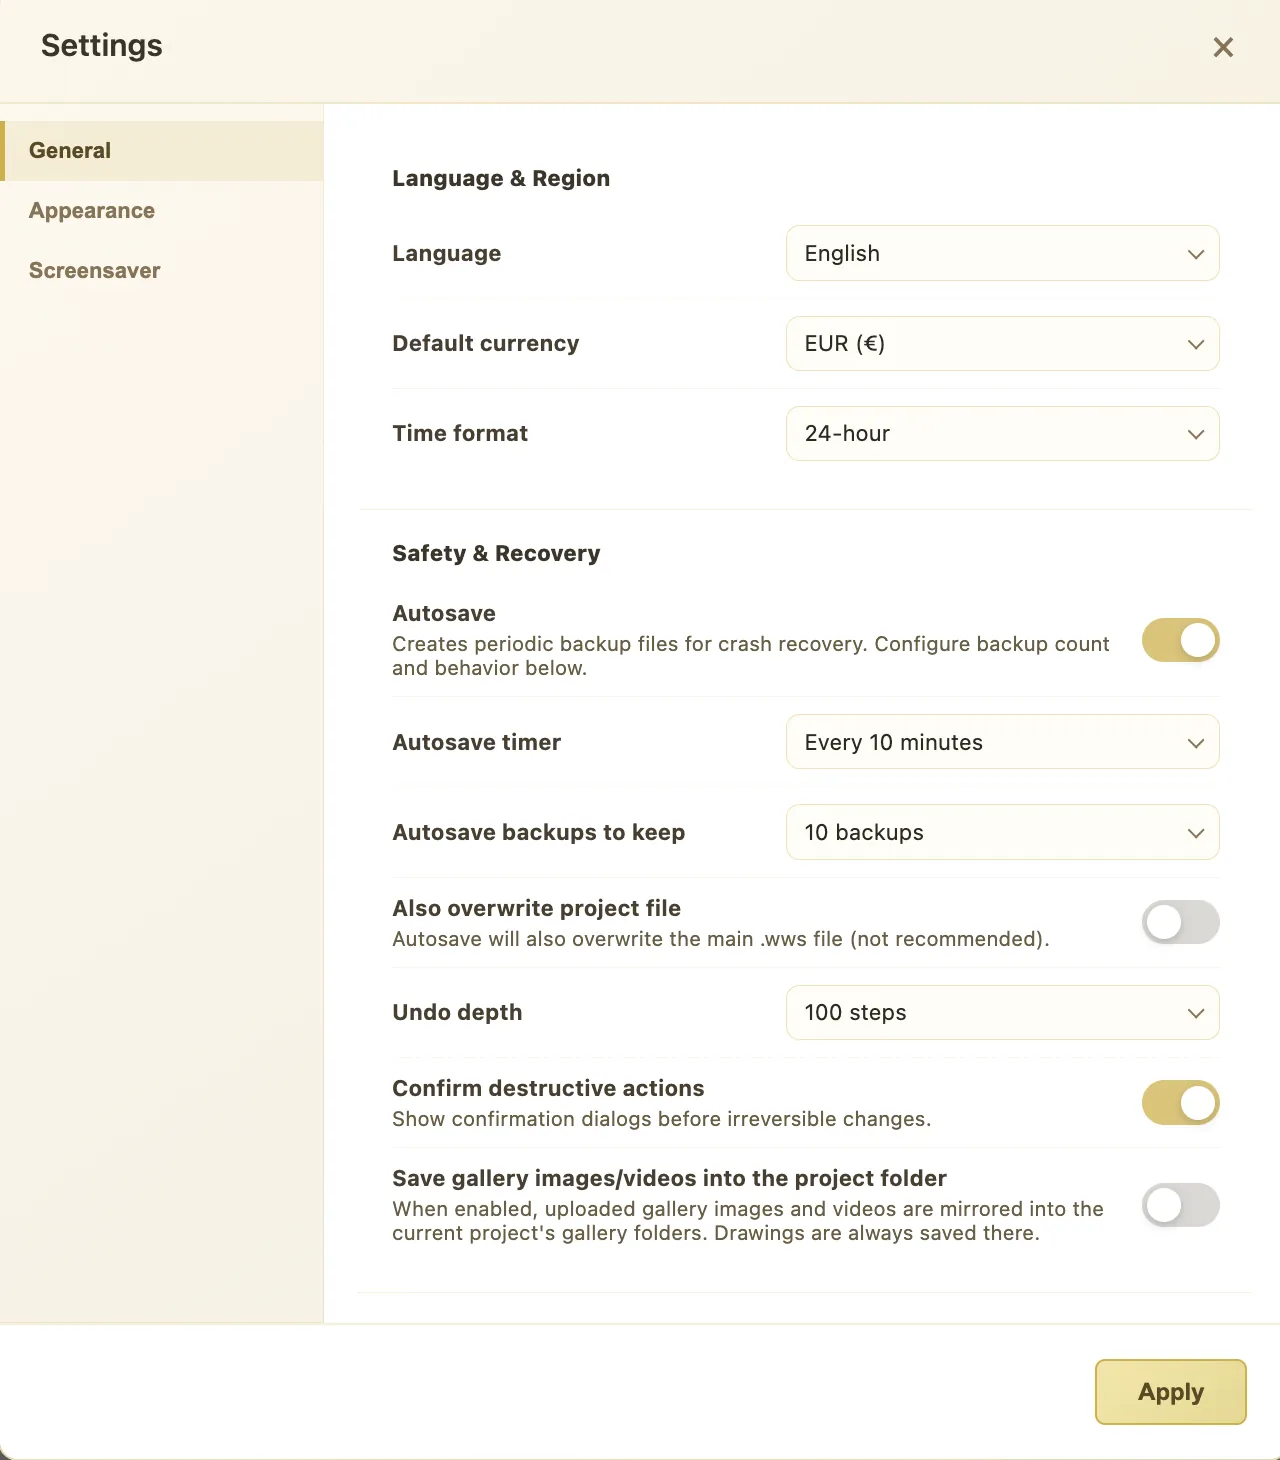
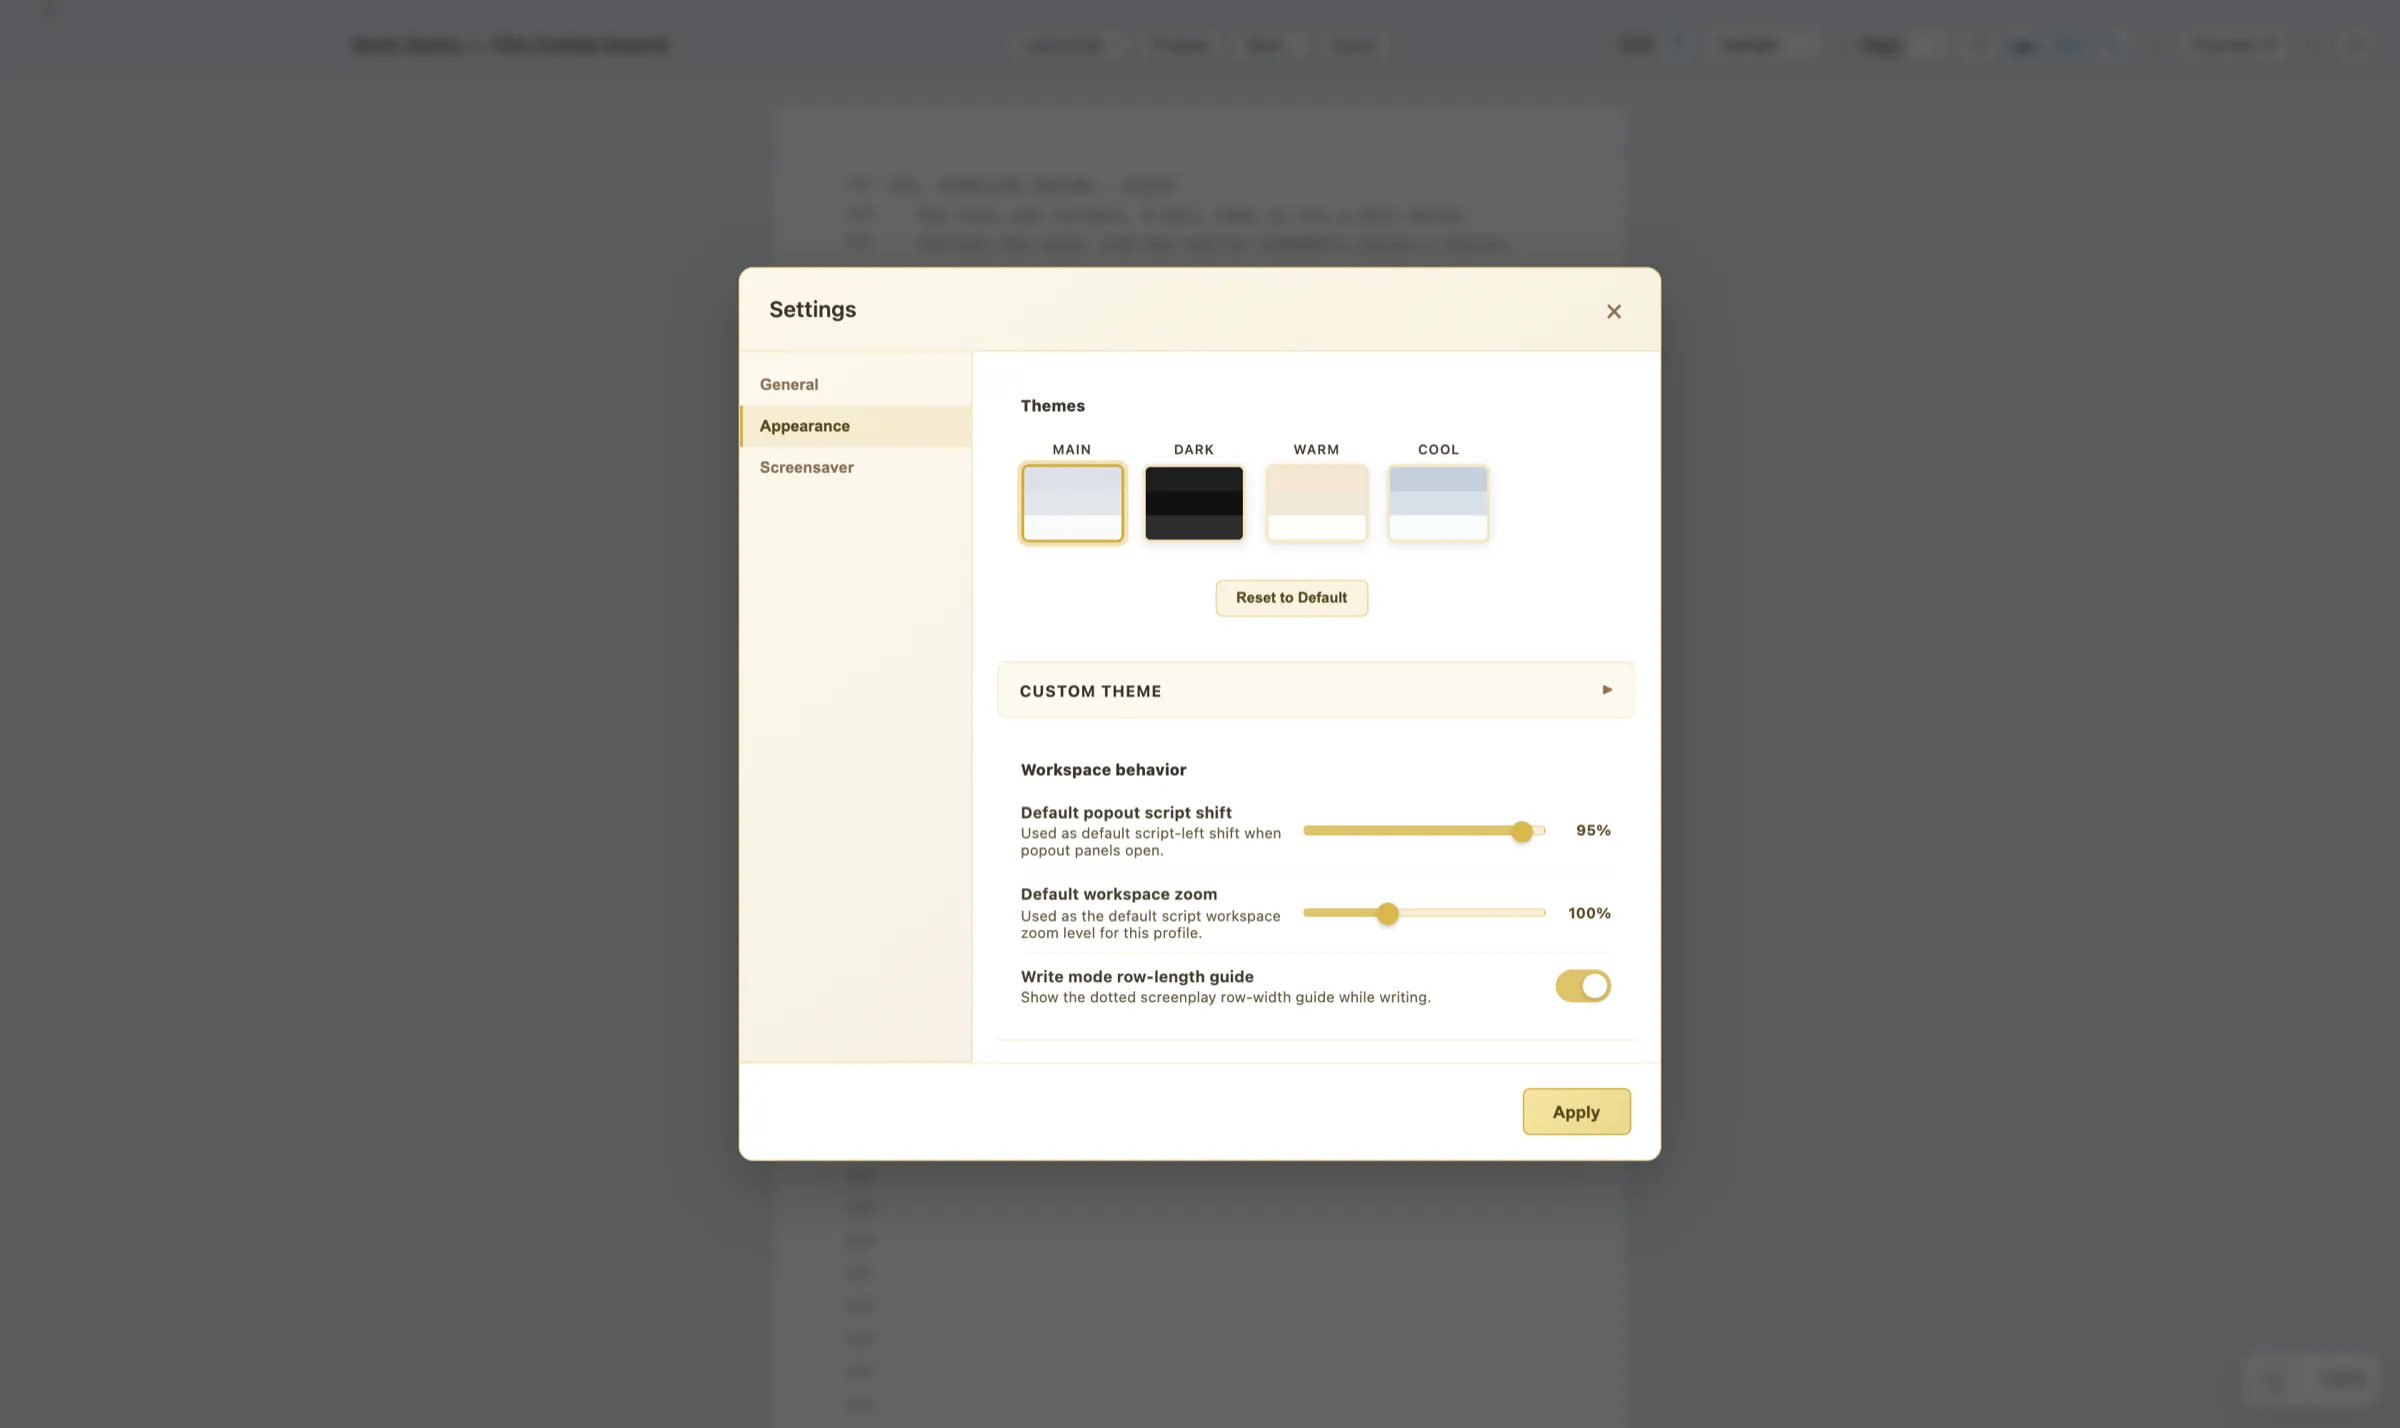
The Settings Panel is accessible via the Settings icon in the top toolbar. After making changes, ensure you click the "Apply" button for them to take effect.
The Settings are divided into three groups:
16.1 General Settings
This tab contains the core configuration options for how the software behaves and handles your data.
- Language & Region: Choose the interface language, the preferred currency for budget spreadsheets, and the time format (12-hour or 24-hour).
- Safety & Recovery: Configure the Autosave interval to automatically save your work at regular intervals. Choose how many backups to keep to balance safety and storage. Adjust the Undo Depth to control how many steps back you can undo — a higher depth gives more freedom but uses more memory.
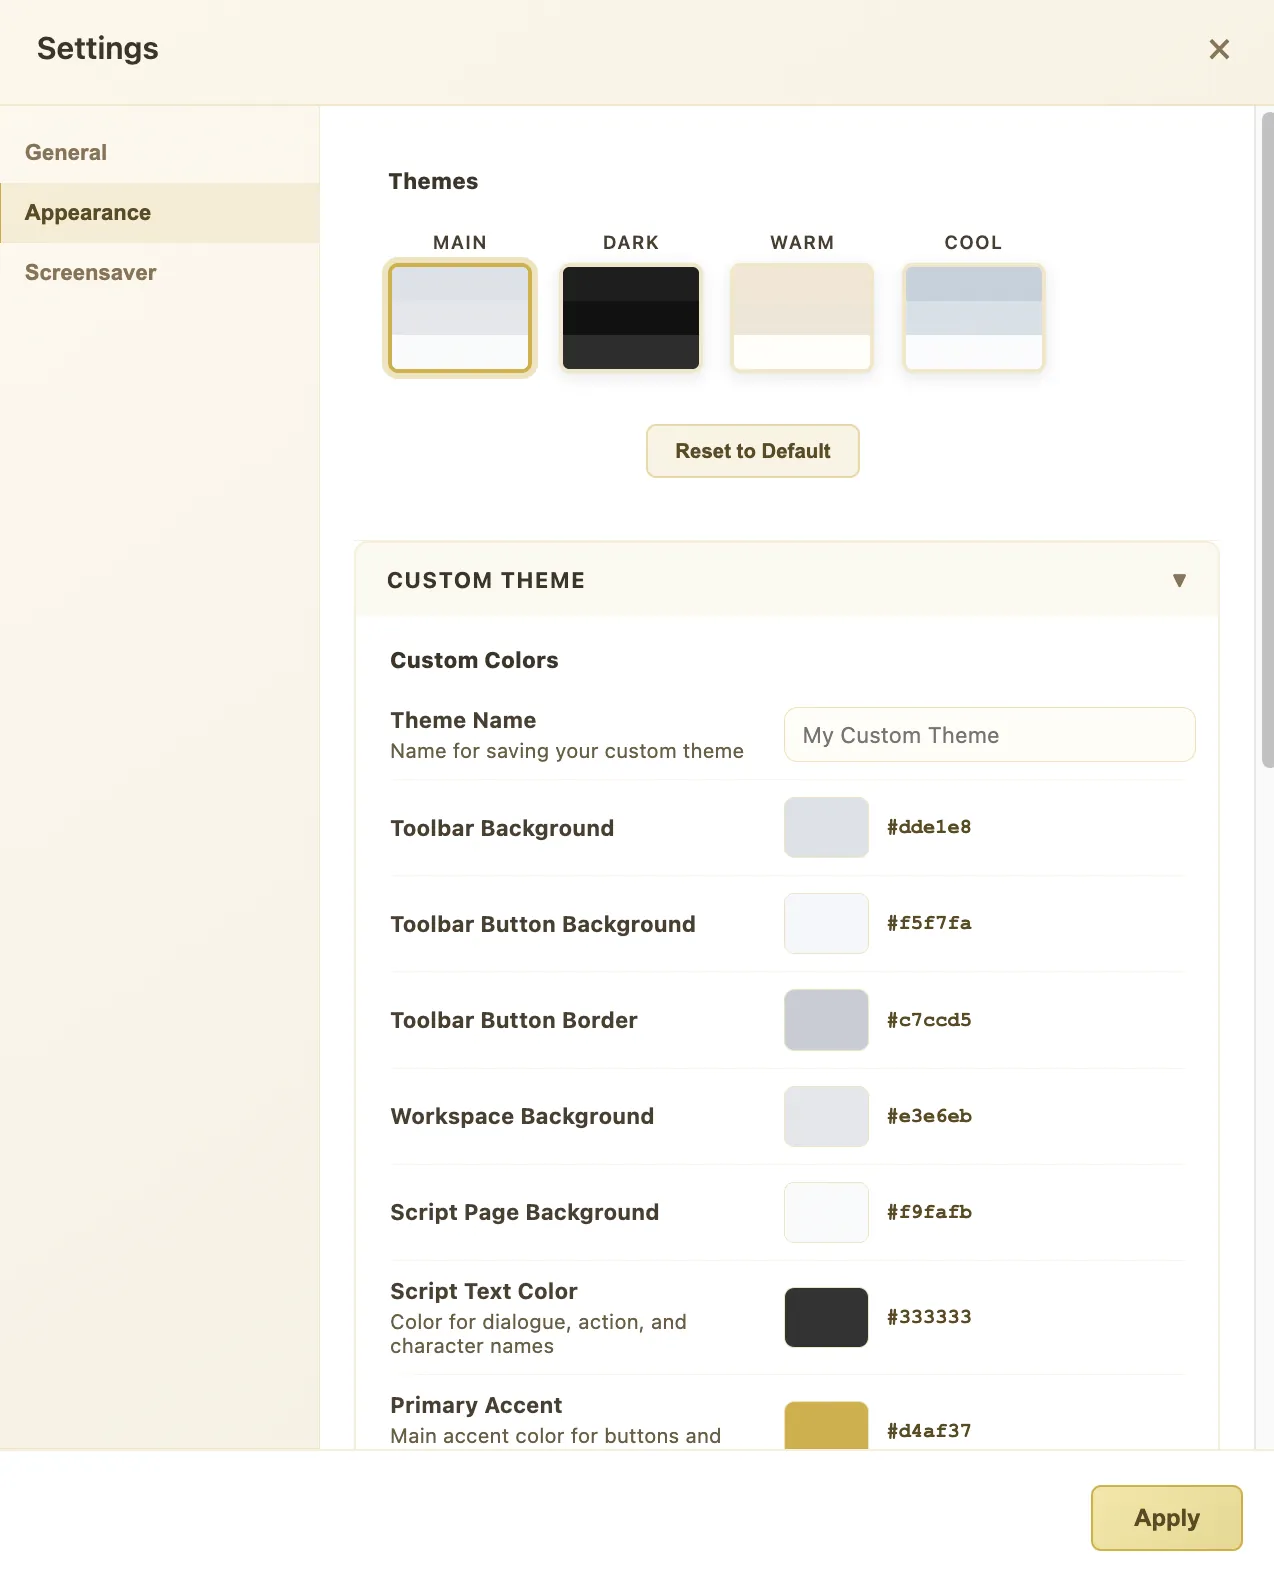
16.2 Appearance Settings
This tab controls the visual look and feel of the workspace, letting you tailor the interface to your preferences or working conditions.
- Themes: Choose from preset color schemes — Main, Dark, Warm, or Cool — to quickly change the overall look of the editor.
- Custom Themes: Create your own theme by adjusting individual colors for the toolbar, workspace background, and text. You can also add background textures such as dots or grids to suit your visual style.
- UI Scaling: The software automatically scales the interface based on your screen resolution. You can manually override this by adjusting the Default Popout Shift and the Default Workspace Zoom to set your preferred starting view every time you open a project.
- Write mode row-length guide: Shows or hides the dotted screenplay row-width rule that marks where an action line wraps in Write Mode. It is a writing aid only and does not appear in exports.
16.3 Screensaver Settings
This tab controls the cinematic screensaver video, allowing you to customize the full-screen display that plays during breaks or presentations.
- Current Video Preview: View the active screensaver video in the Preview section. This lets you confirm which video will play before deploying the screensaver.
- Upload Custom Video: Replace the default screensaver by uploading your own video file from your device.
- Stream from Link: Paste a direct URL to stream a screensaver video directly from the internet instead of using a local file.
- Reset to Default: Click the "Reset to Default" button to restore the original default screensaver video at any time.
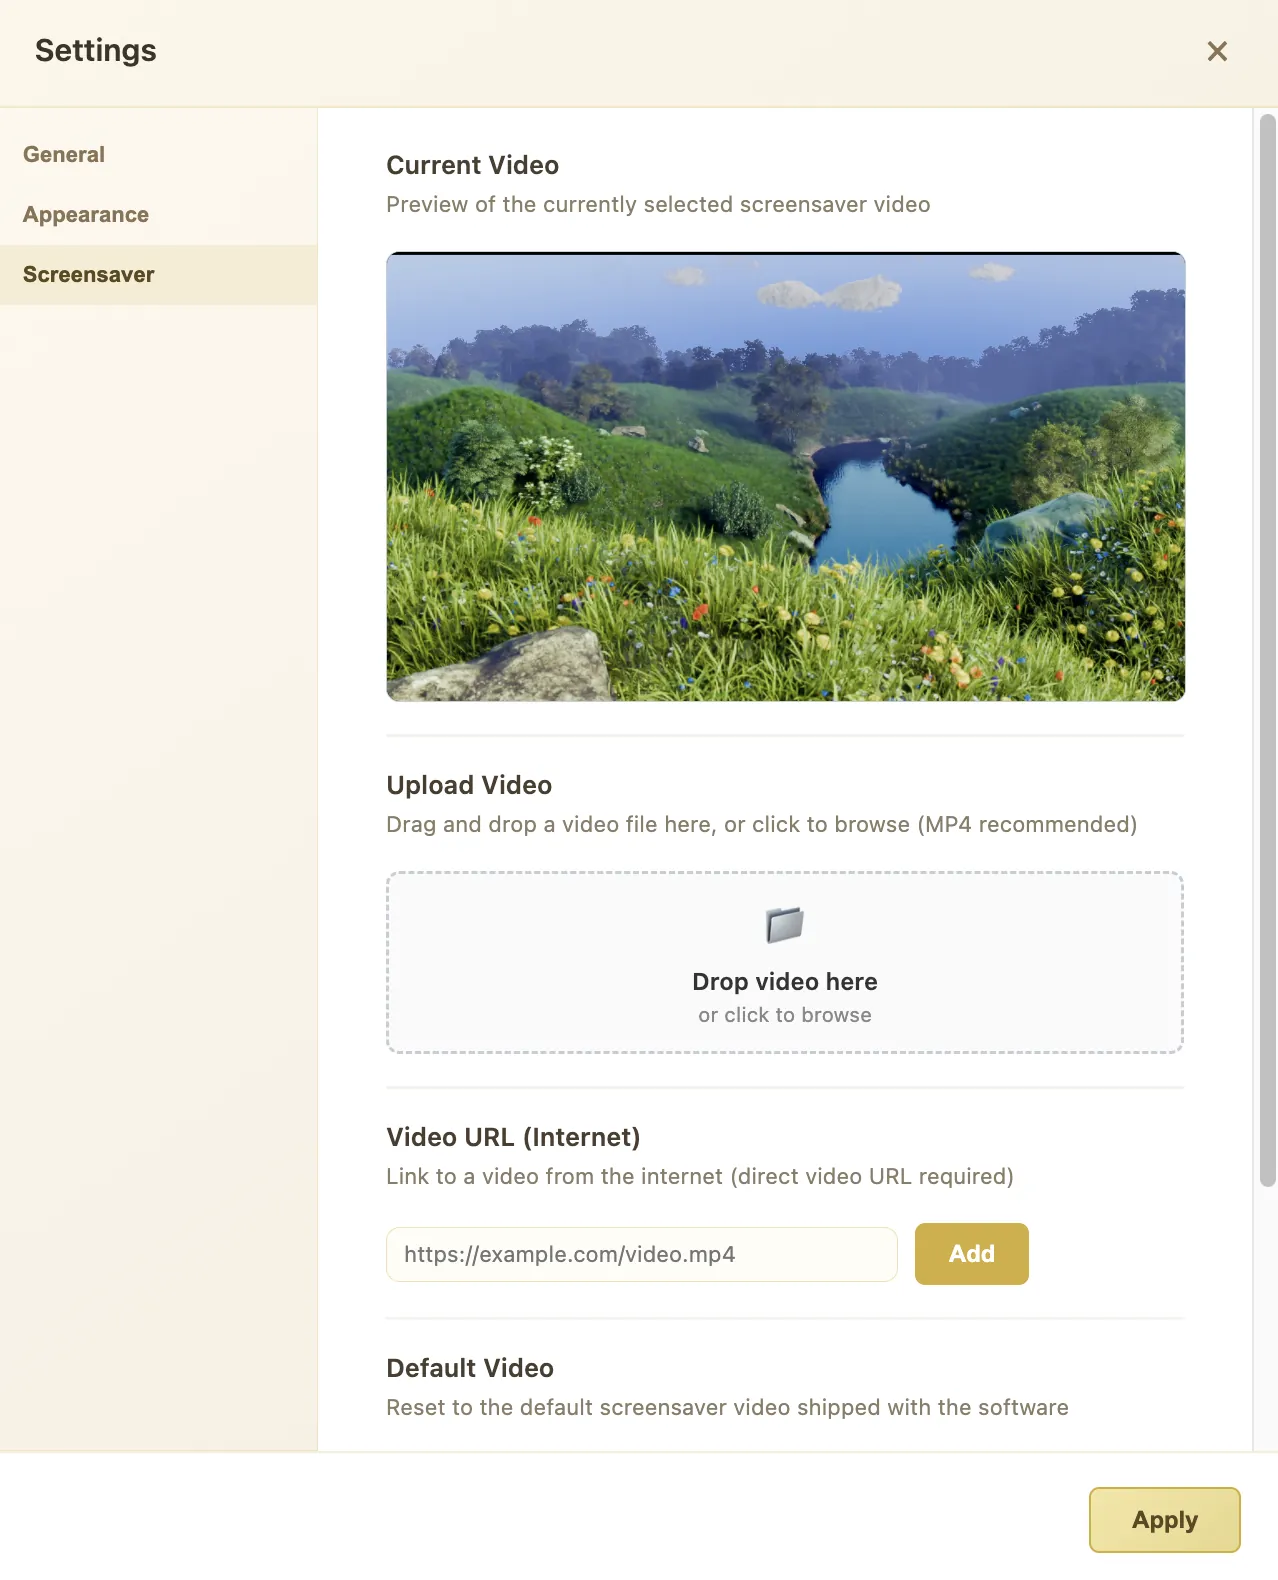
Changes to any settings tab are applied only after clicking the "Apply" button. Settings are saved per user profile, so each collaborator can maintain their own preferences.
17. Shortcuts
| Shortcut | Context | Action |
|---|---|---|
| Global | ||
| Ctrl+Shift+L / Cmd+Shift+L | Script Editor | Toggle screensaver |
| Esc | Screensaver | Retract screensaver |
| M | Screensaver | Mute / unmute audio |
| Click | Screensaver | Play / pause screensaver video |
| Tab | Script Editor | Step to the next mode (Write → Read → Edit) |
| Shift+Tab (hold) | Script Editor | Open the mode switcher; tap Tab to cycle, release Shift to commit, Esc to cancel |
| Cmd+F / Ctrl+F | Script Editor (all modes) | Find in script |
| Enter / Shift+Enter | Search field | Jump to the next / previous match |
| Esc | Search field | Close search and clear all highlights |
| Delete (hold 2.5s) | Script Editor | Delete line or injection (when Safeguard is active) |
| Enter | Page Jump field | Navigate to entered page number |
| Alt+Click / Option+Click | Project Browser | Display full file path on project card |
| Ctrl+Click / Cmd+Click | Various | Select multiple items / Edit a comment bar |
| Shift+Click | Various | Select a range of items or rows |
| Read Mode | ||
| H | Script text | Toggle highlight on selected text on / off |
| Right-click | Script text | Open context menu (Highlight, Change to, Comment) |
| Edit Mode | ||
| + (Plus icon on hover) | Between script lines | Add a new injection box |
| Up Arrow / Down Arrow | Script lines | Jump between script rows while editing |
| Right-click line number | Line gutter | Open row management menu (Insert Above/Below, Delete) |
| Write Mode | ||
| Enter | End of a line | Create the next block in the automatic flow (see 4.2) |
| Enter | Mid-line | Split the row at the caret, keeping the block type |
| Backspace | Start of a line | Merge the line into the row above |
| / + name | Empty line | Open the slash menu and set the block type (/scene, /action, /character, /dialogue, /parenthetical, /transition) |
| Up Arrow / Down Arrow | Slash menu open | Move through the matching blocks; Enter applies, Esc closes |
| Cmd+B / Ctrl+B | Selected text | Bold |
| Cmd+I / Ctrl+I | Selected text | Italic |
| Cmd+U / Ctrl+U | Selected text | Underline |
| Right-click | Selected text | Cut, Copy, Paste, formatting, Change to… |
| Event Notes & Event Graph | ||
| Click | Event sleeve | Show / hide the note's source passage in the script |
| Double-click | Event sleeve | Open the note in the Event Graph |
| Right-click | Event sleeve or card | Open the note menu (edit, colour, range, delete) |
| Cmd+Click / Ctrl+Click | Event card | Jump to the note's lines and close the graph |
| Drag | Card port | Draw a connection to another card |
| Cmd+Click / Ctrl+Click | Card port | Detach the connection on that port |
| Cmd+Scroll / Ctrl+Scroll | Freeform view | Zoom the board (25%–250%) |
| Esc | Event Graph | Cancel a pending connection, pen path or text edit; otherwise close the graph |
| Enter | Pen path in progress | Finish the path |
| Space Bar | Pen anchor point selected | Toggle the point between corner and curve |
| Cmd+G / Ctrl+G | Drawing layers selected | Group; Cmd+Alt+G / Ctrl+Alt+G ungroups |
| Delete / Backspace | Drawing layer selected | Delete the layer |
| Board Draw | ||
| Esc | Pen tool | Quit the Pen tool |
| Space Bar | Anchor point selected | Curve the path at the selected anchor point |
| Ctrl / Cmd + mouse wheel | Anchor point | Adjust curvature of a curved anchor point |
| Double-click on path | Pen tool | Add a new anchor point |
| Double-click on anchor point | Pen tool | Create a branch from the anchor point |
| Cmd / Ctrl + double-click terminal point | Path end | Toggle end arrow on / off |
| Shift | Resizing object | Proportional resizing |
| Ctrl / Cmd | Resizing object | Resize around the center point |
| Cmd / Ctrl + G | Multiple objects selected | Group selected elements |
| Cmd / Ctrl + Alt + G | Grouped objects | Ungroup elements |
| Music Notation | ||
| / | Notation Input Box | Open the shortcut reference list |